
What is the best way to clean kitchen cabinets? The best way to clean kitchen cabinets depends on the cabinet material and finish, but generally involves gentle, non-abrasive cleaners, soft cloths, and a systematic approach to remove grease, grime, and fingerprints, leaving them sparkling and safe.
Kitchen cabinets are the workhorses of your culinary space. They house your dishes, ingredients, and gadgets, and they frame the entire look of your kitchen. Over time, they can become coated in a film of grease, food splatters, dust, and fingerprints, making them look dull and uninviting. Knowing how to clean kitchen cabinets effectively is key to maintaining both their aesthetic appeal and their longevity. This guide will walk you through the best practices for cabinet cleaning solutions, ensuring a sparkling and safe finish for all types of cabinets.
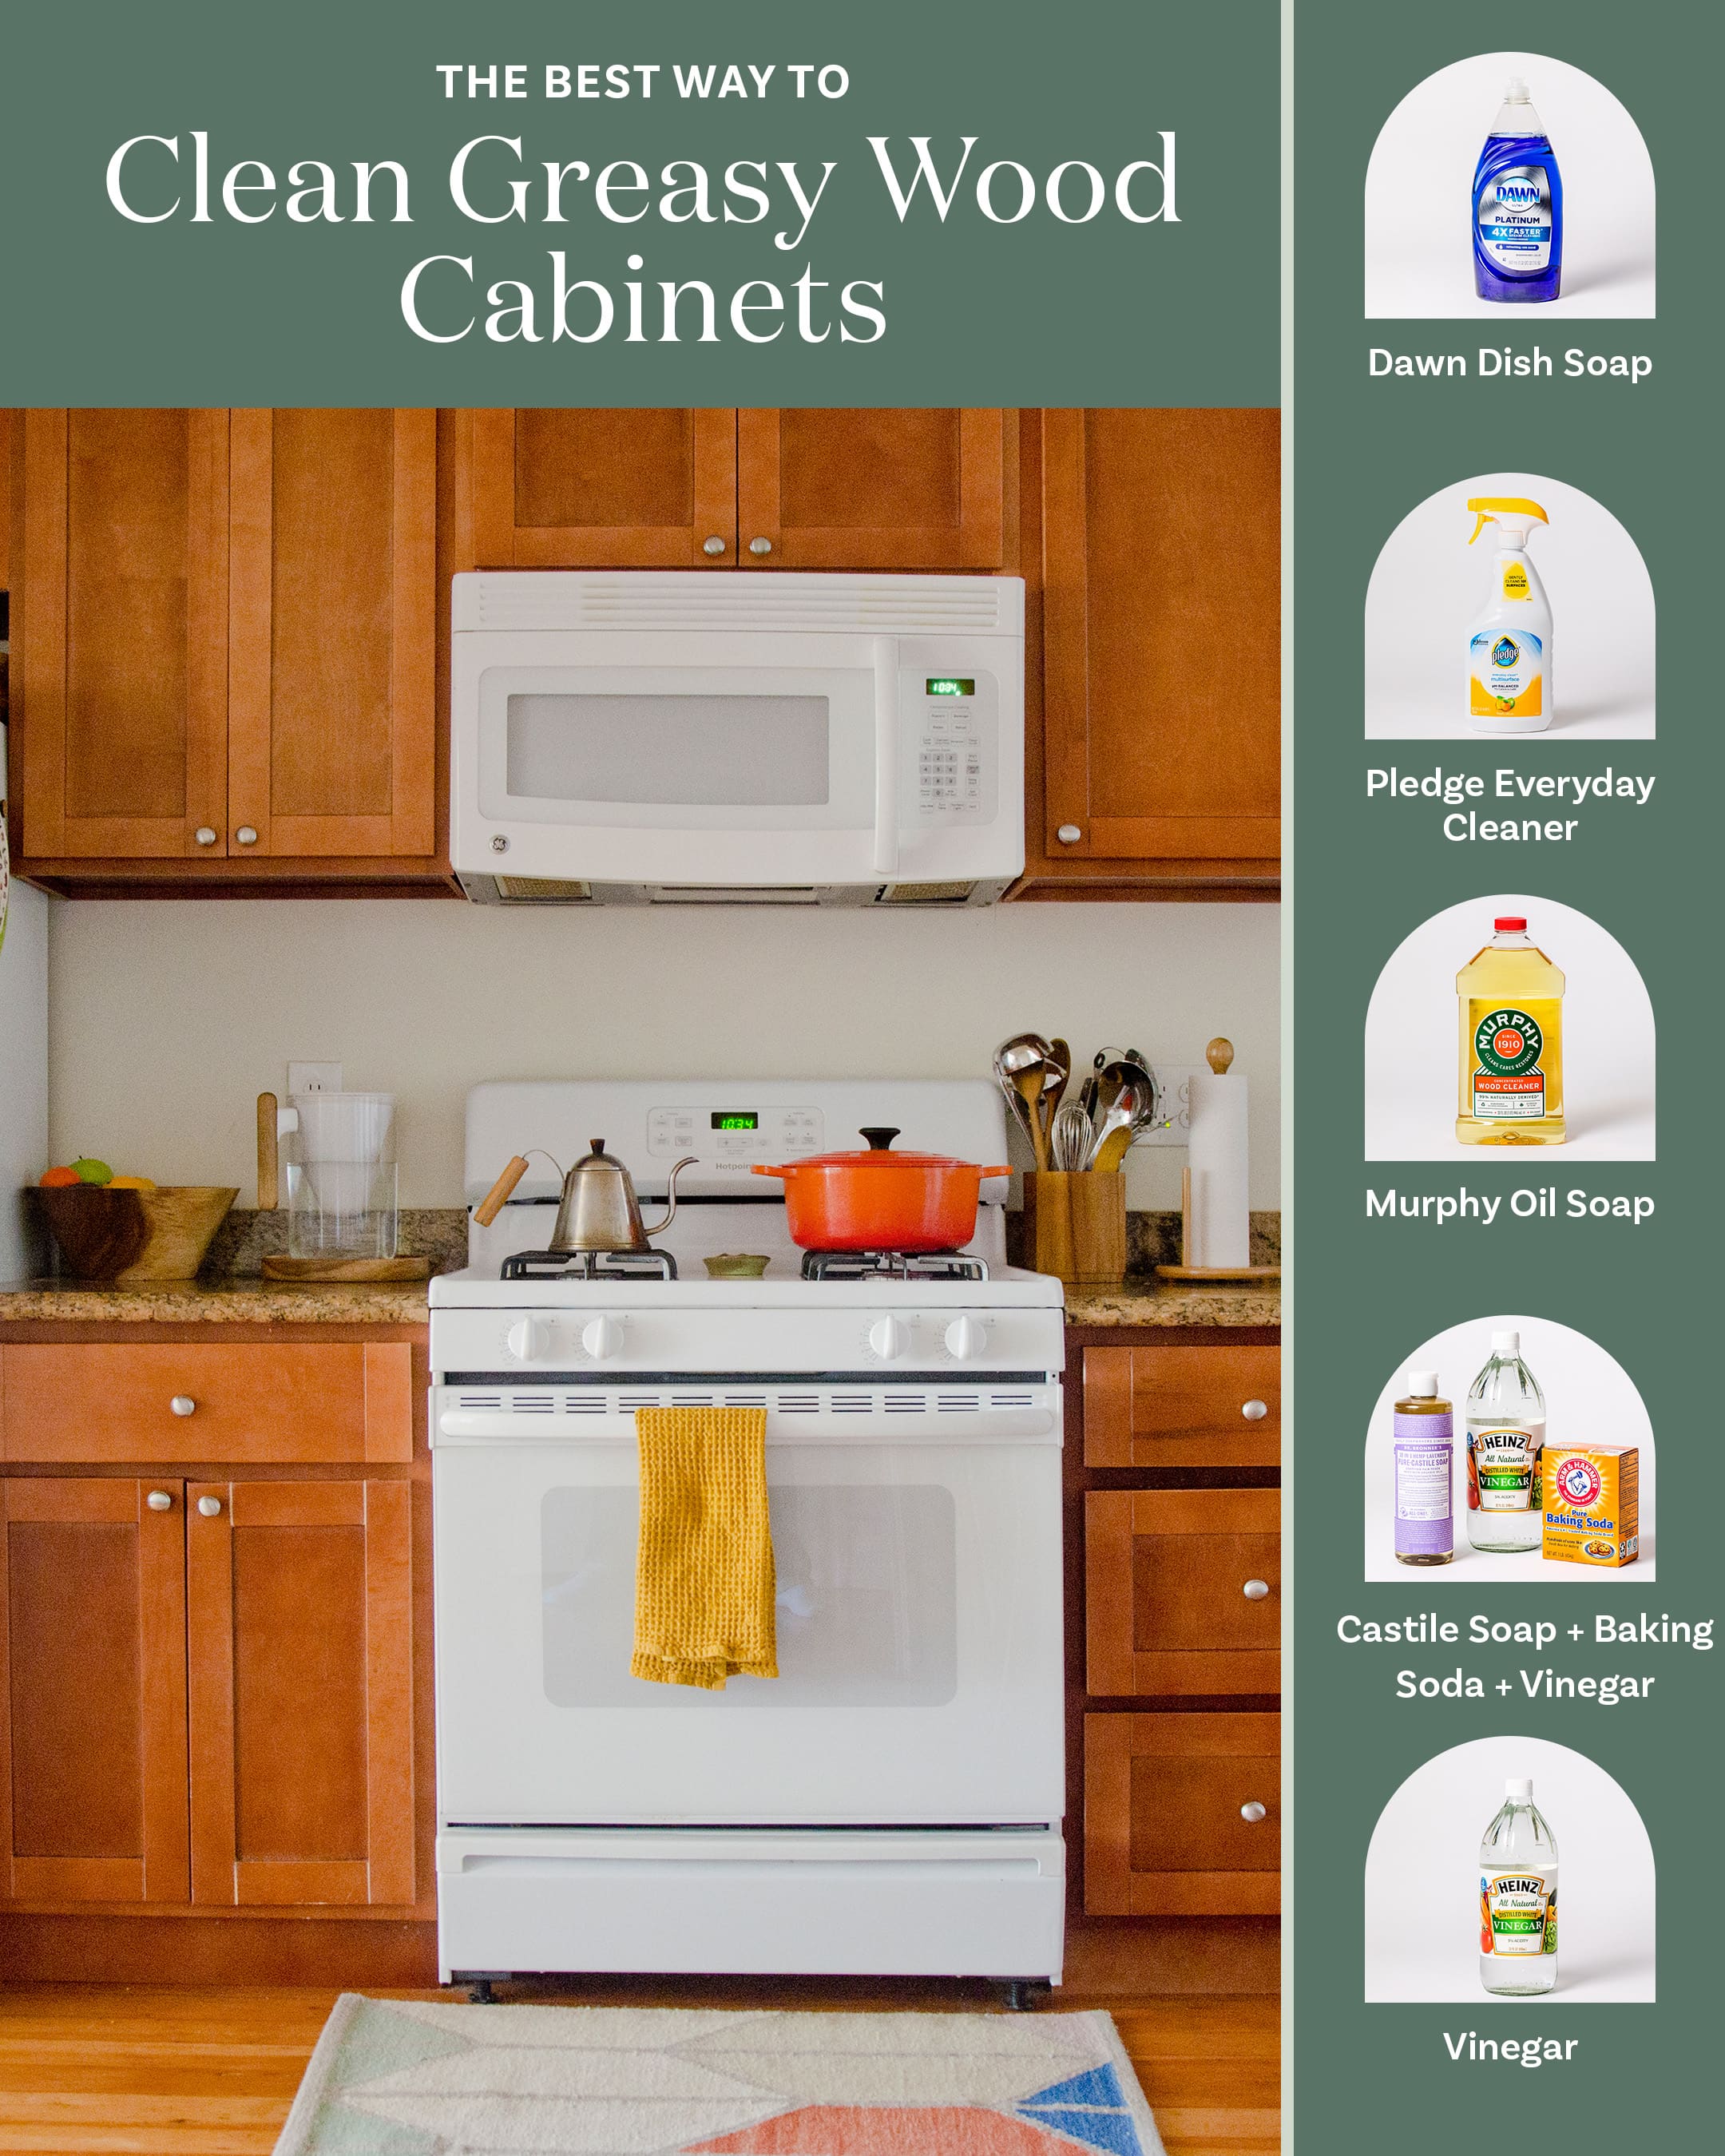
Image Source: cdn.apartmenttherapy.info
Preparing for a Pristine Polish
Before you dive into scrubbing, a little preparation goes a long way. Getting your workspace ready and gathering the right supplies will make the entire process smoother and more efficient.
Gathering Your Cleaning Arsenal
Having the right tools and supplies is crucial for effective cabinet surface cleaning. You don’t need a cupboard full of specialized products; often, common household items will do the trick.
- Soft Cloths: Microfiber cloths are ideal as they are gentle and won’t scratch your cabinet finish. Have plenty on hand for washing, rinsing, and drying. Old, clean cotton t-shirts can also be a good alternative.
- Sponges: Opt for soft, non-abrasive sponges. Avoid those with a scratchy side, as this can damage the finish.
- Bucket(s): You’ll likely need at least two buckets – one for your cleaning solution and one for rinsing your cloths.
- Cleaning Solution: This will vary depending on your cabinet material, which we’ll discuss in detail later.
- Gloves: Protect your hands from cleaning solutions and grease.
- Soft Brush or Old Toothbrush: Useful for getting into nooks and crannies, especially around cabinet hardware.
- Drop Cloths or Old Towels: To protect your countertops and floor from drips.
- Vacuum with Brush Attachment (Optional): For removing loose dust and debris before washing.
Protecting Your Kitchen Space
Think of this as setting up your cleaning stage. Protecting surrounding areas ensures that your cleaning efforts don’t create more mess.
- Clear the Counters: Remove everything from your countertops around the cabinets you’ll be cleaning.
- Lay Down Protection: Place drop cloths or old towels on your countertops and the floor in front of the cabinets. This will catch any drips from your cleaning solutions.
- Remove Hardware (Optional but Recommended): If your cabinet doors have removable knobs or handles, taking them off can make cleaning much easier and more thorough, allowing you to clean edges and corners without obstruction. Place them in a small bag or container so you don’t misplace them.
Deciphering Your Cabinet Material: The Key to the Best Way to Clean Kitchen Cabinets
The best way to clean kitchen cabinets hinges on knowing what they’re made of and what finish they have. Using the wrong cleaner can lead to damage, discoloration, or a dulling of the finish.
Cleaning Wood Kitchen Cabinets
Wood kitchen cabinets are beautiful but can be sensitive to moisture and harsh chemicals.
Solid Wood Cabinets
- Finish: Most solid wood cabinets have a protective finish like varnish, lacquer, or polyurethane.
- Cleaning Method:
- Mild Soap and Water: A solution of a few drops of mild dish soap (like Dawn) in warm water is often sufficient for regular cleaning.
- Damp, Not Wet: Always use a cloth that is damp, not soaking wet. Wring out your cloth thoroughly before wiping the cabinets. Excess moisture can seep into the wood and cause swelling or warping.
- Wipe and Dry: Wipe down the cabinets with your damp cloth, section by section. Immediately follow up with a clean, dry microfiber cloth to buff away any remaining moisture and prevent water spots.
- Address Stubborn Grime: For tougher grease spots, you can try a slightly stronger solution. Mix equal parts water and white vinegar. Test this solution in an inconspicuous area first to ensure it doesn’t damage the finish.
- Conditioning: After cleaning and drying, you might consider using a wood polish or conditioner specifically designed for cabinets. This helps to restore shine and protect the wood.
Veneer Wood Cabinets
- Finish: Veneer cabinets have a thin layer of real wood glued over a substrate (like particleboard or MDF). This layer is delicate.
- Cleaning Method:
- Extra Gentle: Treat veneer cabinets with extra care. The veneer can chip or peel if scrubbed too hard or exposed to too much moisture.
- Mildest Solutions: Stick to very mild soap and water solutions.
- Avoid Soaking: Never let water sit on veneer. Wipe it down quickly and dry thoroughly with a soft cloth.
- No Harsh Scrubbing: Avoid abrasive cleaners or scrub brushes at all costs.
Cleaning Painted Kitchen Cabinets
Painted cabinets are a popular choice, but the paint finish can be susceptible to scratching and certain chemicals.
Latex or Acrylic Paint
- Finish: Most modern painted cabinets are finished with durable latex or acrylic paints.
- Cleaning Method:
- Mild Dish Soap: A gentle dish soap and warm water solution is usually best.
- Soft Cloths: Use only soft microfiber cloths.
- Avoid Harsh Chemicals: Do not use ammonia-based cleaners, bleach, or abrasive cleaners, as these can dull or damage the paint.
- Test First: Always test your chosen cleaner on an inconspicuous area, like the inside of a door, before cleaning the entire cabinet.
- Grease Stains: For stubborn grease stains, a solution of baking soda and water paste can be effective. Apply the paste, let it sit for a few minutes, and then gently wipe it away with a damp cloth. Rinse thoroughly with a clean damp cloth and dry immediately.
High-Gloss Painted Cabinets
- Finish: These cabinets have a very smooth, reflective finish.
- Cleaning Method:
- Special Care: High-gloss finishes can scratch more easily.
- Microfiber is Key: Use only the softest microfiber cloths.
- Water and a Touch of Soap: A solution of water and a tiny amount of mild dish soap is often enough.
- No Wiping Against the Grain: If you can discern a “grain” in the gloss, wipe in that direction.
- Glass Cleaner: For a streak-free shine, a streak-free glass cleaner can be used very sparingly on a microfiber cloth. Ensure it’s safe for painted surfaces.
Cleaning Laminate or Thermofoil Cabinets
These cabinets have a plastic-like coating over a composite material. They are generally durable but can be sensitive to heat and certain solvents.
- Finish: A plastic film adhered to a substrate.
- Cleaning Method:
- Mild Soap and Water: The go-to solution.
- Avoid Heat: Do not use steam cleaners or place hot items directly on the surface.
- No Acetone or Solvents: These can melt or damage the plastic coating.
- Gentle Scrubbing: A soft cloth or sponge is fine. Avoid abrasive pads.
- Clean Quickly: Wipe up spills promptly to prevent them from seeping into seams.
Cleaning Metal Kitchen Cabinets
While less common in residential kitchens, metal cabinets are found in some modern or commercial settings.
- Finish: Stainless steel, powder-coated metal, etc.
- Cleaning Method:
- Stainless Steel: Use a cleaner specifically designed for stainless steel, or a solution of mild dish soap and water. Always wipe in the direction of the grain. Dry immediately with a soft cloth to prevent water spots and streaks.
- Powder-Coated Metal: Generally, mild soap and water is sufficient. Avoid abrasive cleaners.
Mastering the Art of Cabinet Cleaning: Step-by-Step
Now that you know your cabinet material, let’s break down the actual cleaning process. This methodical approach ensures you don’t miss spots and that your cabinets are truly clean.
Step 1: Dust and Debris Removal
Before introducing any moisture, it’s essential to remove loose dust, cobwebs, and any other surface debris.
- Dry Dusting: Use a dry, clean microfiber cloth or a soft-bristled brush to gently wipe down all cabinet surfaces, including doors, drawer fronts, and the sides.
- Vacuuming (Optional): If your cabinets have ornate details or you want to ensure all dust is gone, use your vacuum cleaner’s soft brush attachment to go over all surfaces. Pay attention to corners and crevices.
Step 2: Tackle Those Kitchen Cabinet Doors
Cabinet doors are usually the most visibly dirty part. This is where grease and grime tend to accumulate the most.
- Prepare Your Solution: Mix your chosen cleaning solution in a bucket. Remember, less is often more.
- Dampen Your Cloth: Dip a soft cloth or sponge into the cleaning solution and wring it out thoroughly. It should be damp, not dripping.
- Work in Sections: Start with one cabinet door or a manageable section of a larger cabinet.
- Gentle Wiping: Wipe the cabinet surface using light, even strokes. For stubborn spots, you might need to apply a little more pressure, but avoid scrubbing aggressively.
- Rinse Your Cloth Frequently: As your cloth picks up dirt and grease, rinse it in your clean water bucket (or under running water) and then re-dampen it in the cleaning solution. This prevents you from spreading dirt around.
- Address Knobs and Handles: Use a soft cloth or an old toothbrush dipped in your cleaning solution to clean around hardware.
Step 3: Don’t Forget the Cabinet Frames and Sides
The areas around your cabinet doors and the sides of your cabinet boxes also need attention.
- Follow the Same Method: Use the same damp cloth technique to clean the cabinet frames, drawer fronts, and any visible side panels.
- Pay Attention to Edges: Carefully wipe along the edges of doors and drawers where dust and grime can collect.
Step 4: The Rinse Cycle (Crucial for a Streak-Free Finish)
This step is vital to remove any leftover cleaning solution residue, which can dull the finish or attract more dirt.
- Clean Water Rinse: Take a fresh, clean microfiber cloth and dampen it with plain water. Wring it out thoroughly.
- Wipe Down Again: Go over all the cleaned cabinet surfaces again with this damp cloth.
- Rinse and Repeat: Rinse your cloth frequently in clean water to ensure you’re removing the cleaner, not just spreading it.
Step 5: The Drying and Buffing Finale
Moisture left on cabinets can cause damage, so thorough drying is essential.
- Dry Immediately: Use a separate, clean, dry microfiber cloth to immediately wipe down all the surfaces you just rinsed.
- Buff for Shine: Gently buff the cabinets to remove any lingering moisture and to bring out their natural shine. This is especially important for high-gloss finishes.
Natural Kitchen Cabinet Cleaner Options
For those who prefer to avoid commercial chemicals, several natural kitchen cabinet cleaner options are highly effective and safe.
Vinegar and Water Solution
- Ratio: Mix equal parts white vinegar and water.
- Use: Great for cutting through grease and grime. The acidity of the vinegar helps to break down tough buildup.
- Caution: Always test on an inconspicuous area first, especially on wood or painted surfaces, as the acidity can sometimes dull finishes if used too frequently or undiluted. Always rinse with water afterward.
Baking Soda Paste
- Ratio: Mix baking soda with a small amount of water to create a paste.
- Use: Excellent for tackling stubborn, caked-on grime and grease spots.
- Application: Apply the paste to the stubborn area, let it sit for a few minutes, then gently scrub with a soft cloth or sponge. Rinse thoroughly and dry.
- Caution: While gentle, baking soda is mildly abrasive. Use light pressure and test first.
Lemon Juice
- Use: The citric acid in lemon juice can help cut through grease and leave a fresh scent.
- Application: You can use diluted lemon juice (a few tablespoons mixed with water) on a cloth.
- Caution: Lemon juice is acidic. Use sparingly and rinse well. Avoid on unfinished wood.
Dish Soap
- Use: A few drops of mild dish soap (like Dawn) in warm water is a classic and effective cleaner for general kitchen grime.
- Application: Mix a few drops in a bucket of warm water.
- Caution: Ensure you rinse thoroughly to avoid a soapy residue.
Cleaning Kitchen Cabinet Doors: Specific Tips for Different Types of Grime
Kitchen cabinet doors often bear the brunt of kitchen activity. Here are some targeted approaches for common messes.
Tackling Grease Buildup
Grease from cooking is a persistent enemy.
- Method:
- Start with your mild dish soap and warm water solution.
- For tougher grease, try the diluted vinegar solution (1:1 vinegar to water).
- If that doesn’t work, a baking soda paste applied to the greasy spot can be very effective. Let it sit for 5-10 minutes before gently wiping.
- Always rinse thoroughly with a damp cloth and dry immediately.
Removing Fingerprints and Smudges
A common issue, especially on darker cabinets.
- Method:
- A simple damp microfiber cloth is often all you need.
- For stubborn smudges, a very mild soap solution can be used.
- For high-gloss finishes, a dedicated glass cleaner applied to the cloth (not directly to the cabinet) can provide a streak-free finish.
Dealing with Food Splatters
Accidental splatters of sauces, marinades, or other foods can happen.
- Method:
- Wipe up fresh splatters immediately with a damp cloth.
- For dried-on food, let the damp cloth sit on the spot for a minute or two to soften it before gently wiping it away.
- Use your regular cabinet cleaning solution if needed.
Deep Cleaning Kitchen Cabinets: When a Regular Wash Isn’t Enough
Sometimes, your cabinets need more than a weekly wipe-down. Deep cleaning kitchen cabinets involves a more thorough approach.
Frequency of Deep Cleaning
- Recommendation: Aim for a deep clean at least twice a year, or more often if you notice significant grease buildup, sticky residue, or a dulling of the finish.
- Spring Cleaning: A perfect time to deep clean is during your annual spring cleaning.
- After Heavy Cooking: If you’ve had a period of particularly heavy cooking (e.g., holiday baking), a deep clean might be warranted.
The Deep Cleaning Process
- Empty Cabinets (Optional but Recommended): For a truly deep clean, consider emptying one cabinet at a time. This allows you to clean the inside as well as the outside, and also to declutter.
- Remove All Hardware: As mentioned earlier, this is ideal for a deep clean.
- Pre-Treat Tough Spots: Before you begin washing, identify any areas with heavy grease or grime buildup. You might want to apply your chosen spot cleaner (like a baking soda paste or a degreasing solution) to these areas and let it sit for a while to break down the gunk.
- Wash Thoroughly: Work your way through the cabinets using your chosen cleaning solution and a damp cloth. Be meticulous, ensuring you get into all corners and crevices.
- Rinse Diligently: The rinsing step is even more critical during a deep clean to ensure no residue is left behind.
- Dry and Buff: Dry all surfaces completely and buff for a polished finish.
- Clean Inside Cabinets: Wipe down the interior surfaces of your cabinets and shelves. A mild all-purpose cleaner or a simple soap and water solution works well here. For wooden shelves, ensure they are dry before replacing items.
- Reattach Hardware: Once everything is clean and dry, reattach your knobs and handles.
Kitchen Cabinet Cleaning Tips for Lasting Sparkle
Here are some extra kitchen cabinet cleaning tips to keep your cabinets looking their best between deep cleans.
- Wipe Spills Immediately: Don’t let spills or splatters sit. A quick wipe with a damp cloth can prevent stains and buildup.
- Clean Hardware Regularly: Fingerprints and grime can accumulate on knobs and handles. Clean them during your regular cabinet cleaning.
- Avoid Over-Wetting: This is a recurring theme because it’s so important. Excess moisture is the enemy of most cabinet finishes.
- Use the Right Cleaners: Always tailor your cleaner to your cabinet material.
- Test, Test, Test: Before applying any new cleaner to your cabinets, always test it on a small, inconspicuous area first.
- Consider a Protective Coating: For certain cabinet types, applying a furniture polish or a specialized cabinet protector after cleaning can add a layer of defense against future grime.
- Ventilate: Ensure good ventilation in your kitchen when cleaning, especially if using vinegar or stronger solutions.
- Don’t Forget the Tops: Cabinet tops can collect a surprising amount of dust and grease from cooking. Make sure to include them in your cleaning routine.
- Regular Maintenance: The easier you make it for yourself to clean regularly, the less you’ll need to do a deep clean.
FAQ: Your Cabinet Cleaning Questions Answered
Here are some common questions about how to clean kitchen cabinets.
Q1: Can I use an all-purpose cleaner on my kitchen cabinets?
A1: It depends on the all-purpose cleaner and your cabinet finish. Many all-purpose cleaners contain harsh chemicals or abrasives that can damage cabinet finishes. It’s generally safer to use a mild dish soap and water solution or a cleaner specifically designed for kitchen cabinets. Always test any cleaner in an inconspicuous area first.
Q2: How often should I clean my kitchen cabinets?
A2: For regular cleaning (dusting and light wiping), aim for once a week or as needed. For a more thorough cleaning to remove grease buildup, every 1-3 months is a good interval. Deep cleaning should be done at least twice a year.
Q3: My cabinets have a sticky residue. What’s the best way to remove it?
A3: A solution of equal parts white vinegar and warm water is usually very effective at cutting through sticky residue and grease. Apply with a damp cloth, let it sit for a minute, then wipe clean and dry thoroughly. For stubborn spots, a paste of baking soda and water can also work, but be gentle.
Q4: Can I use a Magic Eraser on my kitchen cabinets?
A4: Magic Erasers are highly effective at removing marks, but they are abrasive. While they can be used with extreme caution on some cabinet finishes (like painted cabinets), they can easily dull or remove the finish if used too aggressively or on certain materials like wood veneer or high-gloss finishes. It’s best to avoid them if possible or test in a very hidden spot first and use minimal pressure.
Q5: How do I clean the inside of my kitchen cabinets?
A5: For a general clean, remove items from the cabinet, then wipe down the shelves and interior walls with a damp cloth. You can use a mild dish soap and water solution if there’s any stickiness or grime. Ensure the interior is completely dry before putting items back. For wooden shelves, avoid over-wetting.
By following this comprehensive guide, you can confidently tackle the task of cleaning kitchen cabinets, ensuring they remain a beautiful and hygienic part of your home for years to come. With the right approach and the right cabinet cleaning solutions, achieving sparkling and safe cabinets is an achievable goal.