
Can you build a kitchen island yourself? Absolutely! Building your own kitchen island is a rewarding DIY project that allows for unparalleled customization to fit your specific needs and kitchen design. What is a kitchen island? It’s a freestanding counter that adds valuable workspace, storage, and seating to your kitchen. This guide will walk you through the entire process of how to make a kitchen island, from initial planning to the final touches.
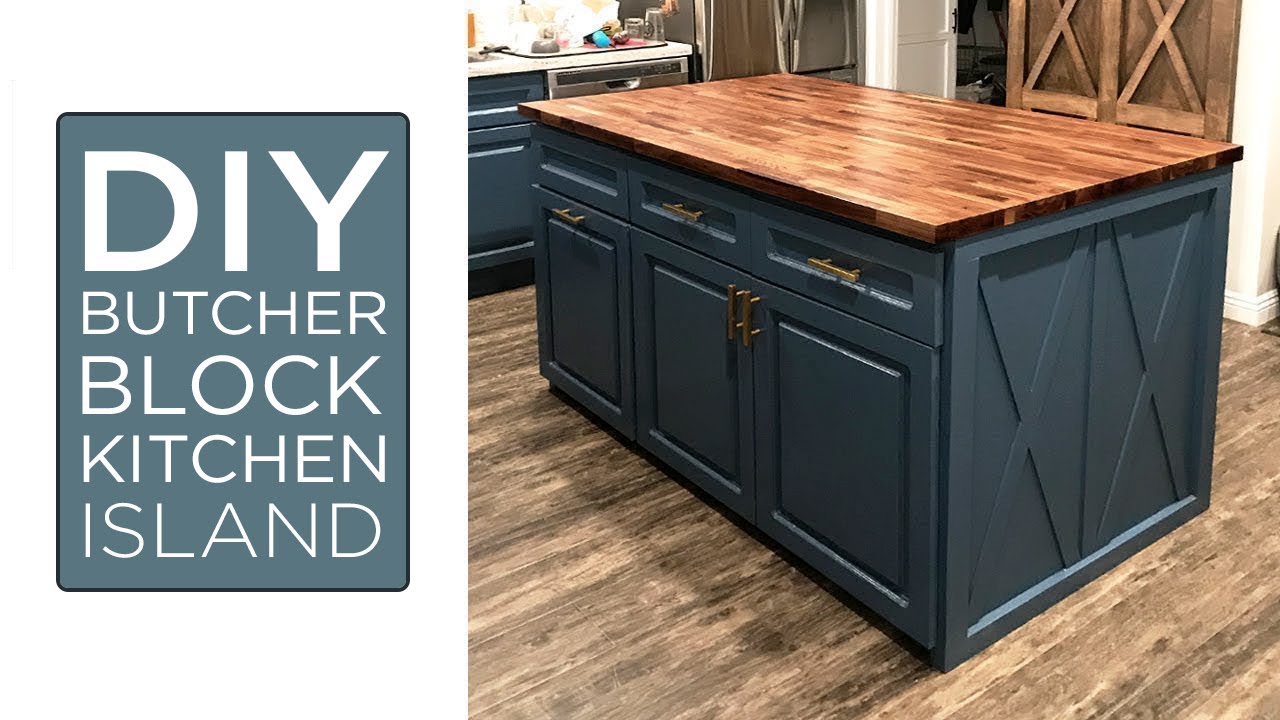
Image Source: i.ytimg.com
Planning Your DIY Kitchen Island
Before you pick up a single tool, thorough planning is essential for a successful DIY kitchen island project. This stage dictates the functionality, aesthetics, and ultimately, the success of your build.
Determining Your Kitchen Island Design
Your kitchen island design should harmonize with your existing kitchen’s style and layout. Consider the following:
- Size and Scale: Measure your kitchen space carefully. Allow at least 36 inches of clearance around the island for comfortable movement. Consider the overall proportions; an island that is too large can make a small kitchen feel cramped, while one that is too small might be lost in a large space.
- Functionality: What will you use your island for?
- Prep Space: Do you need a large, uninterrupted surface for chopping and mixing?
- Seating: Do you envision a breakfast bar with stools? If so, factor in overhang for legroom.
- Storage: How much storage do you need? Think about cabinets, drawers, shelves, or specialized storage like wine racks.
- Appliances: Will you incorporate a cooktop, sink, or dishwasher? This will require more complex planning for plumbing and electrical work.
- Style: Match your island to your kitchen’s existing decor. Options include modern, farmhouse, traditional, or eclectic. Consider the materials you want to use for the cabinetry and countertop.
Kitchen Island Plans
Having clear kitchen island plans is crucial. You can find free plans online, purchase detailed blueprints, or even draw your own.
- Sketching Your Vision: Start with a rough sketch. This helps you visualize the layout and features.
- Detailed Drawings: Once you have a general idea, create more detailed drawings including dimensions for every component. This ensures accuracy when purchasing materials and during construction.
- Material List: Based on your plans, create a comprehensive list of all materials and hardware needed. This includes lumber, fasteners, cabinet doors, drawer slides, hinges, countertops, and finishing materials.
Customization Options for Your Kitchen Island
The beauty of a DIY kitchen island is the ability to create a truly custom kitchen island.
- Integrated Features: Think about adding a pull-out trash bin, a built-in spice rack, or a cookbook shelf.
- Mobile Solutions: If you need flexibility, consider a rolling kitchen island. This allows you to move it as needed, opening up your kitchen space. Wheels with locking mechanisms are essential for stability.
- Storage Solutions: Maximize kitchen island storage with clever design. Deep drawers for pots and pans, narrow pull-out shelves for spices, or open shelving for displaying decorative items can all enhance functionality.
Building the Base of Your Kitchen Island
The base of your kitchen island provides the structural foundation and housing for your storage.
Choosing Your Materials
The most common materials for building a kitchen island base are plywood and solid wood.
- Plywood: ¾-inch birch or cabinet-grade plywood is an excellent choice for cabinet boxes due to its stability and smooth surface.
- MDF (Medium-Density Fiberboard): Can be used for painted projects as it offers a smooth, uniform surface. However, it’s not as strong as plywood and can be susceptible to moisture damage.
- Solid Wood: For visible elements like cabinet frames or decorative trim, solid wood like pine, poplar, or oak is a good choice.
Constructing the Cabinet Boxes
Most DIY kitchen islands are built around cabinet boxes.
- Standard Cabinet Construction: You can use pre-made cabinet boxes or build your own. Building your own involves cutting plywood panels to size and assembling them using wood glue and screws.
- Pocket Holes: Using a pocket hole jig is an efficient way to join cabinet panels securely and cleanly.
- Reinforcement: For added strength, especially if you plan to install heavy appliances or a substantial countertop, consider reinforcing the cabinet boxes with internal bracing.
Table: Common Plywood Thicknesses for Cabinetry
| Application | Recommended Thickness |
|---|---|
| Cabinet Sides/Bottom | ¾-inch |
| Cabinet Back | ½-inch |
| Drawer Sides | ½-inch or ¾-inch |
| Drawer Bottom | ¼-inch or ½-inch |
Assembling the Island Structure
Once your cabinet boxes are built, it’s time to assemble the main structure.
- Joining Cabinets: If your design involves multiple cabinet units, join them together securely. Use screws and wood glue to create a solid, monolithic structure. Ensure they are perfectly aligned and square before fastening.
- Adding a Kick Plate: A kick plate (or toe kick) at the base of the cabinets provides a finished look and protects the cabinet fronts from kicks and scuffs. Cut strips of plywood or solid wood and attach them to the bottom front of the cabinet boxes.
- Creating an Apron: For a more finished appearance or to provide a mounting surface for your countertop, you can add an apron around the top perimeter of the cabinet structure.
Installing Drawer Slides and Hinges
Smooth operation of drawers and doors is essential.
- Drawer Slides: There are various types of drawer slides, including ball-bearing slides (for heavy loads and smooth operation) and epoxy-coated slides. Follow the manufacturer’s instructions precisely for installation on both the cabinet boxes and the drawers themselves.
- Cabinet Hinges: Choose hinges that match your door style (e.g., European-style concealed hinges for a modern look, or surface-mounted hinges for a more traditional aesthetic). Proper alignment is key for doors that open and close correctly.
Adding Drawers and Doors
The functionality of your kitchen island is significantly enhanced by well-built drawers and doors.
Building Drawers
Drawers can be built using ½-inch or ¾-inch plywood.
- Drawer Box Construction: Cut the sides, front, back, and bottom panels. The sides should have dados (grooves) to accept the drawer bottom and front/back panels. Assemble using wood glue and screws.
- Drawer Bottom Support: Ensure the drawer bottom is securely seated in the dados and, for wider drawers, consider adding a reinforcing strip underneath.
- Drawer Fronts: These can be made from plywood, MDF, or solid wood and are attached to the drawer box after the box is built.
Attaching Cabinet Doors
- Measure and Cut: Accurately measure and cut your cabinet doors based on your design.
- Hinge Installation: Install the hinges onto the doors first, then attach the doors to the cabinet boxes, making adjustments for proper alignment and consistent gaps between doors.
Installing the Kitchen Island Countertop
The kitchen island countertop is often the focal point of the island.
Countertop Material Options
There are many materials to choose from for your kitchen island countertop.
- Butcher Block: A butcher block kitchen island offers a warm, natural look and is excellent for food preparation. It requires regular oiling to maintain its finish and prevent drying and cracking.
- Laminate: An affordable and widely available option, laminate comes in a vast array of colors and patterns.
- Granite/Quartz: These natural and engineered stones offer durability, heat resistance, and a high-end look. They are typically heavier and require professional installation.
- Solid Surface: Materials like Corian are non-porous, easy to clean, and can be seamlessly integrated with sinks.
- Concrete: Offers a unique, industrial aesthetic and can be cast in custom shapes and colors.
Preparing the Base for the Countertop
- Leveling: Ensure the top surface of your cabinet base is perfectly level. Use shims if necessary.
- Support: For heavier countertops like granite or quartz, or for larger spans, you’ll need to add support bracing to the cabinet structure. This prevents sagging.
Installing Your Chosen Countertop
The installation method will vary depending on the material.
- Butcher Block: Can be attached from underneath with screws or using construction adhesive.
- Laminate/Solid Surface: Often attached with construction adhesive and clamped in place.
- Granite/Quartz: Typically secured with silicone adhesive and sometimes clips or brackets attached to the underlying support structure.
Finishing Touches for Your Kitchen Island
The final details bring your DIY kitchen island to life.
Sanding and Priming
- Sanding: Smooth all surfaces, especially edges and joints, with sandpaper. Start with a coarser grit and move to finer grits for a smooth finish.
- Priming: Apply a good quality primer. This ensures even paint absorption and adhesion, especially if you are painting over wood or MDF.
Painting or Staining
- Painting: For painted finishes, apply multiple thin coats of paint, allowing adequate drying time between coats. Consider using a high-quality cabinet paint for durability.
- Staining: If you’re going for a wood finish, apply stain evenly and wipe off excess. Follow with a protective topcoat like polyurethane for durability.
Installing Hardware
- Knobs and Pulls: Choose hardware that complements your kitchen’s style. Measure carefully and drill pilot holes before installing to prevent wood splitting.
Adding Decorative Elements
- Backsplash: Consider adding a decorative backsplash to the back of your island if it will be against a wall or if you want an accent.
- Trim and Molding: Add decorative trim or molding to the cabinet base or around the countertop for a more custom look.
Ideas for Enhancing Your Kitchen Island
Beyond the basic build, consider these kitchen island ideas to boost functionality and style.
Maximizing Kitchen Island Storage
- Pull-out Shelves: Ideal for appliances like stand mixers or for storing baking sheets.
- Deep Drawers: Perfect for pots, pans, and other cookware.
- Spice Racks: Built-in spice racks on the sides of the island or within cabinets.
- Wine Rack or Glass Holders: If you enjoy wine, consider integrating a wine rack or stemware holders.
- Open Shelving: For displaying cookbooks, decorative items, or frequently used dishes.
Creating a Rolling Kitchen Island
If mobility is a priority:
- Heavy-Duty Casters: Choose casters rated for the weight of your island, including its contents.
- Locking Mechanisms: Ensure each caster has a reliable locking brake to keep the island stable when in use.
- Sturdy Construction: Build the island robustly to withstand movement.
Incorporating Seating
- Overhang: If you plan for seating, ensure sufficient countertop overhang (typically 10-12 inches for comfortable seating).
- Stool Storage: Design the island so that stools can be tucked neatly underneath when not in use.
Frequently Asked Questions About Building a Kitchen Island
Here are some common questions people have when planning to build their own kitchen island:
Q1: What is the minimum clearance needed around a kitchen island?
A1: You should maintain a minimum of 36 inches (about 91 cm) of clearance around your kitchen island. This allows for comfortable movement and for people to walk behind those seated at the island. Ideally, 42-48 inches is even better, especially if you have a busy kitchen or multiple people working in it.
Q2: How much does it cost to build a DIY kitchen island?
A2: The cost can vary significantly depending on the materials you choose, the size of the island, and whether you incorporate features like sinks or appliances. A basic DIY island might cost anywhere from $200-$500 for materials, while a more complex or higher-end island could range from $1,000-$3,000 or more.
Q3: Can I install a sink or cooktop in my DIY kitchen island?
A3: Yes, you can, but it significantly increases the complexity of the project. You’ll need to plan for plumbing (water supply and drainage) for a sink, and potentially electrical or gas lines for a cooktop. This often requires hiring a plumber and an electrician, which adds to the cost and requires adherence to building codes.
Q4: What kind of wood is best for a DIY kitchen island countertop?
A4: For a butcher block kitchen island countertop, hardwoods like maple, oak, and walnut are excellent choices due to their density and durability. They are also suitable for direct food contact when properly maintained.
Q5: How do I ensure my DIY kitchen island is stable?
A5: Stability comes from robust construction. Use ¾-inch cabinet-grade plywood for the cabinet boxes and assemble them securely with wood glue and screws. Ensure all joints are tight. Add a kick plate and potentially internal bracing, especially if you plan to install heavy countertops or appliances. For a rolling kitchen island, use high-quality locking casters rated for the total weight.
Q6: What are the advantages of a custom kitchen island?
A6: A custom kitchen island allows you to perfectly tailor the size, style, storage, and features to your specific kitchen layout and your family’s needs. You can maximize efficiency, improve workflow, and create a piece that truly enhances your kitchen’s functionality and aesthetics in a way that off-the-shelf options cannot.
By following these steps and considering your specific needs and style, you can successfully build a beautiful and functional DIY kitchen island that will be a cherished addition to your home. Happy building!