
Can you clean a kitchen sponge effectively? Yes, absolutely! Cleaning a kitchen sponge is essential for hygiene and can be done safely and quickly using several methods. We’ll explore the best ways to disinfect your cleaning sponge for dishes so it remains a helpful tool and not a breeding ground for bacteria.
Your kitchen sponge is a workhorse, tackling grease, grime, and food scraps. But this constant battle means it can quickly become a haven for bacteria and germs. Regularly cleaning and sanitizing your sponge is crucial for a healthy kitchen. This guide will walk you through effective and simple ways to clean your kitchen sponge, ensuring it’s safe and ready for its next job.
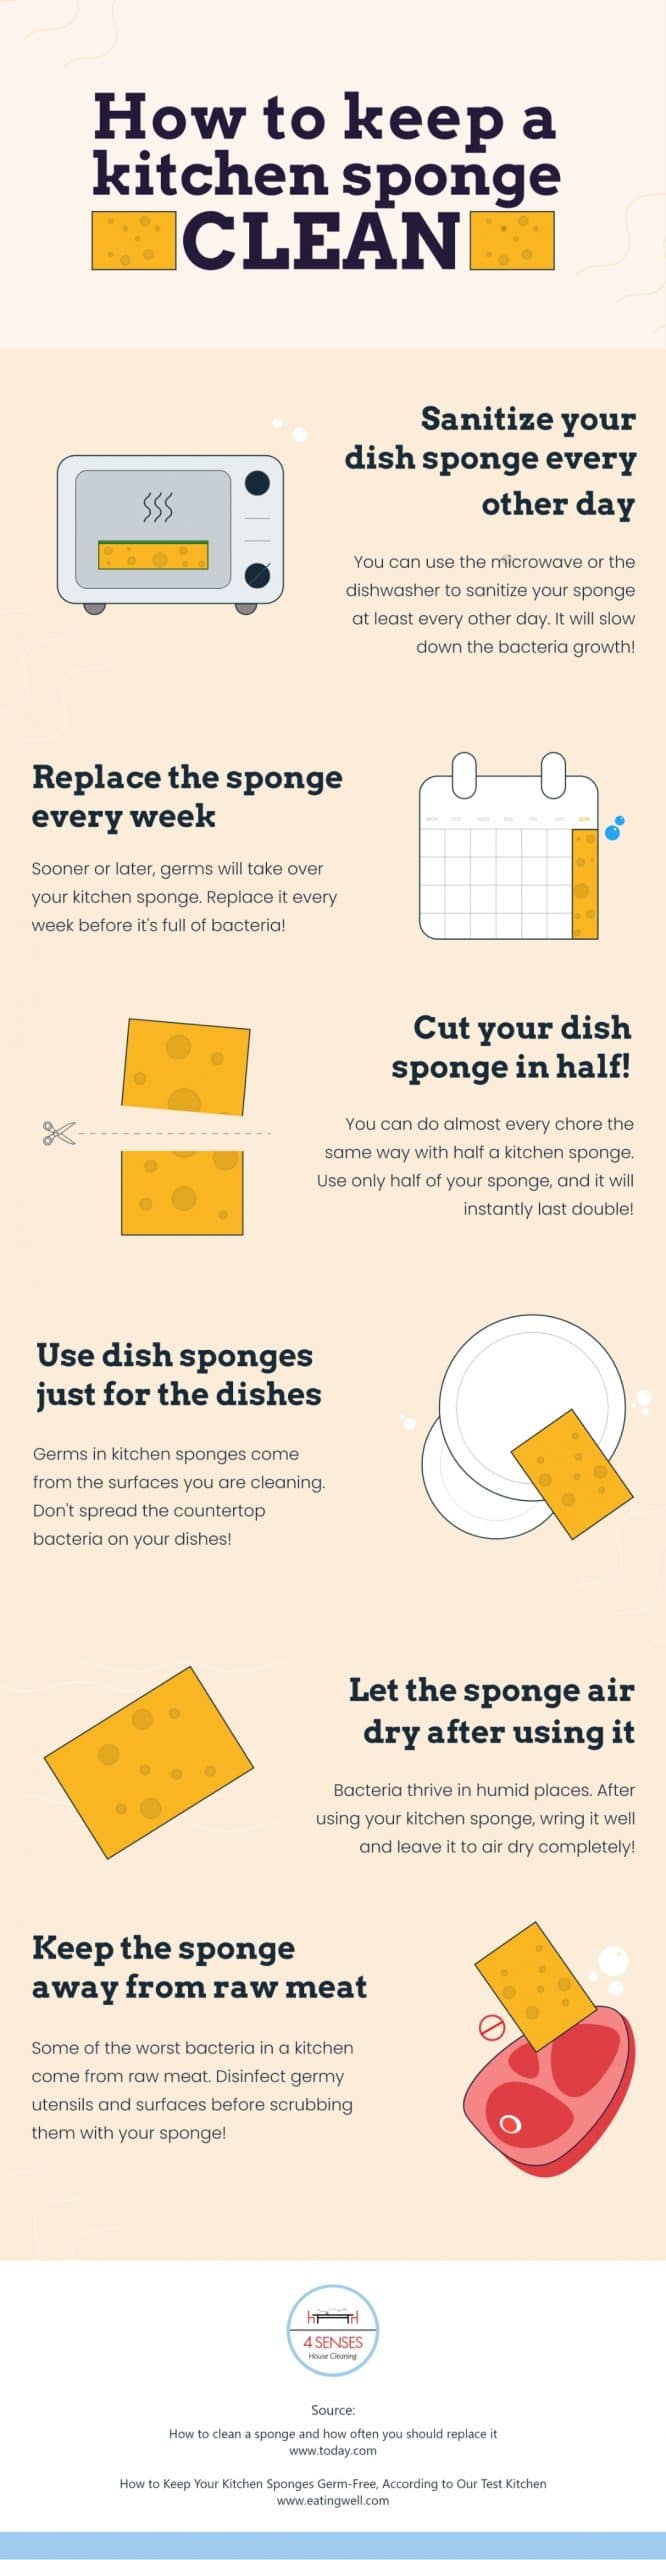
Image Source: 4senseshousecleaning.com
Why Cleaning Your Kitchen Sponge Matters
Kitchen sponges are porous, meaning they have tiny holes that trap moisture and food particles. These conditions are perfect for bacteria like E. coli and Salmonella to grow. A dirty sponge can spread these germs around your kitchen, contaminating surfaces and food. Think about it: after wiping down a cutting board with raw chicken, your sponge is now covered in those bacteria. If you then use that same sponge on your countertops or dishes without proper cleaning, you’re spreading the contamination.
Regularly sanitizing your sponge helps to:
- Prevent the spread of germs: This is the most critical reason. A clean sponge minimizes the risk of foodborne illnesses.
- Eliminate odors: Sponges can develop unpleasant smells as they harbor bacteria. Cleaning them removes these odors.
- Extend the life of your sponge: While sponges don’t last forever, proper cleaning can help them remain effective for longer.
- Maintain a cleaner kitchen: A sanitized sponge contributes to an overall cleaner and healthier kitchen environment.
Safe and Quick Cleaning Methods
There are several effective methods for disinfecting your kitchen sponge. We’ll cover popular and proven techniques, including using your microwave, boiling water, vinegar, soap and water, and your dishwasher.
Microwave Sponge Cleaning: A Speedy Solution
Microwave sponge cleaning is one of the fastest and most effective ways to kill germs.
How to Disinfect a Sponge in the Microwave
- Preparation is Key: Make sure your sponge is wet. A dry sponge can catch fire in the microwave.
- Placement: Place the damp sponge in a microwave-safe bowl or directly on the microwave plate. Some people prefer to place it on a small ceramic plate to catch any drips.
- Microwave Time: Microwave the sponge on high power for 1 to 2 minutes. The steam generated will kill most of the bacteria.
- Cool Down: Carefully remove the bowl or sponge using oven mitts or tongs. The sponge will be extremely hot! Let it cool down completely before handling.
- Squeeze and Dry: Once cool, squeeze out any excess water and let the sponge air dry thoroughly.
Safety Precautions for Microwave Sponge Cleaning
- Never microwave a dry sponge: This is a fire hazard.
- Use a microwave-safe bowl: Avoid metal or containers not designed for microwave use.
- Handle with care: The sponge and bowl will be very hot.
- Check your microwave: Some sponges might contain metal scrubbing elements, which are not microwave-safe. Always inspect your sponge before microwaving.
Boiling Sponge Clean: The Traditional Method
Boiling is a time-tested method for sanitizing many items, and your kitchen sponge is no exception.
Steps for Boiling a Kitchen Sponge
- Fill a Pot: Take a small pot and fill it with enough water to fully submerge your sponge.
- Bring to a Boil: Place the pot on the stove and bring the water to a rolling boil.
- Submerge the Sponge: Carefully place your damp sponge into the boiling water using tongs.
- Boil Time: Let the sponge boil for at least 5 minutes. This prolonged exposure to high heat is very effective at killing bacteria.
- Cool Down: Again, use tongs to remove the sponge from the boiling water. It will be extremely hot. Place it on a heat-safe surface to cool down completely.
- Rinse and Dry: Once cooled, rinse the sponge under cool water to remove any debris and then let it air dry.
Benefits of Boiling
Boiling offers a thorough sanitization because the sustained high temperature ensures that even hardy bacteria are eliminated. It’s a simple yet powerful way to disinfect your cleaning sponge for dishes.
Vinegar Clean Sponge: A Natural Disinfectant
Vinegar is a natural acid that can kill many types of bacteria. It’s a great option if you prefer to avoid harsh chemicals.
How to Use Vinegar to Clean Your Sponge
- Soak in Vinegar: In a bowl, mix equal parts white vinegar and water.
- Submerge the Sponge: Place your sponge in the vinegar-water solution, ensuring it is fully submerged.
- Soaking Time: Let the sponge soak for at least 5 minutes, or up to an hour for a deeper clean.
- Rinse Thoroughly: Remove the sponge from the vinegar solution and rinse it very well under cool running water. This is important to remove the vinegar smell.
- Squeeze and Dry: Squeeze out excess water and allow the sponge to air dry completely.
Why Vinegar Works
White vinegar has acetic acid, which has antimicrobial properties. While it might not kill all bacteria as effectively as heat methods, it’s a good everyday cleaning solution.
Soap and Water Sponge Clean: Daily Maintenance
While soap and water alone might not fully sanitize a sponge, it’s essential for daily cleaning to remove loose debris and some germs.
The Soap and Water Method
- Rinse Well: After each use, thoroughly rinse your sponge under running water to remove any food particles.
- Lather Up: Squeeze a small amount of dish soap onto the sponge.
- Scrub and Rinse: Work the soap into a lather, scrubbing the sponge against itself. Rinse it out thoroughly.
- Air Dry: Squeeze out as much water as possible and stand the sponge up or place it in a way that allows it to air dry completely between uses. Keeping it dry is key to preventing bacterial growth.
Using Soap and Water for Sanitizing
For more effective sanitizing with soap and water, you can try these steps:
- Lather and Scrub: Create a good lather with dish soap.
- Soak in Hot Water: Fill a bowl with hot tap water. Place the soapy sponge in the hot water and let it soak for 5 to 10 minutes.
- Rinse and Squeeze: Rinse the sponge thoroughly under hot water, squeezing out the soapy water.
- Air Dry: Squeeze dry and allow to air dry completely.
This method is a good compromise for daily cleaning and a step towards sanitizing.
Dishwasher Sponge Cleaning: The Automatic Approach
If you have a dishwasher, it can be a convenient tool for sanitizing your kitchen sponge.
Dishwasher Cleaning Steps
- Rinse First: Rinse the sponge to remove any large food particles.
- Placement: Place the sponge on the top rack of your dishwasher, or if it’s a smaller sponge, you can place it in the silverware basket. Ensure it won’t obstruct the spray arms.
- Run a Hot Cycle: Run the dishwasher on a hot water cycle with a heated dry setting. The hot water and steam will help to sanitize the sponge.
- Air Dry: Once the cycle is complete, remove the sponge and let it air dry completely.
Dishwasher Effectiveness
The combination of hot water and detergent in a dishwasher cycle is effective at killing germs. This method is great for busy households as it can be done alongside your regular dishwashing.
Baking Soda Sponge Clean: Gentle and Effective
Baking soda is a mild abrasive and a natural deodorizer, making it useful for cleaning sponges.
Baking Soda Cleaning Technique
- Make a Paste: Mix baking soda with a little water to create a thick paste.
- Apply Paste: Spread the paste all over the damp sponge.
- Scrub and Soak: Gently scrub the sponge with itself or a brush. Then, place the sponge in a bowl with warm water and a tablespoon of baking soda. Let it soak for 15-30 minutes.
- Rinse and Squeeze: Rinse the sponge thoroughly under running water, squeezing out the baking soda solution.
- Air Dry: Squeeze dry and allow to air dry completely.
Benefits of Baking Soda
Baking soda helps to lift grime and neutralize odors, leaving your sponge feeling fresher. It’s a gentler alternative to harsher chemicals.
How to Reuse a Kitchen Sponge Effectively
Reusing a kitchen sponge is possible as long as you maintain its cleanliness and recognize its lifespan.
Signs Your Sponge Needs Replacing
Even with regular cleaning, sponges wear out. Look out for these signs:
- Persistent Odors: If your sponge continues to smell bad even after cleaning, it’s time for a new one.
- Disintegration: If the sponge is falling apart, losing its texture, or large chunks are coming off, it’s no longer effective.
- Discoloration: While some discoloration is normal, significant staining that doesn’t come out with cleaning might indicate deep-seated bacteria or mold.
- Reduced Absorbency/Scrubbing Power: If your sponge isn’t absorbing water or scrubbing effectively anymore, it has likely reached the end of its useful life.
General Rule: Most experts recommend replacing your kitchen sponge every 1 to 2 weeks, depending on usage and how well you clean it.
Maintaining a Clean Sponge for Reuse
To maximize the reuse of your sponge:
- Rinse thoroughly after every use.
- Squeeze out excess water.
- Allow it to air dry completely between uses.
- Sanitize it regularly using one of the methods above (e.g., microwaving, boiling, or dishwasher).
- Designate sponges for specific tasks: Use one for dishes and another for countertops to prevent cross-contamination.
Comparing Cleaning Methods: A Quick Look
| Method | Time to Clean | Effectiveness (Germ Killing) | Ease of Use | Notes |
|---|---|---|---|---|
| Microwave | Very Quick | High | Easy | Sponge must be damp; handle with extreme care when hot. |
| Boiling | Moderate | Very High | Moderate | Requires a pot and stovetop; handle with extreme care when hot. |
| Vinegar Soak | Moderate | Moderate to High | Easy | Natural, but may not kill all germs; requires thorough rinsing. |
| Soap & Hot Water Soak | Moderate | Moderate | Easy | Good for daily cleaning, less effective for deep sanitization. |
| Dishwasher | Varies | High | Easy | Uses existing appliance; ensure hot cycle and heated dry. |
| Baking Soda Soak | Moderate | Moderate | Easy | Good for cleaning and deodorizing; gentler than heat methods. |
Frequently Asked Questions About Cleaning Kitchen Sponges
Q1: How often should I clean my kitchen sponge?
A1: For optimal hygiene, it’s best to sanitize your sponge daily or at least every other day. A quick rinse and squeeze after each use is also crucial.
Q2: Can I use bleach to clean my sponge?
A2: While bleach can kill germs, it’s generally not recommended for cleaning kitchen sponges. Sponges can absorb bleach, and residue could be transferred to dishes or countertops. Plus, the porous nature of sponges can trap bleach, making it hard to rinse out completely. Heat-based methods or vinegar are safer alternatives.
Q3: My sponge smells bad. What should I do?
A3: A bad smell usually indicates bacterial buildup. Try one of the more intensive cleaning methods like microwaving, boiling, or a thorough vinegar soak. If the smell persists after cleaning, it’s time to replace the sponge.
Q4: Can I use my regular dish soap to sanitize the sponge?
A4: Dish soap is excellent for removing food particles and some bacteria, but it doesn’t fully sanitize the sponge on its own. For sanitizing, combine dish soap with hot water and a soak, or use one of the more potent methods like microwaving or boiling.
Q5: How do I know when to throw my sponge away?
A5: As mentioned earlier, replace your sponge if it has persistent odors, starts to disintegrate, is heavily stained, or loses its effectiveness. Generally, a sponge should be replaced every 1-2 weeks.
By incorporating regular cleaning and sanitizing practices into your kitchen routine, you can ensure your trusty kitchen sponge remains a clean and safe tool for all your dishwashing and cleaning needs. Remember, a clean sponge means a cleaner kitchen!