
Can you use dish soap to clean wood kitchen cabinets? Yes, a small amount of mild dish soap diluted in water can be a safe and effective wood cabinet cleaner, especially for everyday grime. However, it’s crucial to use it sparingly and always wipe dry afterward to prevent water damage.
Keeping your wood kitchen cabinets looking their best is essential for the overall aesthetic and hygiene of your home. Over time, cabinets can accumulate grease, grime, food splatters, and dust, dulling their finish and making them look worn. Knowing how to clean them safely and effectively will preserve their beauty and extend their lifespan. This guide will walk you through the best methods, from daily touch-ups to deep cleaning and even restoring wood kitchen cabinets.
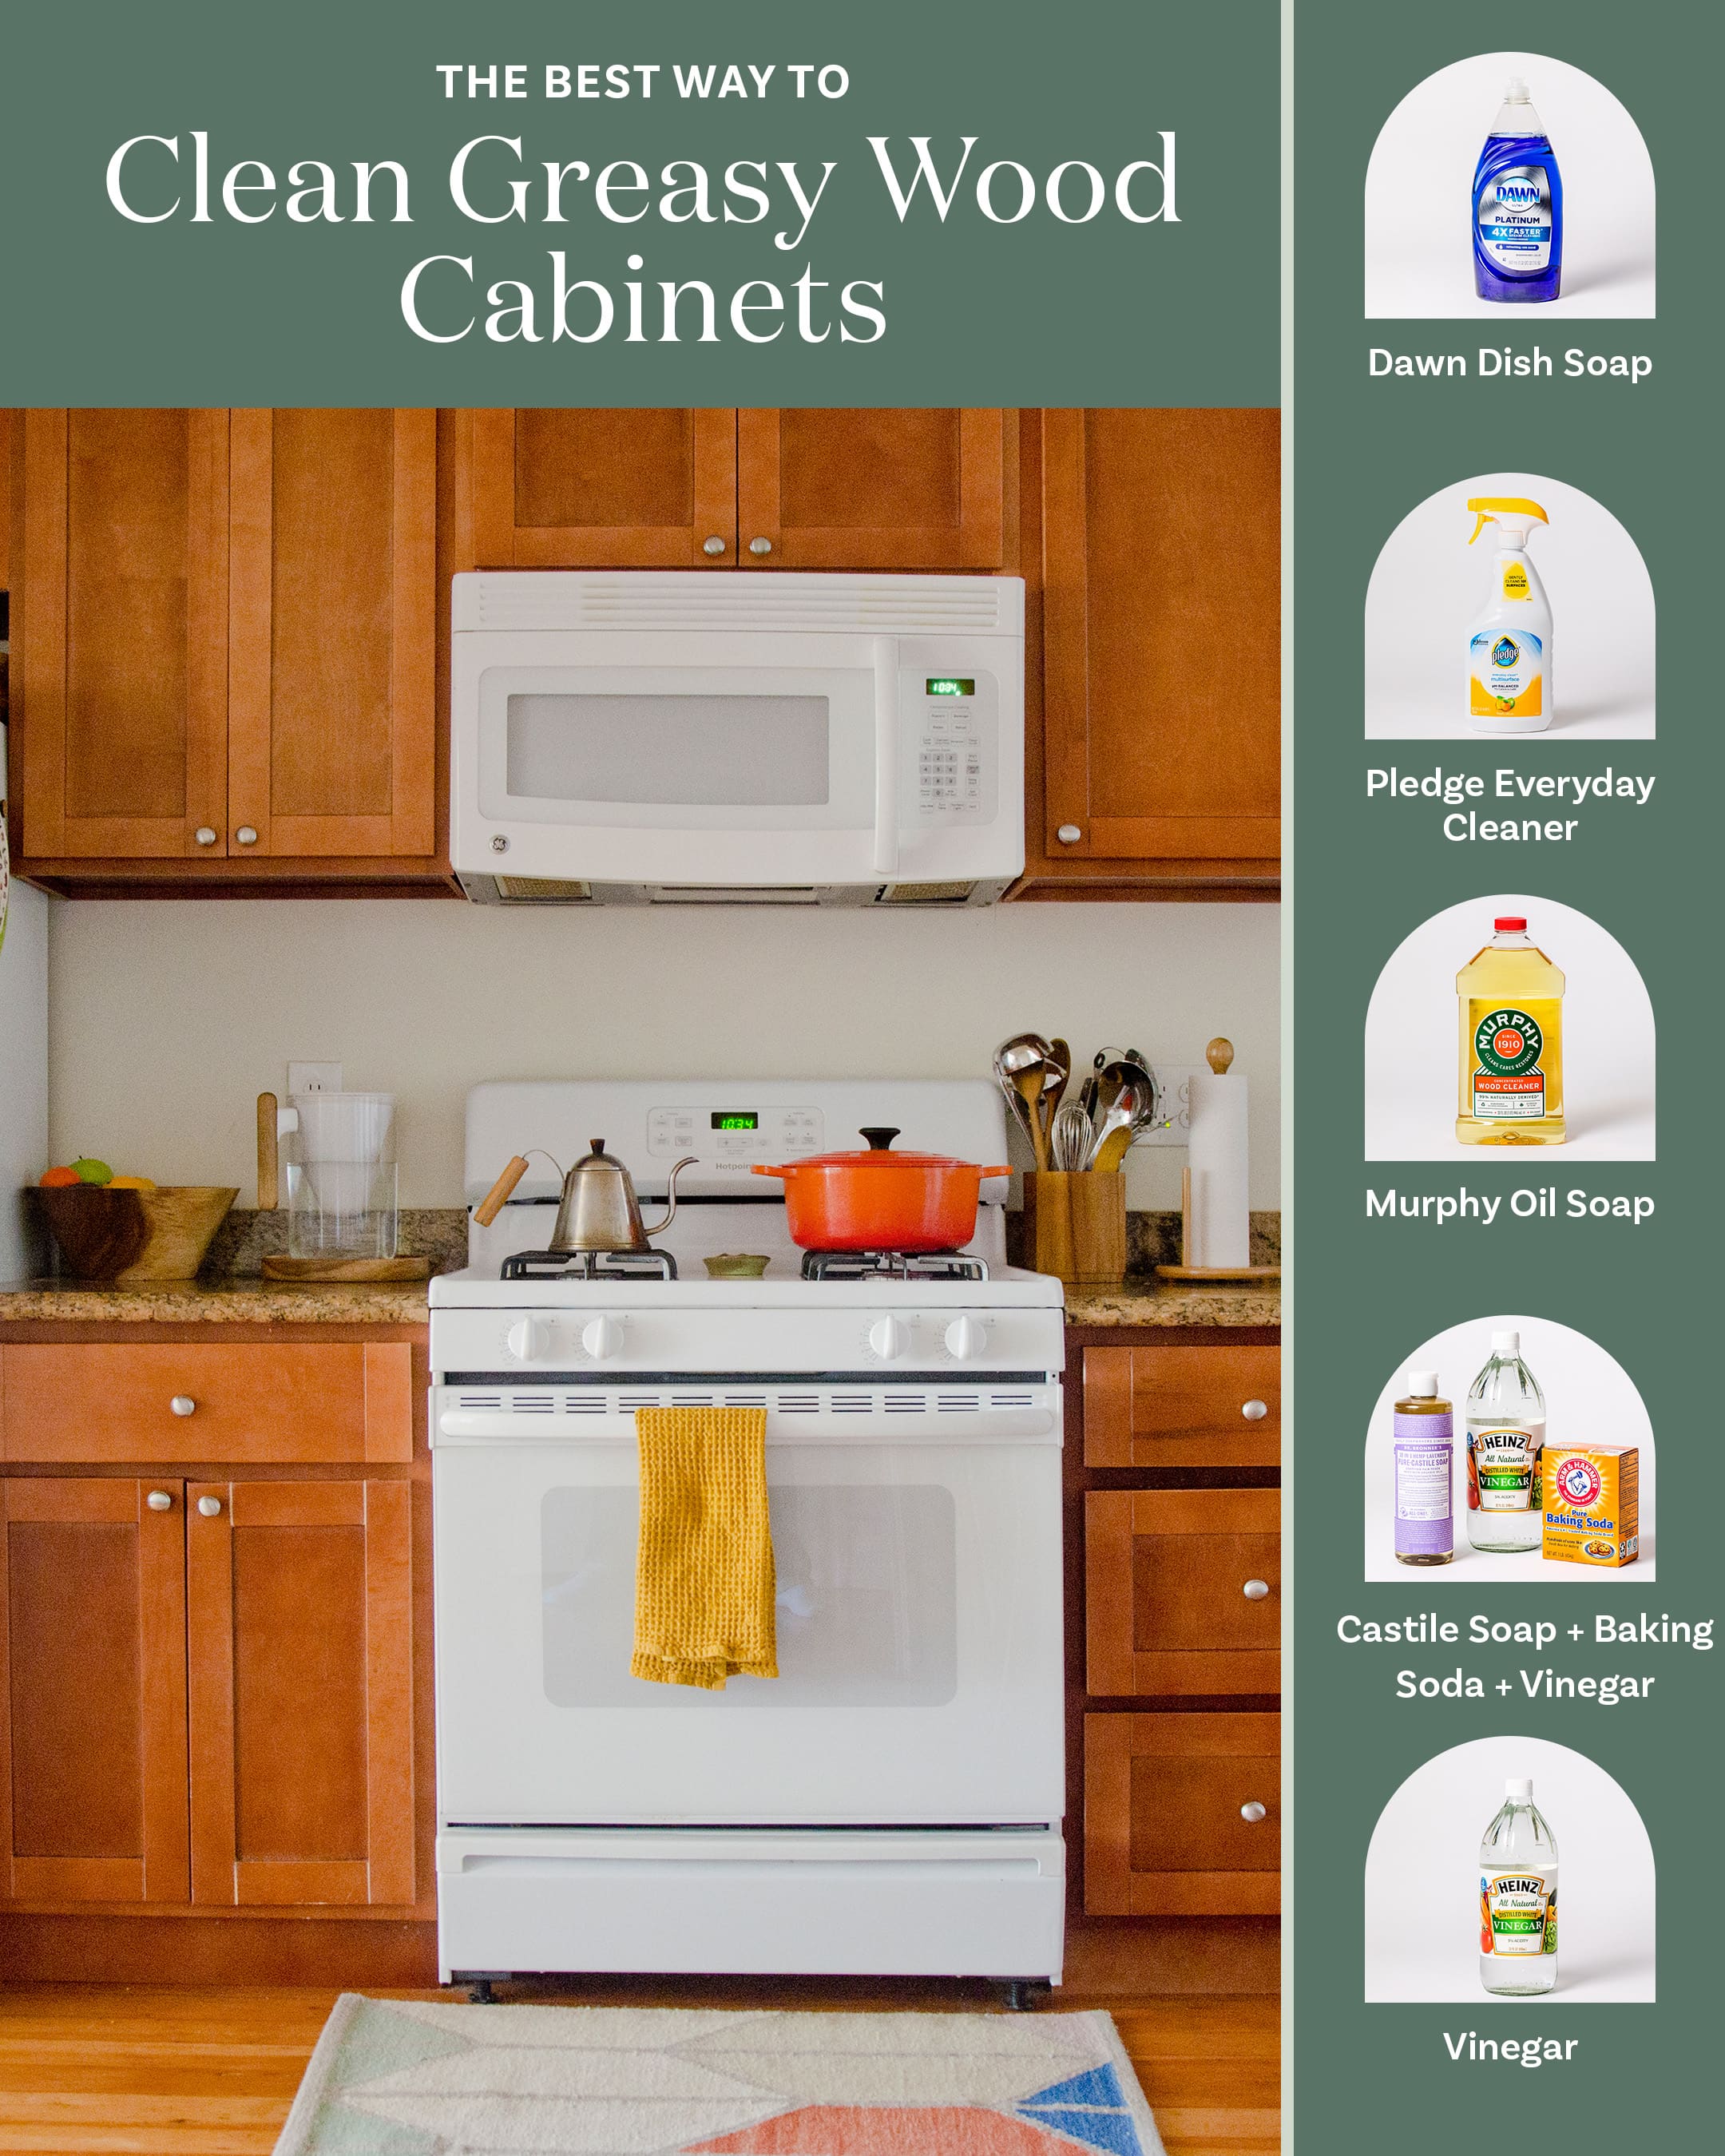
Image Source: cdn.apartmenttherapy.info
Daily & Weekly Cabinet Care
Regular, light cleaning is the best defense against stubborn build-up.
Quick Wipe-Down
- Frequency: Daily or after heavy use.
- Method: Use a soft, dry microfiber cloth to wipe down cabinet fronts. This removes dust and prevents it from settling into a film. For slightly smudged areas, lightly dampen the cloth with plain water. Always wipe dry with a second dry cloth immediately.
Light Cleaning Solutions
- Frequency: Weekly or as needed.
- What You’ll Need:
- Soft microfiber cloths (at least two per cleaning session)
- Warm water
- Mild dish soap (optional, for tougher spots)
- A spray bottle
- Steps:
- Prepare Your Solution: Fill a spray bottle with warm water. If you need a bit more cleaning power for light grease, add just a drop or two of mild dish soap to the water. Too much soap can leave residue.
- Mist Lightly: Lightly mist a section of the cabinet with the cleaning solution. Never spray directly onto the cabinets, as excess moisture can seep into the wood and damage the finish.
- Wipe Gently: Use a clean, soft microfiber cloth to wipe the cabinet front. Work in the direction of the wood grain.
- Rinse (If Needed): If you used soap, lightly dampen another cloth with plain water and wipe the area again to remove any soap residue.
- Dry Thoroughly: Immediately buff the cabinet dry with a clean, dry microfiber cloth. This is a critical step to prevent water spots and damage.
Tackling Tougher Grime: Cleaning Greasy Kitchen Cabinets
Kitchens are notorious for grease splatters, especially around the stove. This grease can attract dirt and become sticky, making your cabinets look dull and dirty.
Identifying Grease Build-up
Grease build-up often appears as a dull, sticky film on the cabinet surface. It’s most common on cabinets closest to the stove and oven. You might notice it feels slightly tacky to the touch.
Effective Grease Removal
When plain water isn’t enough, you’ll need a more robust wood cabinet cleaner.
Option 1: Mild Dish Soap Solution (Revisited)
For moderate grease, the diluted dish soap solution mentioned earlier can work well.
- Concentration: Aim for a ratio of about 1 teaspoon of mild dish soap to 1 quart (about 1 liter) of warm water.
- Application: Lightly dampen a microfiber cloth with the solution. Wipe the greasy areas. Follow up with a cloth dampened with plain water, then dry thoroughly.
Option 2: All-Purpose Wood Cabinet Cleaner
Many commercial wood cabinet cleaner products are available. When choosing one, look for formulas specifically designed for finished wood. Avoid harsh chemicals like ammonia or bleach, which can strip the finish.
- Read Labels Carefully: Ensure the cleaner is safe for your cabinet’s finish (e.g., lacquer, varnish, polyurethanes).
- Test in an Inconspicuous Area: Always test any new cleaner on a small, hidden spot (like the inside of a door) before applying it to the entire cabinet.
- Application: Follow the product’s instructions. Typically, this involves spraying the cleaner onto a cloth, not directly onto the cabinets, and wiping the surface.
Option 3: Natural Wood Cabinet Cleaner Options
For those who prefer a more natural approach, several DIY solutions can be effective.
- Vinegar Solution (Use with Caution): White vinegar is a good degreaser, but it’s acidic. It’s best to dilute it heavily.
- Ratio: Mix 1 part white vinegar with 4-5 parts water.
- Application: Lightly dampen a cloth, wipe the greasy spots, and then immediately wipe with a plain water-dampened cloth. Crucially, follow with thorough drying. Test in an inconspicuous area first, as vinegar can dull some finishes if too concentrated or left on too long.
- Baking Soda Paste (For Stubborn Spots): For very tough, baked-on grease, a paste of baking soda and water can work.
- Preparation: Mix baking soda with just enough water to form a thick paste.
- Application: Gently apply the paste to the greasy spot with a soft cloth or sponge. Let it sit for a few minutes. Do not scrub aggressively, as baking soda is mildly abrasive. Wipe away the paste with a damp cloth and then clean the area with a mild soap and water solution. Rinse thoroughly with a water-dampened cloth and dry completely. This is best for localized, stubborn spots.
Deep Cleaning & Stain Removal
Sometimes, cabinets need more than a routine clean. This is where you might consider more specialized cabinet cleaning solutions.
Dealing with Sticky Residue
Beyond grease, sticky residue can come from spills, food products, or even old polish.
- Mild Soap and Water: Start with the mild soap and water solution.
- Mineral Spirits (For Old Polish/Wax): If a sticky residue persists and you suspect it’s from old wax or polish, mineral spirits can be effective.
- Caution: Mineral spirits are petroleum-based and can be strong. They can also strip certain finishes. Always test in an inconspicuous area first and wear gloves and ensure good ventilation.
- Application: Apply a small amount to a clean cloth and gently wipe the sticky residue. Immediately follow with a clean, damp cloth to remove the mineral spirits, and then dry thoroughly.
How to Clean Oak Kitchen Cabinets
Oak cabinets are popular due to their durability and attractive grain. However, their porous nature means they can absorb moisture if not properly sealed or maintained.
- General Cleaning: The methods described above for mild soap and water or a dedicated wood cabinet cleaner are generally safe for oak. Always wipe with the grain and dry immediately.
- Avoiding Damage: Be cautious with acidic cleaners (like undiluted vinegar) or abrasive scrubbers, as they can dull or scratch the oak’s finish. If you have unfinished or lightly sealed oak, use extra care with moisture.
Restoring Wood Kitchen Cabinets
Over time, the finish on your cabinets can wear down, leading to fading or dullness. Restoring wood kitchen cabinets can bring back their original luster.
Polishing Wood Cabinets
Polishing helps to add a protective layer and enhance the shine of your wood.
- When to Polish: Polish after cleaning, or as a maintenance step every few months.
- Types of Polish:
- Commercial Wood Polishes: Many products are available that clean and polish in one step, or can be used after cleaning. Choose one appropriate for finished wood.
- Natural Oil Polishes: For a more natural approach, a small amount of mineral oil or beeswax polish can be used.
- Mineral Oil: Apply a very thin layer to a cloth and rub into the wood. Buff off any excess with a clean cloth.
- Beeswax Polish: You can buy or make beeswax polish. Apply a thin layer, let it sit for a few minutes, then buff with a clean cloth.
- How to Polish:
- Ensure cabinets are clean and completely dry.
- Apply a small amount of polish to a soft, clean cloth.
- Rub the polish into the wood in the direction of the grain.
- Use a separate clean cloth to buff away any excess and restore shine.
Repairing Minor Scratches and Scuffs
Small imperfections can often be disguised or repaired.
- Walnut or Pecan Trick: For light scratches on wood, rubbing a walnut or pecan over the scratch can help blend it in, especially on stained wood. The oils from the nut can fill and darken the scratch.
- Wood Touch-Up Markers or Crayons: These are available in various wood tones and can be used to fill in scratches. Apply according to product directions and wipe away excess.
- Furniture Polish: Some furniture polishes contain colorants that can help mask minor scuffs.
Choosing the Best Cleaner for Your Cabinets
The best cleaner for wood cabinets depends on the type of finish and the type of dirt you’re dealing with.
Key Considerations:
- Finish Type: Is it a solid wood with a clear coat, a veneer, or painted? Most of this guide focuses on clear-coated solid wood or veneers. Painted cabinets may require specific paint-safe cleaners.
- Type of Grime: Is it dust, light smudges, heavy grease, or sticky residue?
- Natural vs. Commercial: Do you prefer a natural wood cabinet cleaner or a commercial product?
- Safety: Always prioritize safe wood cabinet cleaner options that won’t damage the finish.
What to Avoid:
- Abrasive Cleaners: Steel wool, scouring pads, or abrasive powders can scratch the finish.
- Harsh Chemicals: Bleach, ammonia, and undiluted vinegar can strip finishes or cause discoloration.
- Excessive Water: Never soak your cabinets or leave standing water on them.
- Silicone-Based Polishes: While they add shine, they can build up over time and make future refinishing difficult.
DIY Wood Cabinet Cleaner Recipes
Creating your own diy wood cabinet cleaner is simple and cost-effective.
Simple All-Purpose Cleaner
- Ingredients:
- 1 cup warm water
- 1/4 cup white vinegar OR 1 tablespoon mild dish soap
- Optional: 5-10 drops of essential oil (like lemon or lavender) for scent.
- Instructions: Combine ingredients in a spray bottle. Shake gently before each use. Always spray onto a cloth, never directly onto the cabinets.
Gentle Degreaser
- Ingredients:
- 2 cups warm water
- 1 tablespoon mild dish soap
- Instructions: Mix in a spray bottle. This is your go-to for greasy areas.
Natural Wood Polish
- Ingredients:
- 1/4 cup olive oil or mineral oil
- 1/4 cup white vinegar OR lemon juice
- Instructions: Combine in a bottle or jar. Shake well before each use. Apply a small amount to a cloth and buff. This is great for how to polish wood cabinets and add a subtle sheen.
Technique Matters: The Right Way to Clean
- Work Top to Bottom: This prevents drips from dirtying already cleaned areas.
- Clean in Sections: Don’t try to clean all cabinets at once. Work on one section or door at a time.
- Always Wipe Dry: This is the golden rule to protect your wood. Use a clean, dry microfiber cloth.
- Direction of Grain: Wipe and polish in the direction of the wood grain for the best results and to avoid microscopic scratches.
- Handle Hardware: Don’t forget to clean cabinet knobs and pulls. Use a soft cloth and appropriate cleaner for the metal. If hardware is attached to wood, be careful not to let excess moisture reach the wood.
Maintaining Your Wood Cabinets Between Deep Cleans
- Wipe Spills Immediately: Address any splatters or spills as soon as they happen.
- Ventilation: Ensure good ventilation in the kitchen, especially when cooking, to minimize grease build-up.
- Regular Dusting: A quick dust with a microfiber cloth can prevent dirt from accumulating.
Specific Cabinet Material Considerations
While this guide focuses on finished wood, it’s worth noting:
- Laminate or Thermofoil Cabinets: These often look like wood but are made of different materials. They can usually be cleaned with a damp cloth and mild soap. Avoid harsh chemicals or excessive moisture, as it can cause delamination.
- Painted Cabinets: Use mild soap and water or specialized cabinet cleaners for painted surfaces. Avoid abrasive cleaners that can dull or scratch the paint.
Troubleshooting Common Cabinet Cleaning Issues
| Issue | Cause | Recommended Solution |
|---|---|---|
| Greasy Build-up | Cooking splatters, airborne grease | Mild dish soap solution, dedicated wood degreaser, or natural wood cabinet cleaner (vinegar solution with caution). |
| Sticky Residue | Food spills, old polish | Mild soap and water, mineral spirits for stubborn residue (test first). |
| Dull Finish | Dirt accumulation, worn polish | Thorough cleaning followed by polishing with a quality wood cabinet cleaner or natural polish. |
| Water Spots | Moisture left on surface | Wipe dry immediately. For existing spots, try a light polish. |
| Fading | Sunlight exposure, age | Polish regularly. Consider UV-blocking window films if direct sunlight is an issue. |
| Minor Scratches | Daily wear and tear | Walnut trick, touch-up markers, furniture polish. |
Frequently Asked Questions (FAQ)
Q1: What is the best way to clean dark wood kitchen cabinets?
Dark wood cabinets, like mahogany or cherry, can show dust and smudges more easily. The best approach is regular dusting with a soft microfiber cloth. For cleaning, use a mild soap and water solution or a dedicated wood cabinet cleaner formulated for dark wood. Always buff dry to prevent streaks and water spots, which are more visible on dark finishes. A natural oil polish can also help maintain their deep sheen.
Q2: Can I use furniture polish on my wood kitchen cabinets?
Yes, but choose carefully. Many furniture polishes are designed to clean, shine, and protect wood. Look for products that specifically state they are safe for kitchen cabinets or finished wood furniture. Avoid those with heavy silicones if you plan to refinish them in the future. Test in an inconspicuous area first.
Q3: How do I remove water stains from wood cabinets?
Water stains, especially white rings, often mean the finish has been damaged. For very light water marks, try rubbing the spot with the soft cloth used for polishing wood cabinets. If that doesn’t work, a light application of petroleum jelly or mayonnaise left on the stain for a few hours can sometimes lift it. For deeper stains that have penetrated the finish, you may need to consult a professional or consider refinishing.
Q4: Are vinegar and water solutions safe for all wood cabinets?
While vinegar is a good degreaser, it is acidic. It’s generally safe for most finished wood cabinets when heavily diluted (1 part vinegar to 4-5 parts water) and immediately wiped dry. However, it’s always best to test in an inconspicuous area first, as it can potentially dull or strip certain finishes if used too strong or left too long. If you have delicate or antique cabinets, it’s safer to stick to mild soap and water or a specialized safe wood cabinet cleaner.
Q5: How often should I polish my wood kitchen cabinets?
You should aim to polish your wood kitchen cabinets every 3-6 months, or whenever they start to look dull after cleaning. Regular polishing adds a protective layer and helps maintain their shine and the health of the wood finish.
Q6: What’s the difference between cleaning and polishing wood cabinets?
Cleaning removes dirt, grease, and grime using a wood cabinet cleaner or soapy water. Polishing, on the other hand, applies a protective layer, enhances the shine, and can help mask minor imperfections. Polishing is typically done after cleaning to give the cabinets a final boost in appearance and protection.
By following these steps and using the right cabinet cleaning solutions, you can keep your wood kitchen cabinets looking beautiful and well-maintained for years to come. Remember, gentle, regular care is always better than harsh, infrequent deep cleaning.