
Can you add crown molding to kitchen cabinets yourself? Yes, you absolutely can! Adding crown molding to kitchen cabinets is a fantastic DIY project that can dramatically elevate your kitchen’s aesthetic, making it look more custom and finished. This guide will walk you through everything you need to know, from choosing the right molding to the final installation. This project falls under the umbrella of DIY cabinet upgrade and is a great way to enhance your kitchen cabinet finishing.
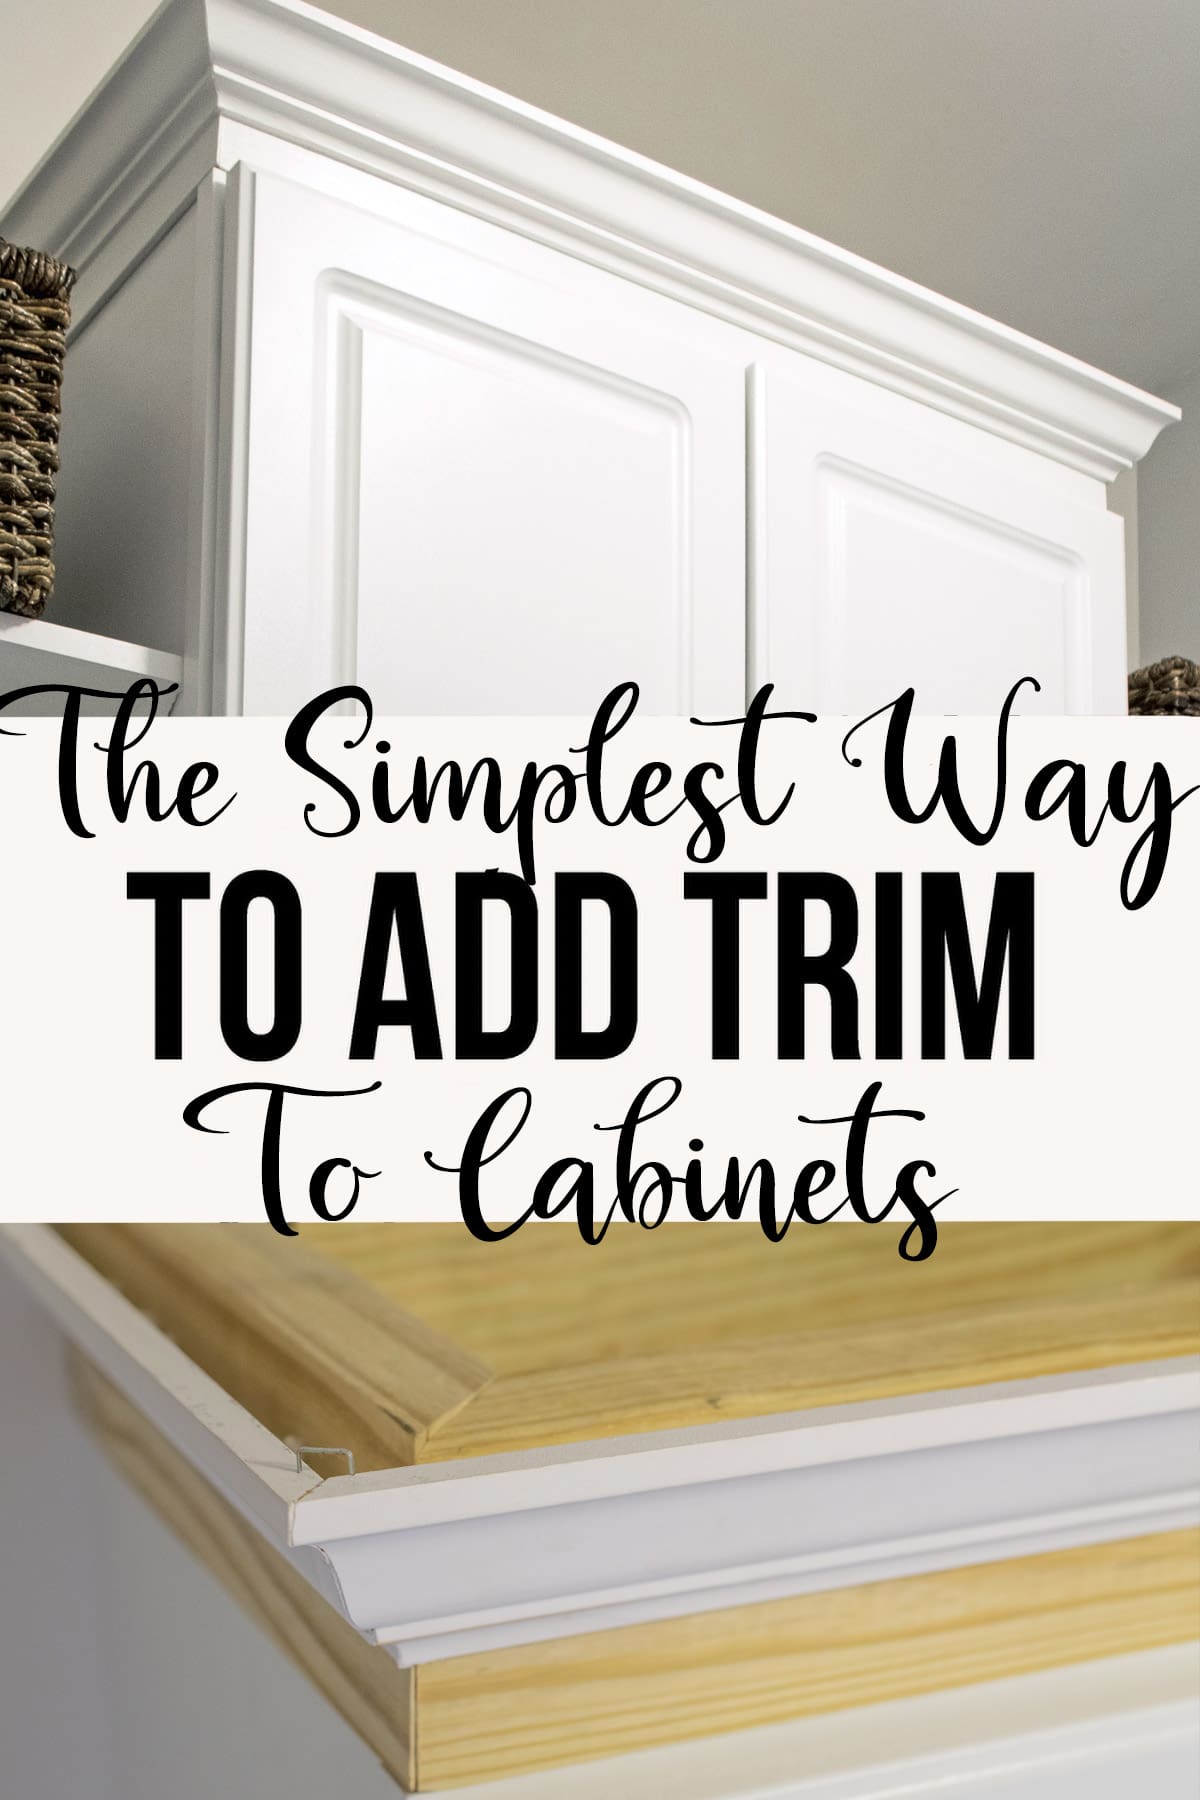
Image Source: www.cravingsomecreativity.com
Why Add Crown Molding to Kitchen Cabinets?
Crown molding is more than just decorative trim; it’s a powerful design element. When you add crown molding to kitchen cabinets, you create a visual transition between the cabinets and the ceiling. This not only adds a touch of elegance and sophistication but also makes your cabinets appear taller and more substantial. It’s a classic touch that can transform a plain cabinet set into a custom-look masterpiece. This is one of the most impactful ways of adding decorative trim to cabinets.
Types of Kitchen Cabinet Molding
Before you start, it’s important to know the different types of kitchen cabinet molding available. The right choice depends on your kitchen’s style and your personal preference.
- Simple Crown Molding: This is a basic profile that offers a clean, elegant line. It’s versatile and works well in most kitchen styles, from modern to traditional.
- Ogee Molding: This molding features a distinctive “S” curve. It adds a touch of traditional charm and is often seen in more ornate or classic kitchen designs.
- Roped Molding: As the name suggests, this molding has a rope-like texture. It adds a distinct decorative detail and is ideal for kitchens aiming for a nautical or very traditional feel.
- Dentil Molding: Dentil molding features a series of small, evenly spaced blocks. It’s a more elaborate option that makes a strong statement, best suited for grand or formal kitchens.
- Craftsman Style Molding: This style often features simpler, geometric profiles, sometimes with a slight bevel. It’s a great choice for Craftsman-style homes or kitchens seeking a more grounded, artisanal look.
- Beaded Molding: This type of molding incorporates a series of small beads along its edge, adding a subtle yet noticeable decorative element.
When selecting crown molding for kitchen cabinets, consider the scale of your kitchen and the height of your ceilings. A very ornate molding might overwhelm a small kitchen, while a simple profile might get lost in a grand, high-ceilinged space.
Materials and Tools You’ll Need
Gathering the right materials and tools is crucial for a successful kitchen cabinet crown molding installation. This is where the real DIY cabinet molding work begins.
Materials:
- Crown Molding: Choose the style and material (wood, MDF, or polymer) that best suits your kitchen. You’ll need to measure your cabinets carefully to calculate the total linear footage required. Always buy a little extra (about 10-15%) to account for mistakes and miter cuts.
- Wood Glue: For securing pieces together and reinforcing joints.
- Finishing Nails: Small nails (e.g., 1-inch or 1 1/4-inch brad nails) for attaching the molding.
- Wood Filler or Caulk: For filling nail holes and gaps for a seamless finish.
- Primer and Paint (or Stain and Sealer): To match or complement your existing cabinets.
- Sandpaper: Various grits (e.g., 120, 180, 220) for smoothing.
- Tack Cloth: For removing dust after sanding.
- Rag or Tack Cloth: For cleaning surfaces.
Tools:
- Miter Saw: Essential for making precise angled cuts. A compound miter saw is ideal for crown molding as it can tilt to create compound miter cuts.
- Measuring Tape: For accurate measurements.
- Pencil: For marking cuts and locations.
- Stud Finder: To locate wall studs for secure attachment.
- Level: To ensure the molding is straight.
- Nail Gun (Brad Nailer): Highly recommended for driving nails cleanly and efficiently. If you don’t have one, a hammer and nail set will work, but it’s more challenging.
- Safety Glasses: Always wear safety glasses when cutting or nailing.
- Dust Mask: To protect yourself from sawdust.
- Clamps: To hold molding pieces in place while glue dries or for precise joint assembly.
- Caulking Gun: For applying caulk.
- Putty Knife: For applying wood filler.
Planning and Measuring Your Kitchen Cabinet Crown Molding
Accurate planning and measuring are the cornerstones of a successful DIY cabinet molding project. Don’t rush this step!
1. Measure Your Cabinets:
- Measure the total length of the top of each cabinet run.
- Measure the depth of the cabinets if you plan to wrap molding around the sides.
- Account for any gaps between cabinets or at corners.
2. Account for Angles and Corners:
- Inside Corners: These require a 45-degree miter cut on each piece of molding, with the inside edge of the molding being longer.
- Outside Corners: These also require 45-degree miter cuts, but the outside edge of the molding will be longer.
- Ceiling Angle: If your ceiling isn’t perfectly flat or has an angle, you’ll need to account for this. However, for most standard kitchen cabinet installations, you’ll be working with 90-degree angles at the cabinet top.
3. Determine Molding Length:
- Add up all your measurements.
- Add approximately 10-15% extra for waste, mistakes, and to ensure you have enough for complex cuts.
Table: Estimating Molding Needs
| Cabinet Section | Length (inches) | Extra for Waste (15%) |
|---|---|---|
| Upper Cabinet Run 1 | 72 | 10.8 |
| Corner Turn | N/A | N/A |
| Upper Cabinet Run 2 | 96 | 14.4 |
| Total Estimated | 168 inches | 25.2 inches |
| Total Required | 193.2 inches | ~ 16 feet |
Note: This is a simplified example. Always measure your specific kitchen.
Preparing the Cabinets and Molding
Proper preparation ensures a smooth and professional-looking finish. This is a critical part of kitchen cabinet finishing.
Preparing the Cabinets:
- Clean the Cabinet Tops: Remove any dust, grease, or debris from the top edges of your cabinets. A clean surface ensures good adhesion for glue and caulk.
- Inspect for Gaps: Check for any unevenness or gaps between the cabinets and the ceiling. You may need to fill small gaps with caulk or wood filler before installing the molding.
- Consider Cabinet Door Clearance: Ensure the molding you choose won’t interfere with the opening of cabinet doors or drawers, especially if they are close to the top.
Preparing the Molding:
-
Cut Your Molding Pieces: This is the most crucial step. Familiarize yourself with how to cut crown molding on your miter saw.
- Standard 45-Degree Miter: For a 90-degree corner, cut each piece at a 45-degree angle.
- Compound Miter Cuts: For crown molding, you’ll often use compound miter cuts. This means the blade is angled (bevel) and the saw itself is angled (miter). The easiest way to learn this is to place the molding upside down and backward on the saw base, as it will sit in its final position. Consult your miter saw manual for specific instructions.
Table: Crown Molding Cutting Angles (Common Scenario: Molding against wall & ceiling)
Cut Type Miter Angle Bevel Angle How to Set Saw (Example) Inside Corner 45° 33.9° Tilt saw 33.9°, Miter 45° (Left for right-side cut) Outside Corner 45° 33.9° Tilt saw 33.9°, Miter 45° (Right for left-side cut) Note: These angles (33.9°) are typical for standard 38° base molding to ceiling molding profiles. Always test cuts on scrap pieces.
-
Test Fit: After cutting your first pieces, test fit them in the corner. This helps you adjust the angles if needed before cutting all your pieces.
Installing Crown Molding to Kitchen Cabinets: Step-by-Step
This is where the magic happens, transforming your cabinets with decorative cabinet edges. This is a key part of kitchen cabinet crown molding installation.
Step 1: Cut the First Piece
- Measure the length of the first cabinet run.
- Set your miter saw to the correct angle for your inside or outside corner (usually 45 degrees for a 90-degree corner).
- Cut your first piece of molding. Remember to account for the width of the molding itself when measuring.
Step 2: Cut the Second Piece
- Measure the length for the next section.
- Cut the second piece of molding, ensuring the miter angle is correct to meet the first piece at the corner. For an inside corner, the cut will be opposite of the first piece. For an outside corner, the cut will mirror the first.
Step 3: Apply Glue and Nail the First Corner
- Apply a thin bead of wood glue along the mitered edge of one of the pieces.
- Carefully position the molding pieces against the cabinet tops.
- Use your nail gun to drive finishing nails through the molding and into the cabinet top. Space nails about 12-16 inches apart. If your cabinets are not securely fastened to the wall, you may need to nail into wall studs where possible.
- Ensure the molding is flush against the cabinet and ceiling.
Step 4: Continue Installing Along the Runs
- Measure and cut subsequent pieces of molding.
- For straight runs, you’ll typically use straight cuts (90 degrees) or bevels to meet the cabinet edge. Some styles might require a slight bevel to sit flush against the wall or ceiling.
- Apply wood glue to mitered joints between pieces.
- Nail each piece securely into the cabinet tops or into wall studs. Use a level to ensure each piece is straight.
Step 5: Handling Corners and Joints
- Inside Corners: Place the first piece with its back against the ceiling. Cut at 45 degrees. Place the second piece with its back against the ceiling. Cut at 45 degrees so the edges meet cleanly.
- Outside Corners: Place the first piece with its back against the ceiling. Cut at 45 degrees. Place the second piece with its back against the ceiling. Cut at 45 degrees so the edges meet cleanly.
- Joining Straight Runs: If you’re joining two pieces of molding in a straight run, you can often use a simple butt joint (cut ends square) or a scarf joint (a long, angled cut that overlaps) for a stronger, less visible seam, especially on very long runs. For cabinets, butt joints are usually sufficient.
Step 6: Finishing Touches
- Fill Nail Holes: Once the glue is dry, use wood filler or a good quality caulk to fill all nail holes.
- Fill Gaps: Apply caulk to any small gaps between the molding and the cabinet or ceiling for a seamless look. Use a damp cloth or your finger to smooth the caulk.
- Sand: Once the wood filler is dry, lightly sand any rough spots or excess filler smooth. Use a fine-grit sandpaper (220 grit) for this.
- Clean: Wipe away all dust with a tack cloth.
Painting or Staining Your New Molding
This step finalizes your DIY cabinet upgrade and is a crucial part of kitchen cabinet finishing.
Painting:
- Prime: Apply a coat of primer to the molding. This helps the paint adhere better and provides a uniform base.
- Paint: Apply two thin coats of your chosen paint color. Allow each coat to dry completely according to the manufacturer’s instructions.
- Touch-ups: Make any necessary touch-ups.
Staining:
- Prep for Stain: If you’re staining, ensure the wood is clean and free of any dust or filler residue.
- Apply Stain: Apply your chosen wood stain according to the manufacturer’s directions.
- Seal: Once the stain is dry, apply a clear protective topcoat, such as polyurethane or a varnish. This will protect the finish and add durability.
Troubleshooting Common Issues
Even with the best preparation, you might encounter a few snags. Here’s how to handle them:
- Molding Won’t Sit Flush: This can be due to an uneven cabinet top, wall, or ceiling. You might need to use shims behind the molding or more caulk to fill the gap. Test your cuts on scrap wood first.
- Gaps in Corners: If your miter cuts aren’t perfect, small gaps can appear. Use a good quality wood filler or a color-matched caulk to fill these before painting. For larger gaps, you might need to recut the molding.
- Nails Splitting the Molding: Use smaller gauge nails (like brad nails) and consider pre-drilling pilot holes for stubborn wood. If using a nail gun, ensure the pressure isn’t too high.
- Molding Falling Off: Ensure you are nailing into solid material (cabinet carcasses or wall studs). Wood glue significantly increases the strength of the joints.
Frequently Asked Questions (FAQ)
Q1: What is the best type of wood for kitchen cabinet crown molding?
A1: Hardwoods like maple, oak, or cherry are excellent choices for durability and appearance. Pine is a more affordable option but can be softer. MDF is also popular as it’s stable and takes paint well, but it’s not ideal for staining.
Q2: Can I use a different angle than 45 degrees for my corners?
A2: While 45 degrees is standard for a 90-degree corner, if your walls or cabinets are not square, you might need to adjust the angle. Measure the actual corner angle and divide by two for your miter saw setting.
Q3: How do I attach crown molding to cabinets that don’t reach the ceiling?
A3: You will attach the molding directly to the top edge of the cabinets. Ensure you are nailing securely into the cabinet structure. If there’s a gap above, you can add a filler strip or simply caulk the seam.
Q4: Do I need to remove cabinet doors for this project?
A4: It’s often easier to remove cabinet doors, especially if they are close to the top edge where you’ll be working. This gives you better access and prevents accidental damage.
Q5: How much molding do I need?
A5: Measure the total linear feet of your cabinet tops, add about 10-15% for waste and error. It’s always better to have a little extra than to run out.
Q6: What’s the difference between crown molding and cabinet trim?
A6: Crown molding is a specific type of decorative molding that typically sits at the angle between walls and ceilings. Cabinet trim is a broader term that can include various decorative profiles applied to cabinets, including crown molding, but also valances, light rails, and applied molding. Adding crown molding to kitchen cabinets is a specific application of cabinet trim installation.
Q7: How do I get a seamless finish when joining molding pieces?
A7: Use wood glue on all mitered joints. For long runs, a scarf joint (a long, angled cut that overlaps) can provide a stronger and less noticeable seam than a butt joint. After installation, fill nail holes and any small gaps with wood filler or caulk and sand smooth.
Q8: Can I apply crown molding directly to drywall ceilings?
A8: Yes, if your cabinets are installed flush against a wall that meets a drywall ceiling, you can extend the crown molding to meet the ceiling. Ensure you locate ceiling joists for secure fastening if the molding is heavy. For cabinet-specific molding, attachment to the cabinet structure is primary.
Adding crown molding to your kitchen cabinets is a rewarding DIY project that offers a significant aesthetic upgrade. By following these steps, using the right tools, and taking your time with measurements and cuts, you can achieve a professional, custom look that enhances your kitchen’s overall design. This DIY cabinet upgrade is a fantastic way to add decorative trim to cabinets and elevate your kitchen’s style.