
Image Source: i.ytimg.com
How To Replace Kitchen Sink Drain: Step-by-Step Guide
Can I replace a kitchen sink drain myself? Yes, you can absolutely replace a kitchen sink drain yourself with some basic tools and a little patience. It’s a common DIY plumbing task that can save you money on a plumber. This guide will walk you through everything you need to know about replacing your kitchen sink drain, from gathering supplies to completing the job.
Replacing a worn-out or clogged kitchen sink drain is a manageable home improvement project. Whether your current setup is leaking, constantly getting blocked, or you simply want to upgrade your kitchen sink strainer, this step-by-step process will help you get the job done right. We’ll cover everything from removing the old drain to installing a new one, including dealing with various plumbing drain parts that make up your kitchen sink plumbing.
Tools and Materials You’ll Need
Before you start, gather these essential tools and materials. Having everything ready will make the process smoother and faster.
- New Sink Drain Assembly: This usually includes the drain flange (the part that sits inside the sink) and the tailpiece. Make sure it’s compatible with your sink’s material and thickness.
- Plumber’s Putty or Silicone Sealant: To create a watertight seal between the drain flange and the sink.
- Adjustable Wrench or Pipe Wrench: For tightening and loosening nuts.
- Bucket: To catch any residual water.
- Rag or Old Towels: For wiping up spills.
- Screwdriver (Phillips and Flathead): For loosening or tightening any mounting screws.
- Safety Glasses: To protect your eyes from debris and water.
- Gloves: To keep your hands clean and protected.
- Pliers: Sometimes needed for stubborn parts.
- Thread Seal Tape (Pipe Dope): For sealing threaded connections.
- Optional: Putty Knife: To scrape away old putty or sealant.
- Optional: Metal File: To smooth any rough edges on the sink opening if needed.
- Optional: Drain Trap Replacement Parts: If you’re also replacing the P-trap or drain pipes.
Step 1: Prepare the Work Area and Shut Off Water
Safety first! Before you begin any plumbing work, it’s crucial to prepare your space and ensure there’s no water flowing.
- Clear Under the Sink: Remove everything from the cabinet beneath your kitchen sink. This will give you plenty of room to work and prevent items from getting wet or damaged.
- Place a Bucket: Position a bucket directly under the existing drain assembly and the P-trap (the U-shaped pipe). This will catch any water that’s still in the pipes.
- Shut Off Water Supply: Locate the hot and cold water shut-off valves under the sink. These are typically small knobs or levers connected to the pipes coming from the wall. Turn them clockwise until they are tightly closed.
- Test the Shut-Off: Turn on the faucet to drain any remaining water from the lines and to confirm that the shut-off valves are working correctly. No water should come out of the faucet after a few seconds.
Step 2: Disconnect the Existing Drain Assembly
Now it’s time to tackle the old drain. This usually involves disconnecting the P-trap and then detaching the drain body from under the sink.
Step 2.1: Detach the P-Trap
The P-trap is the curved section of pipe that prevents sewer gases from entering your home.
- Loosen the Slip Nuts: The P-trap is typically held in place by two large slip nuts. These are usually made of plastic or metal. Use your adjustable wrench or pliers to loosen these nuts. Turn them counter-clockwise. Be prepared for some water to drip out, even after shutting off the main supply.
- Remove the P-Trap: Once the slip nuts are loose enough, you should be able to gently pull the P-trap away from the tailpiece (the straight pipe extending down from the sink drain) and the drainpipe leading to the wall. If it’s stuck, you might need to wiggle it gently or use a bit more force with your wrench.
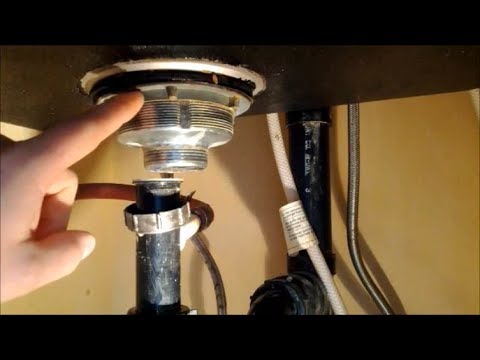
Step 2.2: Remove the Drain Body from Under the Sink
This is the part that directly connects to your sink.
- Locate the Mounting Nut: Underneath the sink, you’ll see a large nut (often a locknut) that holds the drain assembly to the sink.
- Loosen the Mounting Nut: Use your adjustable wrench or pipe wrench to loosen this nut. Turn it counter-clockwise. This nut can sometimes be difficult to reach or stuck due to corrosion or old plumber’s putty. If it’s stubborn, you might need to apply a penetrating lubricant and let it sit for a few minutes.
- Remove the Old Drain Flange: Once the mounting nut is removed, the entire drain assembly should be loose. From underneath the sink, push upwards on the tailpiece. The old drain flange inside the sink should now be free. You can lift it out from the top of the sink.
- Clean the Sink Opening: Use a putty knife or scraper to remove any old plumber’s putty, sealant, or debris from the sink opening. A clean surface is essential for a good seal with the new drain.
Step 3: Install the New Sink Drain Assembly
This is where you’ll be installing the new kitchen sink basket strainer and the rest of the sink drain assembly.
Step 3.1: Prepare the New Drain Flange
The drain flange is the visible part inside your sink.
- Apply Plumber’s Putty or Sealant: Take a generous amount of plumber’s putty (or silicone sealant, depending on your preference and the type of sink) and roll it into a rope about 1/2 inch thick.
- Wrap the Flange: Carefully press this rope of putty around the underside of the new drain flange. Make sure it forms a continuous, unbroken ring. This will create the watertight seal between the flange and your sink. If using silicone, apply a bead around the underside of the flange.
Step 3.2: Insert the New Drain Flange into the Sink
- Position the Flange: Carefully push the prepared drain flange down into the drain opening from the top of the sink. Ensure it’s seated properly. The holes for the mounting screws should align correctly.
Step 3.3: Install the Strainer Body and Mounting Hardware
This is the core of how to install sink drain.
- Assemble the Under-Sink Components: From under the sink, slide the rubber gasket, followed by the metal washer and then the locknut onto the threaded tailpiece of the drain assembly.
- Thread the Locknut: Thread the locknut onto the tailpiece.
- Tighten the Locknut: Hand-tighten the locknut as much as you can. Then, use your adjustable wrench to tighten it another quarter to half turn. Be careful not to overtighten, as this can crack porcelain sinks or strip the threads. The goal is to compress the plumber’s putty and create a firm, watertight seal.
- Wipe Away Excess Putty: From inside the sink, carefully wipe away any excess plumber’s putty that squeezed out around the flange.
Step 3.4: Attach the Tailpiece (if separate)
Some sink drain assemblies come with a separate tailpiece that screws into the drain body.
- Apply Thread Seal Tape: If your tailpiece has threaded connections, wrap the threads with thread seal tape (pipe dope) in a clockwise direction. This helps ensure a watertight seal.
- Screw on the Tailpiece: Screw the tailpiece onto the drain body. Tighten it securely with your wrench, but again, avoid overtightening.
Step 4: Reconnect the Plumbing Drain Parts
Now you need to reconnect the P-trap and any other plumbing drain parts.
Step 4.1: Reattach the P-Trap
- Align the P-Trap: Position the P-trap under the tailpiece and align it with the drainpipe going into the wall.
- Secure the Slip Nuts: Slide the slip nuts and washers onto the pipes. Hand-tighten them first, then use your wrench to tighten them securely. Ensure the washers are seated correctly.
Step 4.2: Reconnect Other Under Sink Plumbing (if necessary)
If you’ve had to disconnect other parts of your kitchen sink plumbing, reconnect them now, ensuring all connections are snug. This might involve connecting the tailpiece to a garbage disposal or other drain lines.
Step 5: Test for Leaks
This is the most important step to ensure your DIY sink drain replacement was successful.
- Remove the Stopper: Make sure the drain stopper isn’t in place.
- Turn On Water Slowly: Slowly turn the hot and cold water shut-off valves back on.
- Fill the Sink: Place the drain stopper in the sink and fill the sink with a few inches of water.
- Check All Connections: With the sink filled, carefully inspect all the connections you made under the sink. Look and feel for any drips or leaks around the mounting nut, the P-trap connections, and any other joints.
- Drain the Sink: Once you’re confident there are no leaks, remove the stopper and let the sink drain. Watch the drain pipes and connections again as the water flows through.
- Tighten if Needed: If you find any small drips, try tightening the suspect connection slightly. If a leak persists, you may need to disassemble that section, reapply plumber’s putty or sealant, and reassemble.
Step 6: Final Touches and Cleanup
- Clean Up: Wipe down any spilled water or debris under the sink.
- Replace Items: Put back any items you removed from the cabinet.
- Test Faucet Operation: Run both hot and cold water through the faucet to ensure everything is working correctly.
Troubleshooting Common Issues
Even with careful work, you might encounter a few snags. Here are some common problems and how to fix them.
Leaky Drain Flange
- Cause: Insufficient plumber’s putty, overtightened locknut (cracking the sink), or an uneven sink surface.
- Solution: If it’s a minor drip, try tightening the locknut slightly. If that doesn’t work, you’ll likely need to remove the drain assembly, clean off the old putty, reapply fresh plumber’s putty or silicone, and re-tighten the locknut.
Leaky P-Trap Connections
- Cause: Loose slip nuts, damaged washers, or debris on the pipe threads.
- Solution: Tighten the slip nuts. If they are already tight, disassemble the connection, check the plastic or rubber washers for damage, clean the pipe threads, and reassemble. Ensure the washers are seated correctly inside the nuts.
Stubborn Mounting Nut
- Cause: Corrosion, old hardened putty, or mineral buildup.
- Solution: Apply a penetrating lubricant like WD-40 and let it soak in for 15-30 minutes. Tap the nut gently with a wrench to help break the seal. Use a pipe wrench for better grip if an adjustable wrench slips. If it’s a plastic nut on a porcelain sink, be very careful not to apply too much force.
Slow Draining After Installation
- Cause: This might indicate a clog further down the drain line or that a piece of debris was pushed into the pipe during installation.
- Solution: Try running hot water and then using a plunger. If that doesn’t work, you may need to disassemble the P-trap again to check for obstructions.
Replacing Sink Pipe vs. Sink Drain Assembly
It’s important to distinguish between replacing the sink drain assembly (which includes the flange and the part directly under the sink) and replacing the sink pipe (which generally refers to the tailpiece or the pipes that connect to the P-trap).
- Sink Drain Assembly: This is what we’ve primarily focused on – the flange inside the sink and the component directly beneath it. It’s responsible for sealing the sink opening and channeling water into the drainpipe.
- Sink Pipe: This can refer to several things:
- Tailpiece: The straight pipe that extends downwards from the sink drain assembly. This is often replaced as part of the drain assembly.
- P-Trap: The U-shaped pipe designed to hold water and prevent sewer gas odors. This can be replaced independently if it’s cracked or leaking.
- Drainpipe to Wall: The pipe that connects the P-trap to your home’s main drainage system. Replacing this is a more involved job and might require a plumber depending on the complexity.
Our guide covers the replacement of the sink drain assembly and the common under sink plumbing parts like the tailpiece and P-trap connections. If you have a severely corroded or damaged pipe leading into the wall, that task might be beyond a basic DIY repair.
Choosing the Right Kitchen Sink Strainer
The term “kitchen sink strainer” can sometimes refer to the removable basket that catches food debris, or it can refer to the entire drain assembly. When we talk about a “kitchen sink basket strainer,” we often mean that removable basket.
When selecting a new drain assembly, consider:
- Material: Stainless steel is durable and resists corrosion. Brass is also a good option but can be more expensive. Plastic is the most affordable but may not be as long-lasting.
- Finish: Match the finish to your faucet and sink accessories (e.g., brushed nickel, chrome, oil-rubbed bronze).
- Type: Some strainers have a simple stopper, while others have a more robust basket with a lift-and-turn mechanism.
- Sink Compatibility: Ensure the flange size fits your sink’s drain opening. Most standard kitchen sinks use a 3.5-inch opening.
FAQ
Q1: How often should I replace my kitchen sink drain?
A1: There’s no set schedule, but you should consider replacing it if you notice persistent leaks, slow draining that isn’t due to a clog, corrosion, or if the existing one is damaged.
Q2: Do I need special tools for replacing a sink drain assembly?
A2: No, you can typically get by with common household tools like an adjustable wrench, pliers, and screwdrivers. A pipe wrench can be helpful for stubborn nuts.
Q3: What’s the difference between plumber’s putty and silicone sealant for sinks?
A3: Plumber’s putty is a pliable clay-like substance that creates a watertight seal and is ideal for metal and ceramic fixtures. Silicone sealant is a flexible, waterproof adhesive that works well on a variety of materials, including some plastics and porous surfaces. Always check the manufacturer’s recommendation for your specific sink and drain assembly.
Q4: Can I replace the drain without disconnecting the P-trap?
A4: It’s usually much easier and cleaner to disconnect the P-trap. Trying to remove the drain assembly without doing so can be awkward and lead to more mess.
Q5: What if my new drain assembly doesn’t come with a tailpiece?
A5: Many drain assemblies are sold as a complete unit including the tailpiece. If yours doesn’t, you’ll need to purchase a compatible tailpiece and potentially a slip-joint extension tube separately. Ensure all parts fit together correctly.
Q6: My sink is old and the drain opening looks a bit rough. What should I do?
A6: If the drain opening has burrs or rough edges, gently smooth them with a metal file after removing the old drain. This will help ensure a better seal for the new kitchen sink strainer.
By following these steps, you can confidently tackle the DIY sink drain replacement project and keep your kitchen plumbing in good working order.