
Can you refinish kitchen cabinets yourself? Absolutely! Refinishing kitchen cabinets is a rewarding DIY project that can dramatically update your kitchen’s look without the high cost of replacement. This comprehensive guide will walk you through every step, from initial cleaning to the final protective coat, making your DIY kitchen cabinet update a success. We’ll cover everything you need to know for kitchen cabinet restoration, whether you’re planning to paint or stain your cabinets.
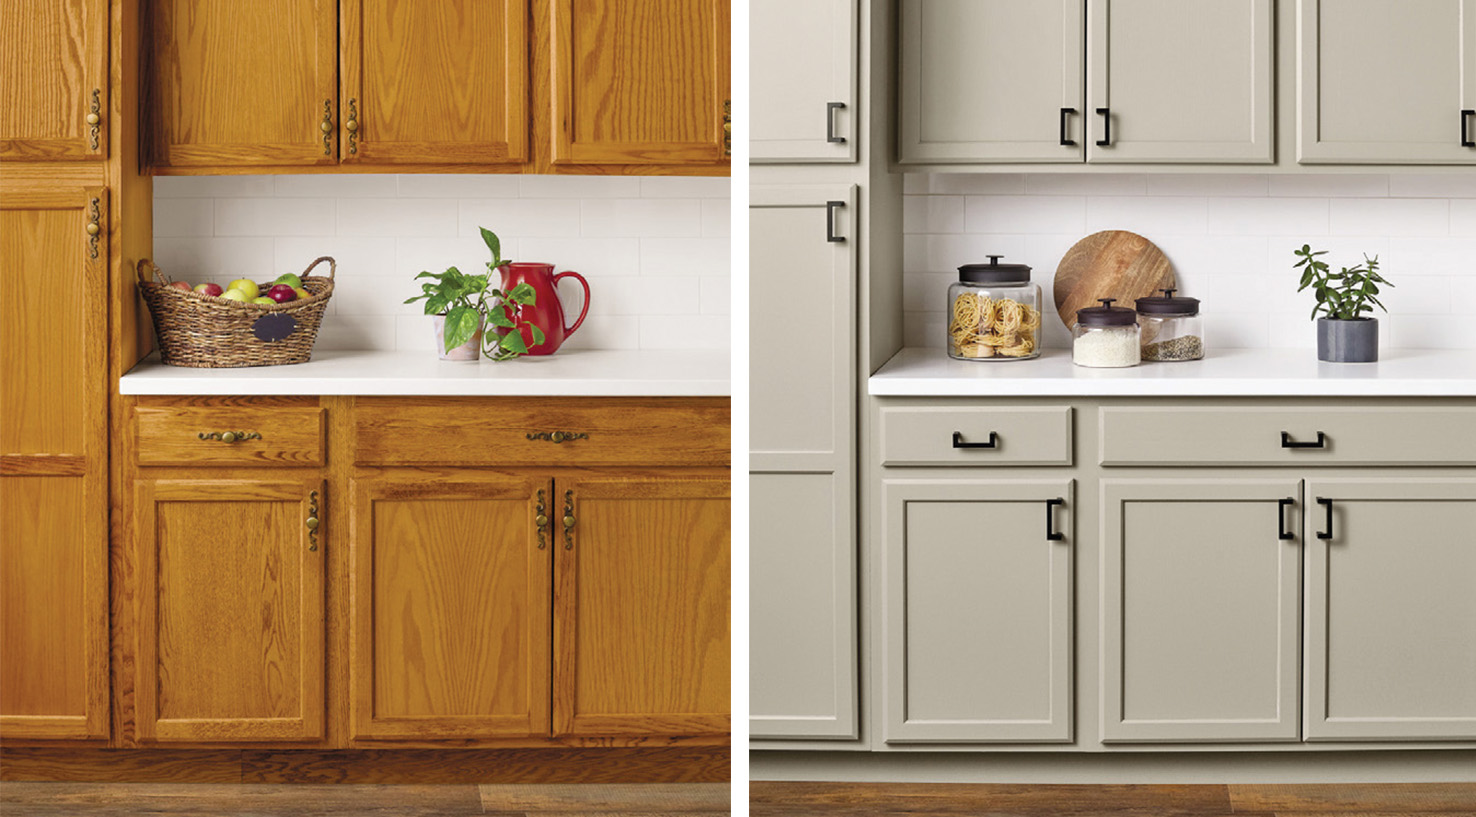
Image Source: swppc.com
Why Refinish Your Kitchen Cabinets?
Refinishing cabinets is a fantastic way to:
- Save Money: New cabinets are expensive. Refinishing breathes new life into your existing ones for a fraction of the cost.
- Transform Your Kitchen: A fresh coat of paint or stain can completely change the feel of your kitchen.
- Customize Your Style: Choose colors and finishes that perfectly match your aesthetic.
- Improve Durability: Applying a fresh, quality finish can protect your cabinets from wear and tear.
- Boost Home Value: Updated kitchens are a major selling point.
Planning Your Cabinet Refinishing Project
Before you start, proper planning is key. This will save you time, frustration, and ensure a professional-looking result.
Assessing Your Current Cabinets
First, take a good look at your existing cabinets. What are they made of? What is their current finish?
- Wood Type: Are they solid wood (oak, maple, cherry, pine), veneer, or laminate? Solid wood and veneer are generally excellent candidates for refinishing. Laminate can be tricky, but some products are designed for it.
- Current Finish: Is it paint, stain, or varnish? This will determine the stripping old cabinet finish methods you might need.
- Condition: Are there deep scratches, gouges, or missing veneer? Minor imperfections can often be repaired during the refinishing process.
Deciding on Your Finish: Paint vs. Stain
This is a big decision that impacts the entire process and the final look.
- Painting: Offers a vast range of color options, from crisp whites and bold blues to subtle grays. It’s excellent for covering wood grain and can create a very modern or farmhouse look. Cabinet painting techniques are crucial here for a smooth, durable finish.
- Staining: Enhances the natural beauty of wood grain. It offers a warm, classic look. You can choose from a wide spectrum of kitchen cabinet stain colors, from light honey tones to deep espresso. Refinishing wood cabinets with stain highlights their inherent charm.
Gathering Your Cabinet Refinishing Supplies
Having the right cabinet refinishing supplies on hand will make the job much smoother. Here’s a comprehensive list:
- For Cleaning and Prepping:
- Degreaser or TSP (Trisodium Phosphate) substitute
- Clean rags or sponges
- Mild dish soap and water
- Screwdrivers (to remove hardware)
- Putty knife or scraper
- Wood filler or putty
- Sandpaper (various grits: 100, 150, 220, and possibly finer for between coats)
- Sanding block or electric sander (orbital or detail sander)
- Tack cloths
- For Stripping (If Necessary):
- Chemical paint stripper (gel or liquid)
- Scrapers (plastic and metal)
- Steel wool (fine grade)
- Mineral spirits or denatured alcohol for cleanup
- Safety gear: gloves, eye protection, respirator/mask
- For Priming:
- High-quality primer (adhesion primer for difficult surfaces like laminate, oil-based for stain blocking, or water-based for general use)
- Paintbrushes (good quality synthetic for latex, natural for oil-based)
- Foam rollers or high-density mini-rollers
- For Painting:
- Cabinet-grade paint (alkyd enamel for durability, or a high-quality latex acrylic enamel)
- Paint trays and liners
- Paintbrushes (angled sash brushes are great for detail)
- Foam rollers or high-density mini-rollers
- Paint sprayer (optional, for a very smooth finish)
- For Staining:
- Wood conditioner (especially for pine or blotch-prone woods)
- Wood stain in your chosen kitchen cabinet stain colors
- Clean, lint-free rags or foam applicators for stain
- Pre-stain wood brightener (optional)
- Topcoat/Sealer (polyurethane, polycrylic, or lacquer)
- Fine-grit sandpaper (220-320 grit) for sanding between coats
- Applicators for topcoat (brushes, rollers, or sprayers)
- General:
- Drop cloths or plastic sheeting
- Painter’s tape
- Cardboard or painting shields
- Good lighting
Step-by-Step Guide to Refinishing Kitchen Cabinets
This is where the real work begins! Follow these steps carefully for the best results.
Step 1: Detach and Organize
- Remove Doors and Drawers: Use a screwdriver to remove cabinet doors and drawer fronts.
- Label Everything: Use masking tape and a pen to label each door and drawer with its location (e.g., “Upper Left,” “Drawer Middle”). This is crucial for putting everything back correctly.
- Remove Hardware: Unscrew hinges, knobs, and pulls. Keep them organized, perhaps in labeled bags.
Step 2: Thorough Kitchen Cabinet Cleaning and Prepping
This is arguably the most important step for a long-lasting finish. Grime, grease, and residue will prevent new paint or stain from adhering properly.
- Degrease: Mix a solution of mild dish soap and warm water, or use a TSP substitute. Wipe down all cabinet surfaces, doors, and drawer fronts thoroughly to remove grease and dirt. For heavily soiled cabinets, a dedicated degreaser is recommended.
- Rinse: Wipe down all surfaces again with a clean, damp cloth to remove any soap residue.
- Dry: Allow all surfaces to dry completely.
Step 3: Sanding for Adhesion
Sanding creates a smooth surface and roughens the existing finish just enough for the new coat to adhere well.
- Initial Sanding: Start with a medium-grit sandpaper (around 100-150 grit) to scuff up the existing finish. If you are refinishing wood cabinets that are already painted or stained, this step is vital.
- Smooth the Surface: Progress to a finer grit (220 grit) for a smoother finish. You don’t need to remove the old finish entirely unless it’s peeling or damaged. The goal is to create a dull surface.
- Sand Drawer Fronts and Doors: Pay attention to all surfaces, edges, and details.
- Clean Dust: After sanding, use a vacuum with a brush attachment to remove most of the dust. Then, wipe down all surfaces with a tack cloth to pick up any remaining fine dust particles. This is essential for a smooth, professional finish.
Step 4: Repairing Imperfections
Now is the time to fix any dings, dents, or scratches.
- Fill Holes and Cracks: Use wood filler or putty to fill any holes (from hardware, for example) or cracks.
- Level the Surface: Once the filler is dry, sand it smooth so it’s flush with the surrounding surface. Use your 220-grit sandpaper.
- Fill Dents: For minor dents, you can sometimes use a damp cloth and an iron to swell the wood fibers, then let it dry and sand lightly.
Step 5: Stripping Old Cabinet Finish (If Necessary)
If your cabinets have a thick, chipped, or peeling finish, or if you want to switch from paint to stain and the existing paint is dark, you might need to strip the old finish. This is a more labor-intensive step.
- Choose a Stripper: Gel strippers are often easier to control and less messy than liquid ones. Always follow the manufacturer’s instructions carefully.
- Apply Stripper: Brush on a thick, even coat of stripper. Work in small sections.
- Wait: Allow the stripper to work for the time recommended on the product label. You’ll see the finish start to bubble or lift.
- Scrape: Use a scraper (plastic is less likely to damage wood) to gently lift the softened finish. Steel wool can be used for intricate areas, but be careful not to scratch the wood.
- Clean Residue: Once the bulk of the finish is removed, wipe the cabinets down with mineral spirits or denatured alcohol to remove any remaining stripper residue. You may need to repeat this process for stubborn finishes.
- Final Sanding: After stripping and cleaning, you’ll likely need to sand again (150-220 grit) to ensure all residue is gone and the wood is smooth.
Step 6: Priming for a Flawless Finish
Primer is essential, especially if you’re painting. It helps the paint adhere, provides a uniform base color, and blocks stains from bleeding through.
- Choose Your Primer:
- Oil-based primer: Excellent for stain blocking and adhesion, but can have strong fumes and requires mineral spirits for cleanup.
- Water-based (latex/acrylic) primer: Easier cleanup, lower VOCs, and good for most applications. Look for a good quality acrylic enamel primer.
- Adhesion primer: Crucial if you’re painting over laminate or a very slick surface.
- Application:
- Brush: Use a good quality synthetic brush for water-based primers and latex paints. Use a natural bristle brush for oil-based products.
- Roller: Foam rollers or high-density mini-rollers provide a smooth finish.
- Sprayer: For the smoothest, most professional finish, a paint sprayer is ideal, but it requires practice and careful masking.
- Apply Thin Coats: Apply a thin, even coat of primer. Avoid drips and runs.
- Sand Between Coats: Once the primer is completely dry (check the can for drying times), lightly sand with 220-grit sandpaper or fine steel wool. This smooths out any brush marks or imperfections and provides a better surface for the next coat.
- Wipe Clean: Use a tack cloth to remove all dust after sanding.
- Second Coat (Optional): For dark woods or if you want to ensure complete stain blocking, a second coat of primer might be beneficial.
Step 7: Applying Your Chosen Finish
This is where your cabinets start to look transformed!
Cabinet Painting Techniques
If you’ve chosen to paint:
- Choose Your Paint: Cabinet-grade enamel paints (alkyd or high-quality latex acrylic) are best for durability and washability.
- Apply Thin, Even Coats: Just like primer, multiple thin coats are better than one thick coat.
- Brushing: Use long, even strokes. Work with the grain. For doors and drawer fronts, paint the edges and then the faces.
- Rolling: Use a high-density foam roller for a smooth, brushed-look finish. Avoid overworking the paint.
- Spraying: If using a sprayer, follow the manufacturer’s instructions for thinning the paint and maintaining the correct distance.
- Drying Time: Allow adequate drying time between coats as recommended by the paint manufacturer. This is crucial for durability.
- Sanding Between Coats: Lightly sand with 220-grit sandpaper or fine steel wool after each coat of paint. Wipe with a tack cloth. This creates a perfectly smooth surface for the next layer.
- Number of Coats: You’ll likely need 2-3 coats of paint for good coverage and durability.
How to Paint Kitchen Cabinets for a Smooth Finish
To achieve that coveted smooth, factory-like finish when painting:
- Proper Prep is Key: We’ve covered this extensively, but it can’t be stressed enough.
- Use Quality Products: Invest in good quality primer and paint specifically designed for cabinets.
- Consider a Sprayer: While not for everyone, a sprayer offers the most consistent and smooth application.
- Thin Coats: Layering thin coats is critical.
- Sand Between Coats: This is non-negotiable for a smooth finish.
- Work in a Dust-Free Environment: Dust settling on wet paint is a common problem.
Refinishing Wood Cabinets with Stain
If you’ve opted for stain:
- Prepare the Wood: Ensure the wood is clean, dry, and smooth from sanding. For blotch-prone woods like pine or maple, apply a pre-stain wood conditioner. This helps the stain penetrate more evenly.
- Test the Stain: Always test your chosen kitchen cabinet stain colors on a scrap piece of wood from your cabinets or an inconspicuous area.
- Apply Stain:
- Rag Application: Dip a clean, lint-free cloth into the stain (don’t soak it). Wipe it onto the wood in long, even strokes, following the grain.
- Foam Applicator: Foam applicators can also work well for even application.
- Wipe Off Excess: Let the stain penetrate for the time recommended on the can (usually 5-15 minutes). Then, using a clean, lint-free cloth, wipe off the excess stain, again following the grain. The longer you leave it, the darker the color.
- Second Coat (Optional): For a darker shade, apply a second coat after the first is dry, repeating the application and wiping process.
- Drying: Allow the stain to dry completely, usually 24-48 hours, before applying a topcoat.
Step 8: Applying a Protective Topcoat
A topcoat (also called a sealer or varnish) protects your painted or stained cabinets from moisture, wear, and chemicals, making them durable and easy to clean.
- Choose Your Topcoat:
- Polyurethane (oil-based): Very durable and water-resistant, but can yellow over time, especially over light colors. Has strong fumes.
- Polyurethane (water-based/polycrylic): Clearer finish, less yellowing, lower VOCs, easier cleanup. Excellent for painted cabinets.
- Lacquer: Dries very fast, provides a hard, durable finish, but can be expensive and requires good ventilation and a sprayer for best results.
- Application:
- Brushing: Use a high-quality synthetic brush. Apply thin, even coats.
- Rolling: A high-density foam roller is good for a smooth finish.
- Spraying: Ideal for the smoothest, most professional finish.
- Multiple Coats: Apply 2-3 thin coats for maximum protection.
- Sand Between Coats: Lightly sand with very fine-grit sandpaper (220-320 grit) or fine steel wool after each coat is dry. This is crucial for a smooth, professional finish. Wipe away dust with a tack cloth.
- Cure Time: Allow the topcoat to cure fully before reassembling. This can take several days to a week, depending on the product and humidity. Avoid heavy use during this period.
Step 9: Reassemble and Enjoy!
Once all the parts are completely dry and cured:
- Reattach Hardware: Screw your hinges, knobs, and pulls back onto the doors and drawer fronts.
- Hang Doors and Install Drawers: Carefully rehang the doors and slide the drawers back into place. Use your labels to ensure everything goes back in the right spot.
- Admire Your Work: Step back and enjoy your beautifully refinished kitchen cabinets!
Common Cabinet Refinishing Pitfalls to Avoid
- Skipping Prep Work: This is the number one mistake. Inadequate cleaning and sanding lead to peeling, chipping, and a poor finish.
- Rushing the Process: Drying times between coats are there for a reason. Patience yields a better result.
- Using Cheap Supplies: Investing in quality paint, primer, and brushes makes a significant difference in the final outcome and durability.
- Applying Thick Coats: Thin coats dry evenly, prevent drips, and provide a smoother finish.
- Not Sanding Between Coats: This step is vital for a smooth, professional look.
- Ignoring Manufacturer Instructions: Always read and follow the product guidelines for primers, paints, stains, and topcoats.
- Not Testing Colors/Finishes: Always test your chosen kitchen cabinet stain colors or paint colors on a scrap piece before committing to your cabinets.
Popular Kitchen Cabinet Stain Colors and Paint Choices
Choosing the right color can make or break your kitchen’s aesthetic.
Trendy Kitchen Cabinet Stain Colors:
- Natural Oak: A classic, warm tone that works with many decors.
- Espresso/Dark Walnut: Rich, deep colors that add sophistication and a modern edge.
- Gray Wash: A subtle, contemporary look that provides a neutral backdrop.
- White Oak Stain: Lighter, brighter, and Scandinavian-inspired.
- Honey/Golden Oak: A slightly warmer, more traditional wood tone.
Popular Paint Colors for Cabinets:
- Classic White: Timeless, bright, and opens up the space.
- Navy Blue: Bold, sophisticated, and a popular statement color.
- Sage Green: Earthy, calming, and brings a touch of nature indoors.
- Charcoal Gray: Modern, dramatic, and a great alternative to black.
- Greige (Gray-Beige): A versatile neutral that bridges the gap between gray and beige.
Frequently Asked Questions About Refinishing Kitchen Cabinets
Q1: How long does it take to refinish kitchen cabinets?
A1: The time can vary greatly depending on the size of your kitchen, the condition of your cabinets, and whether you are painting or staining. A typical DIY project can take anywhere from a long weekend to a week or two of dedicated work, factoring in drying times.
Q2: Can I paint over stained cabinets?
A2: Yes, you can paint over stained cabinets, but proper preparation is key. You’ll need to clean, degrease, lightly sand the surface, and then apply a high-quality primer specifically designed to block stain. Follow with your paint coats.
Q3: Can I stain over painted cabinets?
A3: Generally, no. Staining requires raw wood to penetrate. If you want a stained look, you’ll need to strip the old paint down to the bare wood first.
Q4: What is the best finish for kitchen cabinets?
A4: For painted cabinets, a durable enamel paint (like alkyd or high-quality acrylic latex) combined with a robust topcoat (like water-based polyurethane or polycrylic) is best. For stained cabinets, the wood grain is the primary focus, protected by a durable, clear topcoat like polyurethane.
Q5: How do I get a smooth finish when painting cabinets?
A5: Achieve a smooth finish through meticulous preparation (cleaning, sanding), using high-quality primer and paint, applying thin, even coats, sanding lightly between each coat with fine-grit sandpaper, and using a good quality brush or roller (or a sprayer for the best results).
Q6: Do I need to use wood conditioner when staining?
A6: If you are staining woods like pine, maple, or cherry, using a pre-stain wood conditioner is highly recommended. It helps the stain penetrate more evenly and prevents blotchiness, leading to a more uniform color.
Q7: Can I refinish laminate cabinets?
A7: Refinishing laminate cabinets is more challenging as paint and stain don’t adhere well to the slick surface. You’ll need a special adhesion primer designed for laminate or melamine, followed by your paint and topcoat. Light sanding with a fine grit is usually necessary.
By following these detailed steps and using the right cabinet refinishing supplies, you can achieve a professional-looking DIY kitchen cabinet update that will revitalize your kitchen for years to come. Happy refinishing!