
Can you paint wood kitchen cabinets? Yes, you absolutely can paint wood kitchen cabinets! It’s a fantastic way to give your kitchen a fresh, modern look without the hefty price tag of new cabinetry. This guide will walk you through everything you need to know for a successful DIY kitchen cabinet update, from choosing the best paint for wood cabinets to mastering cabinet painting techniques. We’ll cover essential cabinet painting supplies, how to properly prep wood cabinets for paint, and even discuss the difference between wood cabinet stain vs paint. Get ready to transform your kitchen!
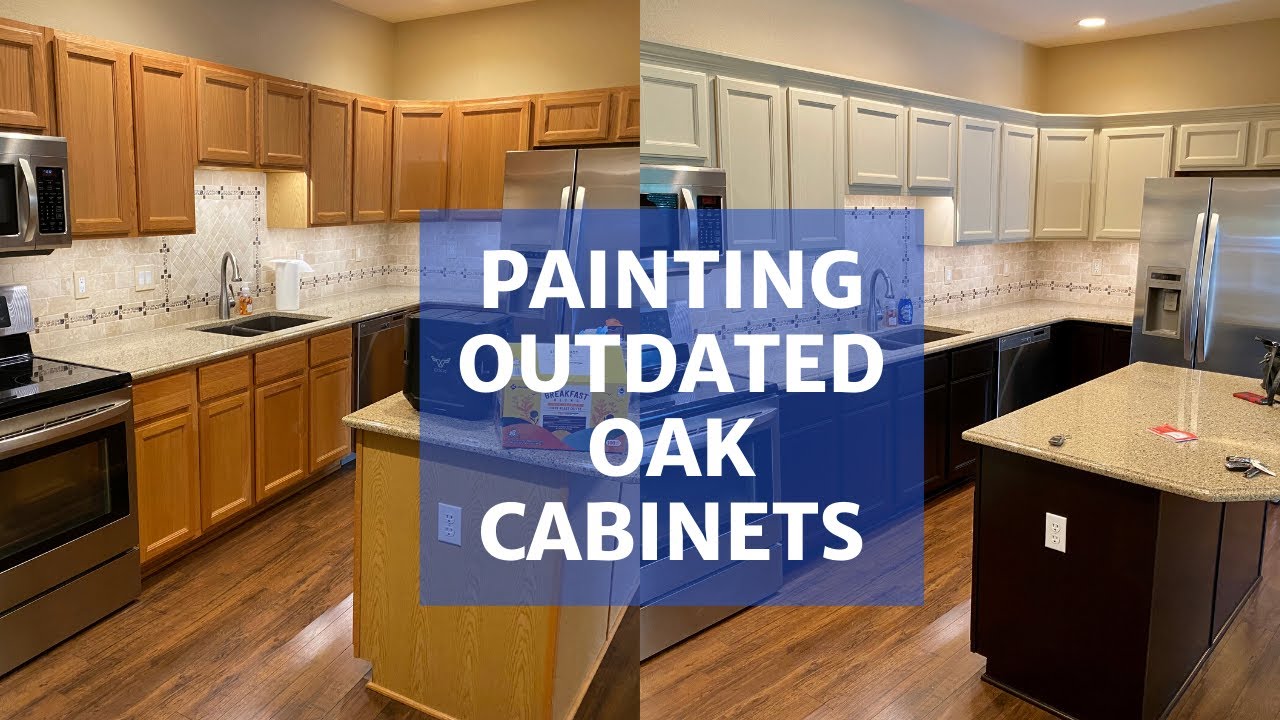
Image Source: i.ytimg.com
Revitalizing Your Kitchen: The Appeal of Painting Wood Cabinets
Is your kitchen feeling a little tired? Perhaps the color of your wood cabinets no longer matches your style, or maybe they’ve seen better days. Painting wood kitchen cabinets is a popular and effective wood cabinet refinishing project. It allows you to:
- Change the entire look and feel of your kitchen: Go from dated oak to sleek white, or from dark cherry to a bold contemporary color.
- Save money: Refinishing cabinets is significantly cheaper than buying new ones.
- Update your style: Keep up with current design trends or create a timeless look.
- Increase home value: A fresh coat of paint can make your kitchen more appealing to potential buyers.
Deciding Between Wood Cabinet Stain vs Paint
Before you grab a paintbrush, it’s crucial to consider whether staining or painting is the right choice for your cabinets. While this guide focuses on painting, it’s helpful to know the difference:
| Feature | Painting | Staining |
|---|---|---|
| Look | Creates a solid, opaque color. Hides wood grain. Offers a vast color palette. | Enhances the natural wood grain. Creates a translucent, rich color. Limited color options compared to paint. |
| Finish | Can be matte, satin, semi-gloss, or high-gloss. | Typically a satin or semi-gloss finish. |
| Durability | Very durable when done correctly with the right primer and paint. Can chip if not prepped properly. | Durable, but scratches and dings will reveal the wood underneath. |
| Prep Work | Requires thorough cleaning, sanding, and priming. | Requires cleaning and light sanding. Less intensive than painting prep. |
| Covering Imperfections | Excellent at hiding flaws, damage, or mismatched wood tones. | Less effective at hiding imperfections; the grain is still visible. |
| Maintenance | Easy to clean. Touch-ups can be done with matching paint. | Similar to painted cabinets in terms of cleaning. |
| Application | Can be applied with brushes, rollers, or sprayers. Requires multiple thin coats. | Applied with rags or brushes. Often involves wiping off excess. |
When to Choose Paint: If you want a dramatic color change, have cabinets with an undesirable wood grain, or if your cabinets have some imperfections you want to cover, painting is likely your best bet.
When to Choose Stain: If you love the natural look of your wood grain and want to enhance it with a richer color, staining is a great option.
Gathering Your Cabinet Painting Supplies
Having the right cabinet painting supplies is key to a professional-looking finish. Don’t skimp on quality here – it will make a difference in the final result and the longevity of your paint job.
Essential Supplies:
- Screwdriver: To remove cabinet doors and hardware.
- Drop cloths or old sheets: To protect your floors and surrounding areas.
- Painter’s tape: For masking off areas you don’t want to paint.
- Degreaser/Cleaner: A strong kitchen degreaser (like TSP substitute or a trisodium phosphate alternative) to thoroughly clean cabinets.
- Sanding sponges or sandpaper: Various grits (e.g., 120, 180, 220) for preparing the surface.
- Orbital sander (optional but recommended for large areas): Speeds up the sanding process.
- Tack cloths: To remove dust after sanding.
- Quality Primer: A cabinet primer for wood is crucial for adhesion and a smooth finish. Oil-based or shellac-based primers are often recommended for wood due to their excellent adhesion and stain-blocking properties.
- High-Quality Paint: The best paint for wood cabinets is typically a water-based enamel or a hybrid oil-based enamel. These paints offer durability and a smooth finish.
- Paintbrushes: High-quality synthetic brushes for cutting in edges and detailed areas.
- Foam rollers or mohair rollers: For smooth application on cabinet doors and frames. Use 1/4-inch or 3/8-inch nap rollers for a smooth finish.
- Paint tray and liners: For easy cleanup.
- Ventilation: Fans and open windows to ensure good airflow.
- Safety gear: Gloves, safety glasses, and a respirator or mask (especially when sanding or using oil-based products).
- Putty knife and wood filler: For patching any holes or imperfections.
- Rag or shop towels: For cleaning up spills.
How to Prep Wood Cabinets for Paint: The Foundation of Success
This is arguably the most important step in the entire process. Proper prep wood cabinets for paint will determine how well your paint adheres and how durable the finish will be. Rushing this stage is a recipe for peeling or chipping paint.
Step 1: Remove Doors and Hardware
- Systematically remove doors and drawers: As you remove each door, label it with a piece of painter’s tape (e.g., “Upper Left 1,” “Drawer Front 3”). This will save you immense frustration when it’s time to reassemble.
- Store hardware: Place hinges and screws in a labeled plastic bag for each door. You might consider updating your cabinet hardware later for an even bigger impact.
Step 2: Deep Clean Your Cabinets
- Degrease thoroughly: Kitchen cabinets accumulate grease, grime, and cooking residue. Use your chosen degreaser and a sponge or cloth to clean every surface. Pay close attention to areas around the stove and sink.
- Rinse and dry: Wipe down the cabinets with a clean, damp cloth to remove any degreaser residue, and then dry them completely with a clean towel.
Step 3: Fill Imperfections
- Patch holes and gouges: Use wood filler to fill any dents, scratches, or holes. Apply the filler with a putty knife, slightly overfilling the area.
- Allow to dry: Let the wood filler dry completely according to the product’s instructions.
Step 4: Sanding for Adhesion
- Lightly sand all surfaces: This step is crucial for creating a surface the primer and paint can adhere to. Use 120-grit sandpaper or sanding sponges to scuff up the existing finish. You don’t need to remove the old finish, just create a dull, uniform surface.
- Address imperfections: Once the wood filler is dry, sand it smooth with the surrounding surface. Use a slightly finer grit (180-220) for this.
- Sand cabinet doors: Ensure you sand both sides of the cabinet doors if you’re painting both.
- Clean off dust: After sanding, use a vacuum with a brush attachment to remove most of the dust. Then, wipe down all surfaces with a tack cloth. This sticky cloth will pick up any remaining fine dust particles. Repeat tack cloth wiping until no dust is visible.
Priming for a Perfect Finish
The right primer is your best friend when painting wood cabinets. It seals the wood, blocks stains (especially important with woods like oak or pine that can bleed through paint), and provides a smooth, even surface for your topcoat.
Choosing the Right Primer:
- Oil-Based or Shellac-Based Primers: These are generally considered the best primer for wood cabinets because they offer superior adhesion and stain-blocking capabilities. They have a strong odor and require mineral spirits for cleanup, but the performance is often worth it.
- Water-Based Primers: Some high-quality water-based primers are also formulated for wood and can work well, especially if you prefer easier cleanup and less odor. Look for those specifically designed for cabinetry or high-traffic surfaces.
Priming Process:
- Apply a thin, even coat: Use a good quality brush or roller. Avoid applying the primer too thickly, as this can lead to drips and an uneven finish.
- Work in sections: Prime a few doors or a section of the cabinet frame at a time.
- Allow to dry completely: Follow the manufacturer’s instructions for drying times.
- Lightly sand between coats: Once the primer is dry, lightly sand it with 220-grit sandpaper or a fine-grit sanding sponge. This will smooth out any minor imperfections and create a better surface for the paint.
- Wipe with a tack cloth: Again, remove all dust with a tack cloth after sanding.
- Apply a second coat of primer (if needed): For woods prone to staining or if you’re making a drastic color change, a second coat of primer might be beneficial.
Selecting the Best Paint for Wood Cabinets
The best paint for wood cabinets will provide durability, a smooth finish, and resistance to wear and tear.
Paint Types to Consider:
- Water-Based Enamel Paints (Acrylic Latex Enamels): These are the most popular choice for cabinet painting. They offer excellent durability, good adhesion, easy cleanup with water, and low VOCs (volatile organic compounds). Look for “cabinet enamel” or “trim enamel” formulas.
- Oil-Based Enamels (Alkyd Enamels): These paints create an extremely hard, durable finish and level out beautifully. However, they have a strong odor, require mineral spirits for cleanup, and tend to yellow over time, especially in lighter colors. They are a great option for durability but can be trickier to work with.
- Hybrid Enamels: These paints combine the best of both worlds – the durability and hardness of oil-based paints with the easier cleanup and lower VOCs of water-based paints. They are an excellent choice for cabinets.
Sheen Options:
- Satin: A popular choice for cabinets, offering a subtle sheen that is easy to clean and hides imperfections well.
- Semi-Gloss: More reflective than satin, semi-gloss provides excellent durability and is very easy to wipe clean. It can, however, highlight imperfections more than satin.
- Gloss: Offers a highly reflective, durable finish. It’s very easy to clean but will show every imperfection. Generally best reserved for trim or specific design choices.
- Matte/Eggshell: These sheens are less durable and harder to clean for high-traffic areas like kitchen cabinets, so they are generally not recommended.
Cabinet Painting Techniques: Achieving a Professional Look
Now for the fun part – applying the paint! Using the right cabinet painting techniques will make all the difference between a DIY look and a professional finish.
Painting Cabinet Doors:
- Set up a painting station: Lay down drop cloths in a well-ventilated area. You can paint doors flat on sawhorses or on a protected table.
- Apply thin, even coats: This is the golden rule for any painting project, especially cabinets. Thin coats dry faster, are less likely to drip, and build up a smoother, more durable finish.
- Use a high-quality brush for edges and details: Carefully paint around the edges and any detailed areas of the cabinet doors.
- Use a foam or mohair roller for flat surfaces: Rollers create a smoother finish than brushes on larger, flat areas. Apply paint in a consistent pattern, like “W” or “N” strokes, then back-roll lightly to even out the coverage.
- Avoid overworking the paint: Don’t go back over areas that are starting to dry, as this can create brush marks or uneven textures.
- Allow adequate drying time between coats: Consult your paint can for specific drying times. This is crucial for proper adhesion and preventing damage.
- Lightly sand between coats (optional but recommended): After the first coat of paint is dry, you can lightly sand with 220-grit sandpaper or a fine-grit sanding sponge to smooth out any imperfections. Wipe with a tack cloth afterward.
- Apply multiple thin coats: Typically, two to three thin coats of paint are needed for full coverage and a durable finish.
Painting Cabinet Frames (the boxes attached to the wall):
- Protect surrounding areas: Use painter’s tape to mask off walls, countertops, and appliances.
- Paint the frame sections: Use a combination of brushes and rollers for the cabinet frames. A small roller is excellent for the larger flat panels, while brushes are necessary for corners and edges.
- Work from top to bottom: This helps prevent drips from landing on freshly painted areas.
- Be mindful of the interior: Decide if you want to paint the inside of your cabinets. If so, you’ll need to tape off the edges very carefully.
Updating Cabinet Hardware
A simple yet impactful way to enhance your newly painted cabinets is by updating cabinet hardware. This can dramatically change the style of your kitchen and complement your new paint color.
- Consider your style: Are you going for modern, farmhouse, traditional, or eclectic? Choose knobs and pulls that match your vision.
- Measure for placement: If you’re replacing existing hardware, ensure the new pieces match the hole spacing. If you’re drilling new holes, use a template for precision.
- Don’t forget the soft-close mechanisms: If your cabinet doors have them, be careful not to damage them during the painting process.
Drying and Curing Times: Patience is a Virtue
- Drying Time: This is the time it takes for the paint to be dry to the touch and ready for the next coat. This can be a few hours.
- Curing Time: This is the time it takes for the paint to reach its maximum hardness and durability. This can take anywhere from 7 to 30 days, depending on the paint type. During the curing period, be extra gentle with your cabinets. Avoid heavy scrubbing or placing sharp objects directly on the surface.
Frequently Asked Questions (FAQ)
-
Q1: Can I paint over varnished wood cabinets?
A1: Yes, you can paint over varnished wood cabinets. The key is proper preparation, including thorough cleaning, degreasing, and light sanding to create a surface for the primer to adhere to. Skipping this step can lead to peeling paint. -
Q2: What is the best paint finish for kitchen cabinets?
A2: Satin or semi-gloss finishes are generally the best for kitchen cabinets. They offer a good balance of durability, washability, and a pleasing sheen that hides minor imperfections better than a high-gloss finish. -
Q3: How many coats of primer should I use on wood cabinets?
A3: For most wood cabinets, one good coat of primer is sufficient. However, if your cabinets are made of a wood that is prone to bleeding (like oak or pine), or if you are making a drastic color change (e.g., dark to very light), two coats of primer might be necessary to ensure complete coverage and stain blocking. -
Q4: Can I spray paint my kitchen cabinets?
A4: Yes, spraying paint is an excellent way to achieve a very smooth, professional finish on kitchen cabinets. However, it requires specialized equipment (a paint sprayer), careful masking to protect surrounding areas, and practice to achieve an even coat. -
Q5: How do I clean my painted cabinets?
A5: Once your cabinets are fully cured, you can clean them with a mild detergent and water. Avoid abrasive cleaners or scrub brushes, as these can damage the paint finish. A soft cloth is usually best. -
Q6: How long will painted cabinets last?
A6: When done correctly with proper prep, primer, and quality paint, painted cabinets can last for many years, often a decade or more. Regular gentle cleaning and avoiding harsh chemicals will prolong their lifespan.
By following these detailed steps, you can successfully transform your kitchen with painted wood cabinets. It’s a rewarding project that offers significant aesthetic and functional improvements, making your kitchen a more enjoyable space to be in. Happy painting!