
Can you paint kitchen countertops? Yes, you absolutely can! Painting your kitchen countertops is a fantastic way to achieve a dramatic countertop makeover without breaking the bank. This budget-friendly method can refresh your kitchen’s look and feel, giving you that “new kitchen” vibe without the hefty price tag. Whether you’re dealing with outdated laminate, worn-out solid surfaces, or even looking to mimic the look of granite, there’s a DIY countertop paint solution for you. This guide will walk you through everything you need to know about refinishing kitchen counters, from choosing the right paint to achieving a durable, beautiful finish.
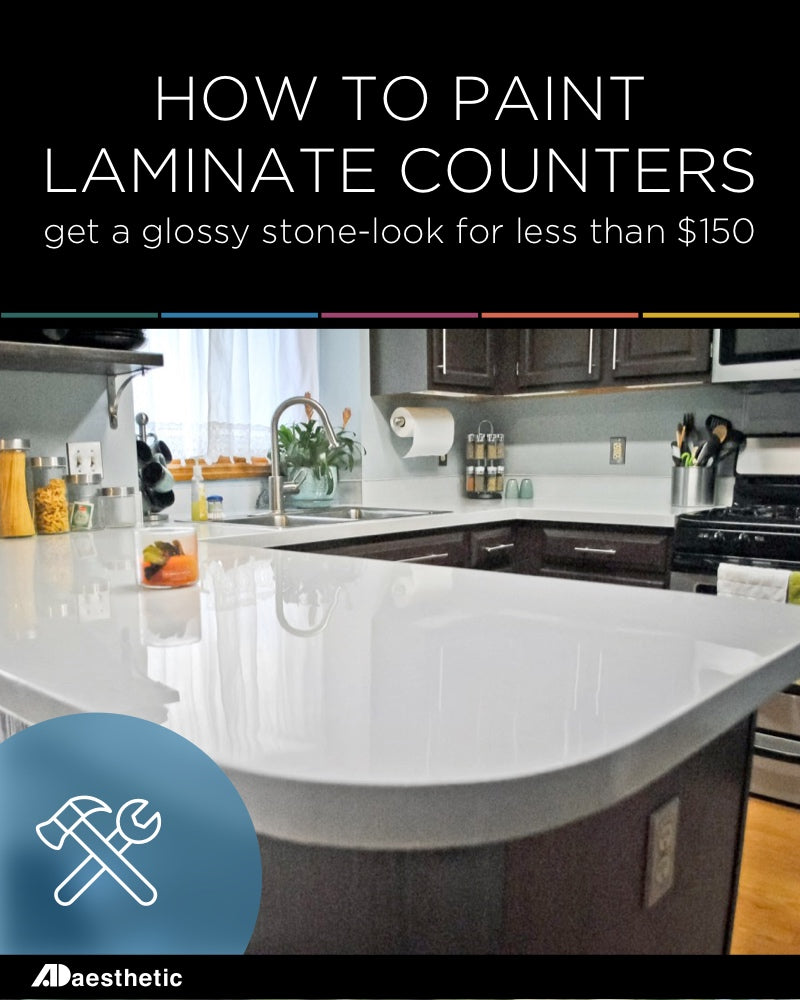
Image Source: adaesthetic.com
Why Paint Your Kitchen Countertops?
There are several compelling reasons to consider painting your kitchen counters. It’s a project that offers significant visual impact for a relatively small investment of time and money.
- Cost-Effective: Replacing countertops can cost thousands of dollars. Painting is a fraction of that cost.
- Quick Transformation: You can transform your kitchen in a weekend or two, giving your space a fresh, modern look.
- Customization: You can choose any color or finish imaginable to match your kitchen decor. Want faux granite? Or a bold, modern color? You can do it.
- Hides Imperfections: Paint can cover up chips, stains, and scratches that have accumulated over time.
- Accessible for Beginners: With the right preparation and materials, it’s a project many DIYers can tackle successfully.
Fathoming Your Countertop Material
Before you grab a brush, it’s crucial to know what material your current countertops are made of. The type of countertop will dictate the best paint and preparation methods.
Painting Laminate Countertops
Laminate countertops are incredibly common and often the primary target for this type of makeover. Painting laminate countertops can breathe new life into worn-out, dated surfaces. The key to success here is proper adhesion. Laminate is typically smooth and non-porous, which can make paint slip off if not prepared correctly.
Painting Other Countertop Materials
- Butcher Block: These are usually sealed with oil or polyurethane. You’ll need to sand them thoroughly and use a paint specifically designed for wood.
- Tile Countertops: Grout lines can be tricky. You’ll need a good primer and a durable topcoat. You can even paint over the tiles themselves to create a seamless look.
- Solid Surface (Corian, etc.): These can be painted, but they often have a glossy finish that needs to be dulled for paint to adhere.
Deciphering Your Paint Options: What’s the Best Kitchen Countertop Paint?
Choosing the best kitchen countertop paint is vital for a lasting finish. You need a paint that can withstand daily wear and tear, moisture, and cleaning.
Epoxy Countertop Paint Kits
These kits are a popular choice for a reason. Epoxy countertop paint is renowned for its durability and resistance to chemicals, heat, and abrasion. They often come in two parts that you mix together, creating a super-hard, long-lasting finish. Many kits offer a faux granite or marble effect, making them a great option for an ambitious countertop makeover.
Pros of Epoxy Kits:
* Extremely durable and resistant to scratches and stains.
* Waterproof and chemical resistant.
* Often come with integrated color systems for a granite-like look.
* Can create a thick, protective layer.
Cons of Epoxy Kits:
* Can be more expensive than other paint options.
* Require precise mixing and application within a specific timeframe (pot life).
* Application can be more involved, often requiring rollers and brushes specific to epoxy.
* Ventilation is crucial during application and curing.
Specialized Countertop Paints
There are also paints specifically formulated for countertops that aren’t necessarily a two-part epoxy. These might be acrylic-based or have other durable binders. Look for products that advertise themselves as “countertop paint” or “cabinet and furniture enamel” with high durability.
Pros of Specialized Countertop Paints:
* Often easier to apply than two-part epoxies.
* Good range of colors available.
* Can be more affordable.
* Some offer a matte, satin, or gloss finish.
Cons of Specialized Countertop Paints:
* May not be as incredibly durable as a true epoxy.
* Heat resistance might be lower than epoxies.
* Requires a good primer for best results.
High-Quality Enamels
A high-quality enamel paint, particularly an oil-based one or a water-based acrylic enamel with a high solids content, can also work, but you’ll need excellent surface preparation and a robust clear coat for protection. This is more akin to how to paint laminate with a durable finish that mimics a professionally painted surface.
Pros of High-Quality Enamels:
* Widely available in many colors and finishes.
* Can be applied with standard painting tools.
* Generally more affordable.
Cons of High-Quality Enamels:
* Requires rigorous prep and multiple coats.
* Needs a very durable clear coat to protect against wear.
* May not offer the same level of heat or chemical resistance as epoxies.
Essential Countertop Painting Supplies
Gathering the right countertop painting supplies is half the battle. Having everything on hand before you start will make the process smoother and more efficient.
Here’s a list of what you’ll likely need:
- Cleaning Supplies:
- Dish soap or a degreaser
- Rags or microfiber cloths
- Sponge
- Rubbing alcohol (for final cleaning)
- Sanding Supplies:
- Medium-grit sandpaper (100-150 grit)
- Fine-grit sandpaper (220-320 grit)
- Sanding block or orbital sander (optional, but helpful for larger areas)
- Priming Supplies:
- High-quality bonding primer (specifically for laminate or difficult surfaces)
- Foam roller or high-quality synthetic brush
- Paint Application:
- Your chosen DIY countertop paint (epoxy kit, specialized paint, etc.)
- High-density foam rollers (specifically designed for smooth finishes, often labeled for cabinets or trim)
- Small synthetic or foam brushes for edges and details
- Paint tray and liners
- Finishing & Protection:
- Durable clear topcoat (polyurethane, polycrylic, or the topcoat included in epoxy kits)
- Fine-grit sandpaper (400-600 grit) for between clear coats (optional, for ultra-smooth finish)
- Clean rags for dusting
- Protection & Safety:
- Painter’s tape (good quality, for masking edges)
- Drop cloths or plastic sheeting to protect surrounding areas
- Safety glasses
- Gloves (chemical-resistant if using epoxy)
- Respirator mask (especially if using oil-based paints or epoxies)
Step-by-Step Guide: How To Paint Kitchen Countertops
Now, let’s dive into the process of how to paint laminate and other countertop types.
Step 1: Thorough Cleaning and Degreasing
This is arguably the most critical step for any painting project, especially on slick surfaces like laminate. Any grease, grime, or residue will prevent the paint from adhering.
- Initial Wash: Use a good degreasing cleaner and a sponge or rag to thoroughly wash down your countertops. Get into any nooks and crannies.
- Rinse Well: Rinse the surfaces thoroughly with clean water to remove all soap residue.
- Final Wipe-Down: Once dry, wipe the entire surface with rubbing alcohol. This removes any remaining invisible oils and ensures a clean surface for the primer. Let it dry completely.
Step 2: Sanding for Adhesion
This step creates a “tooth” for the primer and paint to grip onto. Don’t skip this, even on seemingly smooth surfaces.
- Initial Sanding: Using your medium-grit sandpaper (100-150 grit), lightly sand the entire countertop surface. The goal isn’t to remove material, but to scuff up the surface. You’ll notice the glossiness disappear, and the surface will look and feel slightly rougher.
- Smooth Sanding: Follow up with the fine-grit sandpaper (220-320 grit) to smooth out any sanding marks from the coarser grit.
- Dust Removal: This is vital. Use a vacuum cleaner with a brush attachment to get all the dust, then wipe down thoroughly with a tack cloth or a damp (not wet) microfiber cloth.
Step 3: Priming for Durability
A good primer is your best friend for refinishing kitchen counters, especially laminate. It acts as a bonding agent between the countertop surface and your paint.
- Apply Primer: Using a high-quality bonding primer, apply a thin, even coat. Use a foam roller for large areas and a brush for edges. Avoid applying it too thick, as this can lead to drips and an uneven finish.
- Drying Time: Allow the primer to dry completely according to the manufacturer’s instructions. This might be several hours or overnight.
- Second Coat (Optional but Recommended): For maximum adhesion and a uniform base color, apply a second thin coat of primer.
- Light Sanding (Optional): Once the primer is fully dry, you can lightly sand again with very fine-grit sandpaper (320-400 grit) to create an ultra-smooth surface. Wipe away all dust meticulously.
Step 4: Applying Your Countertop Paint
Now comes the exciting part – applying the color! The technique will vary slightly depending on the type of paint you’re using.
Painting with Epoxy Countertop Paint Kits
If you’re using an epoxy countertop paint kit that creates a faux granite effect, follow the kit’s specific instructions precisely.
- Mixing: Carefully measure and mix the two parts of the epoxy according to the instructions. Do NOT mix more than you can apply within the working time (pot life).
- Application: Many epoxy kits involve pouring the base coat and then “splattering” or “veining” the accent colors onto the wet surface to create the granite look. Use the provided tools or follow the kit’s recommendations. Work in sections if needed.
- Smooth Finish: Some kits may require a clear epoxy topcoat, which is applied after the base and accent colors have cured sufficiently.
- Curing: Allow the epoxy to cure fully. This can take several days and the surface should not be used or exposed to moisture during this time.
Painting with Specialized Countertop Paints or Enamels
For other types of paints, the process is more like traditional painting.
- First Coat: Apply a thin, even coat of your chosen best kitchen countertop paint using a high-density foam roller for the main surfaces and a brush for edges. Work in one direction and avoid overworking the paint.
- Drying: Allow the first coat to dry completely. Check the paint can for specific recoat times.
- Second Coat: Apply a second thin, even coat.
- Third Coat (Often Necessary): Most countertop paint jobs benefit from at least three thin coats to build durability and ensure full coverage.
- Allow to Cure: Let the paint cure for the time recommended by the manufacturer before proceeding to the topcoat.
Step 5: Applying a Durable Clear Topcoat
This is essential for protecting your painted finish from scratches, heat, and chemicals.
- Choose Your Topcoat: Use a high-quality polyurethane, polycrylic, or a dedicated countertop sealant. Ensure it’s suitable for high-traffic areas and is water-resistant. Some epoxy kits include a specific clear topcoat.
- First Topcoat Layer: Apply a thin, even layer of the clear topcoat using a foam roller or brush. Avoid bubbles.
- Drying and Light Sanding (Optional): Let the first layer dry completely. For an extra smooth finish, you can lightly sand with very fine-grit sandpaper (400-600 grit) and then wipe away dust.
- Subsequent Topcoat Layers: Apply 2-3 more thin coats of the clear topcoat, allowing each to dry thoroughly and sanding lightly between coats if desired. The more layers of topcoat, the more durable your finish will be.
Step 6: Curing Time
This is the final, and often most patient, step. Even after the paint is dry to the touch, it needs time to fully cure and harden.
- Touch Dry: Usually a few hours.
- Light Use: Many paints and topcoats recommend waiting 3-7 days before placing items on the countertops or performing light cleaning.
- Full Cure: For maximum durability, wait at least 7-14 days before exposing the countertops to heavy use, moisture, or hot items. Always check the specific product instructions.
Tips for Painting Laminate Countertops Success
How to paint laminate without it looking like painted laminate requires attention to detail.
- Use the Right Primer: A good bonding primer is non-negotiable.
- Scuff Sanding is Key: Don’t skip the sanding step.
- Thin Coats: Multiple thin coats are always better than one thick coat.
- Avoid Overworking the Paint: This can cause streaks or an uneven texture.
- Work in Good Light: This helps you see imperfections as you go.
- Ventilation: Ensure good airflow throughout the process, especially with epoxies or oil-based paints.
Making Your Painted Countertops Last: Maintenance
Even the most durable paint job needs proper care.
- Cleaners: Use mild dish soap and water for daily cleaning. Avoid abrasive cleaners, harsh chemicals, or scouring pads, which can scratch or dull the finish.
- Hot Items: Always use trivets or hot pads under hot pots and pans. While some paints have good heat resistance, extreme heat can damage the finish.
- Cutting: Never cut directly on painted countertops. Use a cutting board.
- Spills: Wipe up spills, especially acidic ones like lemon juice or vinegar, promptly to prevent damage.
Comprehending Color Choices and Finishes
The aesthetic possibilities are vast when updating kitchen counters with paint.
Faux Finishes
- Granite: Achieved with a base color, then splattering or sponging on various flecks of contrasting colors (black, white, brown, gold). Kits are readily available for this.
- Marble: More complex, involving marbling techniques with thin paints or glazes to mimic the swirling patterns of marble.
- Concrete: A matte grey finish, often achieved with specific concrete-effect paints or by using grey paints with textured applicators.
Color Palettes
- Neutrals: Whites, greys, beiges, and blacks are classic and timeless, offering a clean look.
- Bold Colors: A bright color can be a statement piece, but consider how it will integrate with the rest of your kitchen.
- Two-Tone: Painting the main surface one color and the edges or a separate section another can add visual interest.
Finishes
- Matte: Offers a modern, subtle look but can be slightly less durable and harder to clean.
- Satin: A popular choice, offering a slight sheen that’s more durable and easier to wipe clean than matte.
- Semi-Gloss/Gloss: Provides a highly reflective, durable finish. However, any imperfections in the surface prep will be more visible.
Common Challenges and How to Address Them
Even with the best intentions, DIY projects can have hiccups.
| Challenge | Cause | Solution |
|---|---|---|
| Paint Not Adhering | Insufficient cleaning or sanding. | Re-clean and sand thoroughly. Ensure the correct bonding primer is used. |
| Peeling or Chipping | Lack of proper adhesion, no or thin topcoat. | This is tough to fix after the fact. Next time, focus on prep and ensure adequate topcoat layers. May require complete redo. |
| Streaks or Roller Marks | Applying paint too thickly, wrong roller. | Apply thin, even coats. Use a high-density foam roller. Avoid overworking the paint. |
| Bubbles in Finish | Trapped air, too much agitation. | Apply paint smoothly. Avoid excessive stirring of paint/epoxy. Use a fine-tooth comb to pop bubbles if possible before drying. |
| Heat Damage | Using hot pots directly on painted surface. | Always use trivets and hot pads. Most paints have limited heat resistance. |
| Chemical Stains | Spills not wiped up quickly. | Clean up spills immediately. Use mild, pH-neutral cleaners. |
Frequently Asked Questions (FAQ)
Q1: Can I paint my granite countertops?
While it’s possible to paint over granite, it’s generally not recommended if you want to preserve the natural beauty of the stone. If your granite is very dated or you’re set on a change, you’d follow similar prep steps (clean, degrease, light sand) and use a high-quality bonding primer and durable paint system, likely an epoxy kit for the best longevity. However, painting can mask the unique patterns of granite, and the durability might not match its original finish.
Q2: How long does painted countertop paint last?
The lifespan of painted countertops depends heavily on the quality of the materials used, the thoroughness of the preparation, and how well the countertops are maintained. With proper care, a well-done epoxy paint job or a high-quality acrylic enamel with a robust topcoat can last anywhere from 2 to 5 years before needing touch-ups or a refresh. Lighter use areas might see them last longer.
Q3: Do I need a special roller for painting countertops?
Yes, it’s highly recommended to use high-density foam rollers specifically designed for smooth finishes. These rollers hold less paint, allowing for thinner, more even coats that minimize the risk of drips, roller marks, and bubbles. Standard fluffy rollers are not suitable for this type of project.
Q4: Can I cut on my painted countertops?
Absolutely not. Painted countertops, even with a durable topcoat, are not designed to be cut on. Always use a cutting board to protect your new finish from knife marks.
Q5: What’s the difference between countertop paint and regular wall paint?
Countertop paint, especially epoxy formulations, is designed for extreme durability. It needs to withstand constant contact with water, food, grease, cleaning chemicals, and abrasion. Regular wall paint is not formulated for this level of wear and tear and will quickly chip, scratch, and stain.
Q6: Is it better to use an epoxy kit or individual paints and topcoats?
For maximum durability and resistance to heat and chemicals, epoxy countertop paint kits are generally superior. They are formulated to work together for a robust finish. However, they can be more expensive and require careful application. If budget or ease of application is a higher priority, a high-quality acrylic enamel with a good primer and several coats of a durable clear topcoat can yield good results, though likely with slightly less longevity.
Q7: What is the best way to update kitchen counters on a budget?
Painting is one of the most effective budget countertop makeover options. Other budget-friendly alternatives include contact paper or peel-and-stick vinyl films, though these are less durable than paint. For a more significant but still budget-conscious update, consider butcher block countertops if your current ones are laminate, as they are relatively affordable and can be stained or sealed in various finishes.
By following these detailed steps and employing the right techniques, you can successfully transform your kitchen with painted countertops. It’s a rewarding DIY project that can dramatically enhance your kitchen’s appearance and your enjoyment of the space. Happy painting!