
Image Source: www.nhance.com
How To Paint Kitchen Cabinets Professionally: Achieve A Pro Finish
Can you paint kitchen cabinets yourself? Yes, you can achieve a professional finish when painting kitchen cabinets yourself with the right preparation, tools, and techniques. This guide will walk you through every step to transform your kitchen cabinets from drab to fab, giving you a stunning, durable, and showroom-quality result. We will cover everything from choosing the best paint to mastering advanced cabinet painting techniques.
Why Refinish Your Kitchen Cabinets?
Refinishing your kitchen cabinets offers a fantastic way to update your kitchen’s look without the hefty price tag of a full renovation. It’s a rewarding DIY project that can dramatically improve your home’s aesthetics and value. Many homeowners wonder about the professional cabinet painting cost. While hiring a professional can range from $2,000 to $7,000 or more depending on the size of your kitchen and the condition of your cabinets, a DIY approach can save you thousands. This detailed guide empowers you to tackle this project with confidence and achieve results that rival those of hired experts.
Planning Your Cabinet Painting Project
Before you even think about picking up a brush, proper planning is crucial for a successful kitchen cabinet refinishing project. This involves assessing your current cabinets, choosing your desired finish, and gathering all necessary supplies.
Assessing Your Current Cabinets
The condition of your existing cabinets will influence the amount of prep work needed.
- Material: Most kitchen cabinets are made of wood, MDF, or laminate. Each material requires slightly different preparation and primer. Wood cabinets generally offer the best surface for painting. Laminate can be painted, but it requires special primers and meticulous surface preparation to ensure adhesion.
- Finish: Are your cabinets currently stained, painted, or a laminate veneer? Existing finishes can affect how well new paint adheres. Glossy or heavily varnished surfaces will require more sanding.
- Condition: Look for any damage like chipping paint, water stains, or peeling veneer. These areas will need repair before painting.
Choosing Your Color and Finish
This is where you can truly personalize your kitchen!
- Color: Consider your kitchen’s overall style and color scheme. White, gray, and greige remain popular choices for their versatility and ability to brighten a space. Darker colors can create a dramatic and sophisticated look.
- Finish:
- Satin: A popular choice for cabinets, offering a subtle sheen that is easy to clean and hides imperfections better than semi-gloss.
- Semi-Gloss: Provides a more durable and washable surface, but it highlights imperfections more than satin.
- Eggshell: Offers a very low sheen, ideal for a more matte look, but can be less durable and harder to clean.
Essential Cabinet Painting Supplies
Having the right cabinet painting supplies is key to a professional outcome. Don’t skimp here; quality tools make a significant difference.
- Screwdriver or Drill: For removing cabinet doors and hardware.
- Sanding Blocks or Orbital Sander: For preparing surfaces.
- High-Quality Painter’s Tape: For masking areas you don’t want to paint.
- Drop Cloths or Plastic Sheeting: To protect floors and countertops.
- Degreaser or Trisodium Phosphate (TSP): For thorough cleaning.
- Rags or Microfiber Cloths: For cleaning and wiping surfaces.
- Primer: Specifically formulated for cabinets (e.g., oil-based or a high-adhesion water-based primer).
- Paint: High-quality enamel paint designed for cabinets (e.g., acrylic enamel or latex enamel).
- Applicators:
- High-Density Foam Rollers: For smooth, even coverage on flat surfaces.
- High-Quality Angled Paint Brushes: For cutting in edges and detailed areas.
- Paint Sprayer: For the most professional and smooth finish (optional but highly recommended).
- Paint Trays or Buckets: For pouring paint.
- Stir Sticks: For mixing paint.
- Safety Gear: Gloves, safety glasses, and a respirator or mask (especially if spray painting).
- Wood Filler or Bondo: For repairing any dings or scratches.
- Sandpaper: Various grits (e.g., 120-grit, 180-grit, 220-grit).
- Tack Cloths: To remove dust after sanding.
- Plastic Bags or Containers: To store hardware and label doors.
Mastering Cabinet Painting Prep Work
This is arguably the most critical stage of the entire process. Proper cabinet painting prep work ensures your paint adheres well and your finish looks smooth and professional. Rushing this step will lead to a subpar result.
Step 1: Remove Cabinet Doors and Drawers
- Use your screwdriver or drill to carefully remove each cabinet door and drawer front.
- Label each door and drawer with masking tape to indicate its original location. This is crucial for reassembly. Store the screws in labeled bags corresponding to each door.
- Remove all hinges, handles, and knobs. Store them together in a safe place or consider replacing them for a fresh look.
Step 2: Clean Thoroughly
Kitchen cabinets are notorious for accumulating grease and grime. A deep clean is essential.
- Degrease: Use a strong degreaser or a TSP solution. Mix TSP according to the manufacturer’s instructions. Wear gloves and eye protection.
- Wipe Down: Wipe down every surface of the doors, drawer fronts, and the cabinet frames with a damp cloth to remove any cleaning residue. Allow everything to dry completely.
Step 3: Repair Imperfections
Fill any holes, dents, or scratches with wood filler or Bondo.
- Apply the filler slightly proud of the surface.
- Once dry, sand the filled areas smooth and flush with the surrounding surface using 120-grit sandpaper.
Step 4: Sand Everything
Sanding creates a smooth surface for the primer and paint to adhere to.
- Doors and Drawer Fronts: Lightly sand all surfaces of the doors and drawer fronts with 150-grit sandpaper. The goal is to scuff up the existing finish, not to remove it entirely. If you have a laminate surface, ensure you are scuffing the veneer.
- Cabinet Frames: Sand the cabinet frames in place. Pay attention to corners and crevices.
- Smooth Finish: After the initial sanding, go over all surfaces again with 220-grit sandpaper for a super smooth feel.
Step 5: Dust Removal
Dust is the enemy of a smooth paint finish.
- Use a shop vacuum with a brush attachment to remove most of the dust.
- Follow up with tack cloths to pick up any remaining fine dust particles. Wipe down all surfaces until no dust is visible.
Step 6: Masking
Protect areas you don’t want painted.
- Use high-quality painter’s tape to mask off any adjacent walls, countertops, or cabinet interiors you are not painting.
- Ensure the tape is pressed down firmly to prevent paint bleed.
Cabinet Priming Steps: The Foundation of Your Finish
Primer is non-negotiable for a durable and professional paint job on cabinets. It seals the surface, provides a uniform base color, and improves paint adhesion. Following proper cabinet priming steps is vital.
Choosing the Right Primer
- Oil-Based Primer: Excellent for blocking stains, especially on wood cabinets with knots or previous dark finishes. They offer superior adhesion but can have strong fumes and require mineral spirits for cleanup.
- Water-Based (Latex/Acrylic) Primer: Easier to work with, low odor, and easy cleanup with water. Look for high-adhesion formulas specifically designed for cabinets or slick surfaces. These are often a good choice for laminate or previously painted cabinets.
- Shellac-Based Primer: The best option for blocking tough stains and odors, and it adheres to almost any surface. However, it has strong fumes and requires denatured alcohol for cleanup.
Applying the Primer
- Stir the Primer: Always stir primer thoroughly before and during use. Do not shake, as this can create air bubbles.
- Application Method:
- Brushing: Use a high-quality angled brush for edges and detailed areas on the cabinet frames.
- Rolling: Use a high-density foam roller for smooth, even coverage on the larger flat surfaces of doors and frames. Apply thin, even coats.
- Spraying: For the smoothest and most professional finish, spray painting kitchen cabinets is the best method. This requires a spray gun and proper ventilation.
- Thin Coats are Key: Apply thin, even coats of primer. Avoid overloading your brush or roller, which can lead to drips and an uneven finish. Two thin coats are generally better than one thick coat.
- Drying Time: Allow adequate drying time between coats as recommended by the primer manufacturer. This is crucial for proper adhesion.
- Sanding Between Coats: After the first coat of primer is completely dry, lightly sand all surfaces with 220-grit sandpaper. This will knock down any raised grain or imperfections. Wipe down with a tack cloth to remove dust before applying the second coat.
- Inspect: Before applying paint, inspect the primed surfaces for any missed spots or imperfections. Address them now.
The Art of Painting Kitchen Cabinets
With a well-primed surface, you’re ready for the main event – painting! The quality of your paint and your application technique will determine the final look.
Selecting the Best Paint for Kitchen Cabinets
The best paint for kitchen cabinets is a durable enamel that can withstand frequent cleaning and wear.
- Formula Type:
- Acrylic Enamel (Water-Based): The most popular choice for DIYers due to its ease of use, low VOCs (Volatile Organic Compounds), and quick drying times. Look for “cabinet enamel” or “trim and door” paints.
- Oil-Based Enamel: Offers exceptional hardness and durability, with a smooth, furniture-like finish. However, they have strong odors, require mineral spirits for cleanup, and can yellow over time, especially in lighter colors.
- Sheen: Satin or semi-gloss are the most practical choices for kitchens. They offer good durability and are easier to clean than matte finishes.
Application Techniques for a Professional Finish
You have a few options for applying paint, each with its pros and cons.
1. Brushing and Rolling
This is the most accessible method for DIYers.
- Prepare Your Paint: Stir the paint thoroughly. If using a thicker enamel, you might need to thin it slightly according to the manufacturer’s instructions for a smoother application.
- Start with Edges and Details: Use a high-quality angled brush to paint the edges, corners, and any decorative details on the cabinet frames and doors.
- Roll Flat Surfaces: Use a high-density foam roller for the larger, flat surfaces. Apply paint in thin, even strokes, working in one direction. Overlap your strokes slightly to avoid lap marks.
- Maintain a Wet Edge: Always work towards a “wet edge” – meaning you overlap your strokes with the newly applied paint. This helps prevent visible brush marks.
- Two Thin Coats: Apply two thin, even coats of paint, allowing adequate drying time between each coat as recommended by the paint manufacturer.
- Sanding Between Coats: Lightly sand with 220-grit or 320-grit sandpaper after the first coat dries. This removes any dust nibs or slight imperfections, creating a smoother surface for the next coat. Wipe down with a tack cloth.
2. Spray Painting Kitchen Cabinets
This method yields the smoothest, most factory-like finish.
- Equipment: You’ll need a paint sprayer (HVLP – High Volume Low Pressure – sprayers are excellent for this). Renting or buying a good quality sprayer is an investment.
- Preparation is Paramount: Since spray paint covers everything, meticulous masking of your kitchen area is essential. Cover floors, countertops, appliances, and walls with plastic sheeting and painter’s tape. Ensure good ventilation.
- Thinning the Paint: Most paints need to be thinned for spraying. Follow the paint manufacturer’s recommendations or the sprayer’s manual for the correct thinning ratio.
- Practice: If you’re new to spray painting, practice on a piece of cardboard or scrap wood to get a feel for the trigger control, distance, and overlap.
- Application:
- Hold the sprayer an even distance from the surface (usually 6-10 inches).
- Move the sprayer in smooth, even strokes, overlapping each pass by about 50%.
- Start spraying before you reach the surface and stop after you pass it to avoid drips at the beginning and end of each stroke.
- Paint doors and drawer fronts horizontally on sawhorses for best results.
- Multiple Thin Coats: Apply several thin coats rather than one thick one. This prevents runs and drips and provides a more even finish.
- Drying Time: Allow ample drying time between coats as per the paint manufacturer’s instructions.
- Sanding (Optional but Recommended): After the final coat is dry, you can lightly wet-sand with very fine grit sandpaper (400-600 grit) if desired, followed by a polishing compound, for an ultra-smooth finish. Again, use tack cloths to remove dust.
Reassembling Your Kitchen Cabinets
Once the paint is completely dry and cured (this can take several days to a week for full hardness), it’s time to put everything back together.
Reattaching Hardware
- If you’re reusing your old hardware, clean it thoroughly. You might consider spray painting hardware for a quick refresh.
- Attach hinges and handles to the doors and drawer fronts.
Rehanging Doors and Reinstalling Drawers
- Carefully reattach the doors to the cabinet frames. Use the labels you created earlier to ensure each door goes back to its original position.
- Adjust hinges as needed to ensure doors hang straight and close properly.
- Reinstall drawer fronts.
Final Touches and Curing
- Step back and admire your work!
- Remember that paint continues to cure over time, increasing its hardness and durability. Be gentle with your newly painted cabinets for the first few weeks. Avoid harsh cleaners or abrasive scrubbing.
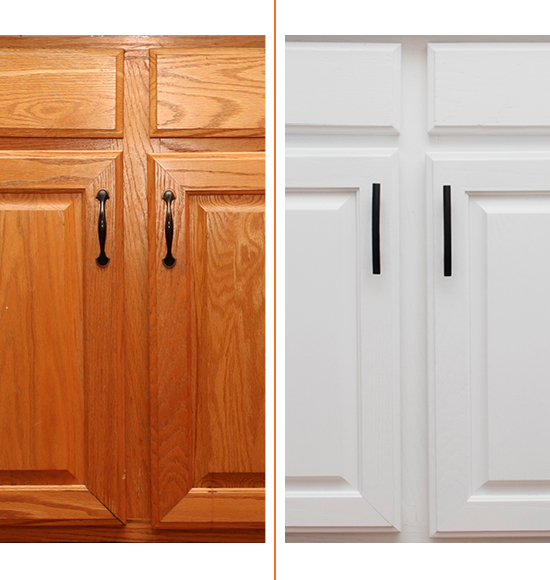
Cabinet Painting Before and After: The Transformation
The visual impact of a cabinet painting before and after can be astonishing. What was once dated and worn can become a sleek, modern centerpiece of your kitchen. You’ll notice:
- Updated Aesthetic: A fresh coat of paint can completely change the style of your kitchen, making it feel more modern, spacious, or elegant.
- Enhanced Durability: High-quality cabinet paint protects your cabinets from moisture and wear, extending their lifespan.
- Increased Home Value: A professionally refinished kitchen can significantly boost your home’s appeal and market value.
- Cost Savings: Compared to replacing cabinets, painting is an incredibly cost-effective way to achieve a dramatic kitchen update.
Frequently Asked Questions (FAQs)
Q1: How long does it take to paint kitchen cabinets?
A: The time commitment can vary significantly based on the size of your kitchen, the number of doors and drawers, and whether you are brushing/rolling or spraying. A typical DIY project can take anywhere from 3 days to a week or more, factoring in drying times and multiple coats. Spray painting can sometimes speed up the application process but requires extensive prep and cleanup.
Q2: What is the best paint finish for kitchen cabinets?
A: Satin or semi-gloss finishes are generally recommended for kitchen cabinets. They offer a good balance of durability, washability, and a pleasant sheen without highlighting imperfections too much.
Q3: Can I paint over laminate cabinets?
A: Yes, you can paint over laminate cabinets, but it requires extra careful preparation. Thorough cleaning, scuff sanding, and the use of a high-adhesion primer (like a bonding primer or a shellac-based primer) are crucial for the paint to adhere properly and prevent peeling.
Q4: Do I need to remove the cabinet doors to paint them?
A: Yes, it is highly recommended to remove cabinet doors and drawer fronts to paint them. This allows you to access all sides and edges for a thorough and even finish. It also makes it easier to achieve a smooth, factory-like finish, especially if you are spray painting.
Q5: What is the best way to clean kitchen cabinets before painting?
A: Thoroughly clean cabinets with a degreaser or a TSP solution to remove grease, grime, and any residue. After cleaning, wipe them down with a damp cloth to remove cleaning product residue and allow them to dry completely.
Q6: How many coats of paint do I need?
A: For most cabinet painting projects, two to three thin, even coats of paint are recommended to achieve full coverage and a durable finish. Always allow adequate drying time between coats, and consider light sanding with fine-grit sandpaper between coats for the smoothest result.
Q7: How do I ensure a smooth, brush-stroke-free finish?
A: To minimize brush strokes, use a high-quality synthetic bristle brush for cutting in and detailed areas. For larger surfaces, use a high-density foam roller. Apply paint in thin, even coats, maintaining a wet edge and working in one direction. Spray painting is the best method for achieving a completely smooth, brush-stroke-free finish.
By following these detailed steps and DIY cabinet painting tips, you can confidently tackle your kitchen cabinet refinishing project and achieve a professional, beautiful, and lasting transformation for your kitchen.