
What are the fastest and most effective ways to degrease kitchen cabinets? The quickest and most effective ways to degrease kitchen cabinets involve using a mild degreasing solution, working in small sections, and wiping clean immediately. Natural options like vinegar or baking soda mixtures can also be very effective, especially for lighter grease buildup.
Kitchen grease is a persistent adversary, clinging stubbornly to your cabinets and dimming their shine. Over time, this greasy film can become sticky and even attract more dirt, making your kitchen look dull and uninviting. But don’t worry! With the right approach and a few simple household ingredients, you can achieve sparkling clean kitchen cabinets fast and effectively. This guide will walk you through the best methods for degreasing your kitchen cabinets, tackling even the toughest grease removal from cabinets. We’ll explore various cabinet cleaning solutions, from powerful commercial products to gentle, natural degreaser for cabinets options, ensuring you find the perfect fit for your needs and cabinet material.
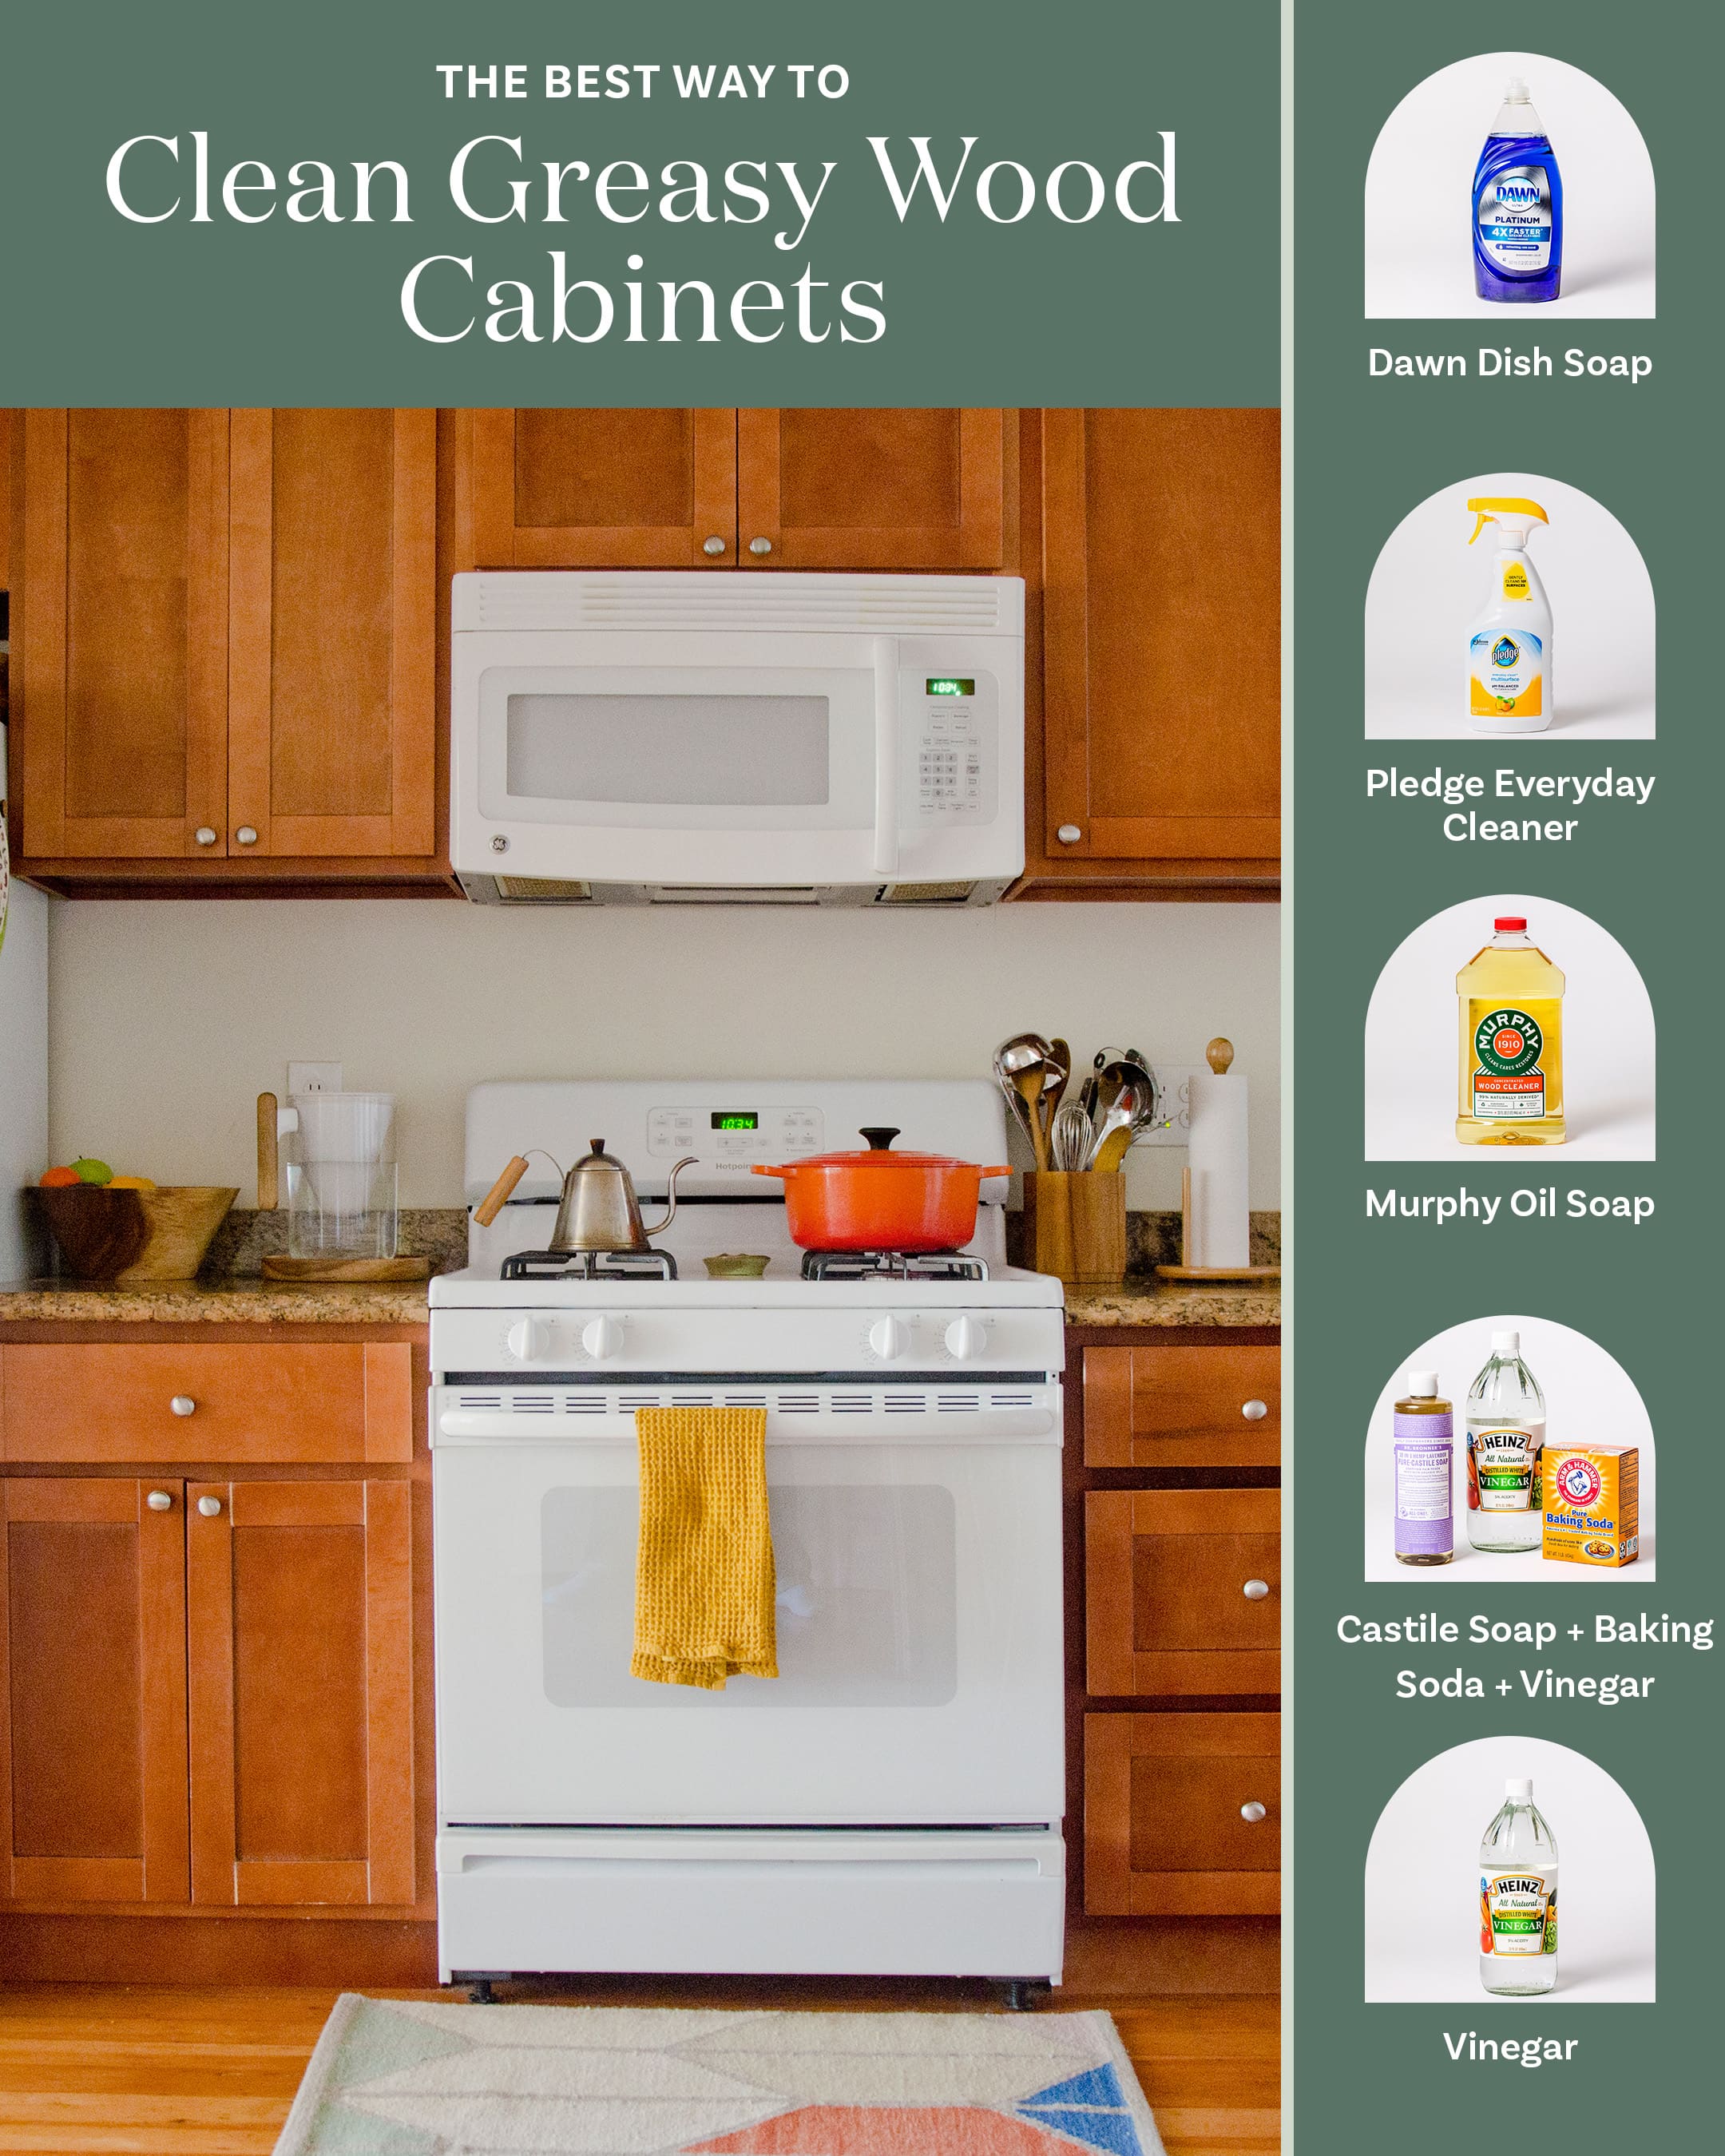
Image Source: cdn.apartmenttherapy.info
The Science Behind Kitchen Grease
Before we dive into the cleaning methods, let’s briefly touch on why kitchen cabinets get greasy. Cooking, especially frying and sautéing, releases tiny oil droplets into the air. These droplets, along with other airborne particles, settle on surfaces, including your cabinets. As these oils heat up and cool down repeatedly, they can polymerize and become sticky, creating a tough layer that’s hard to remove. This is why kitchen cabinet cleaning can feel like a constant battle.
Preparing for the Degreasing Mission
Before you start scrubbing, a little preparation goes a long way. This ensures a smoother, more efficient cleaning process and protects your cabinets.
Gather Your Supplies
Having all your tools and cleaning agents ready before you begin is crucial for a fast and effective clean.
Essential Supplies:
- Gloves: Protect your hands from cleaning solutions and grease.
- Soft Cloths or Microfiber Towels: You’ll need several for applying cleaner, wiping, and buffing. Microfiber is excellent at trapping grease and dirt.
- Buckets: One for your cleaning solution and one for clean rinse water.
- Sponge (non-abrasive): For gently scrubbing stubborn spots.
- Toothbrush or Small Brush: Ideal for cleaning in crevices and around hardware.
- Old Towels or Drop Cloths: To protect your countertops and floor.
Identify Your Cabinet Material
The best way to clean greasy kitchen cabinets depends on their material. Wood, laminate, thermofoil, and painted cabinets all require slightly different care. Always test any cleaning solution in an inconspicuous area first to ensure it doesn’t damage the finish.
- Wood Cabinets: Can be sensitive to harsh chemicals and excessive moisture. Avoid abrasive cleaners.
- Laminate & Thermofoil Cabinets: Generally durable but can be damaged by strong solvents or abrasive scrubbing.
- Painted Cabinets: The type of paint and its finish will determine how it responds to cleaning. Matte finishes are more delicate than gloss finishes.
Effective Cabinet Cleaning Solutions
Now, let’s explore the various cabinet cleaning solutions that can help you tackle grease. We’ll cover both commercial and DIY options.
Natural Degreaser for Cabinets: The Gentle Giant
For those who prefer a more natural approach, several household items can effectively cut through grease. These are often gentler on finishes and better for the environment.
1. Vinegar Solution
White distilled vinegar is a powerhouse when it comes to breaking down grease.
DIY Vinegar Degreaser Recipe:
- 1 part white distilled vinegar
- 1 part warm water
How to Use:
- Mix the vinegar and water in a spray bottle.
- Lightly mist a section of your cabinet. Avoid saturating.
- Let it sit for a minute or two to allow the vinegar to work on the grease.
- Wipe clean with a soft, damp cloth.
- For tougher spots, gently scrub with a non-abrasive sponge dipped in the solution.
- Rinse the area with a cloth dampened with plain water.
- Dry thoroughly with a clean, soft cloth to prevent water spots.
Tip: The smell of vinegar dissipates quickly once dry.
2. Baking Soda Paste
Baking soda is a mild abrasive and a natural degreaser, perfect for cleaning sticky cabinets.
DIY Baking Soda Degreaser Recipe:
- 3 parts baking soda
- 1 part water (enough to form a paste)
How to Use:
- Mix baking soda and water in a small bowl to create a paste.
- Apply the paste directly to greasy areas.
- Let it sit for 5-10 minutes.
- Gently scrub the area with a soft brush or damp cloth.
- Wipe away the paste with a clean, damp cloth.
- Rinse thoroughly with plain water.
- Dry immediately with a soft cloth.
Caution: While mild, use gentle pressure to avoid scratching delicate finishes.
3. Dish Soap Solution
Simple dish soap, designed to cut through grease on dishes, is also highly effective on cabinets.
DIY Dish Soap Degreaser Recipe:
- A few drops of mild dish soap
- 1 cup of warm water
How to Use:
- Mix the dish soap and warm water in a bowl or spray bottle.
- Dip a soft cloth into the solution, wring it out well, and wipe down the cabinet surface.
- For stubborn grease, gently rub with a soft sponge.
- Wipe with a clean, damp cloth to rinse.
- Dry with a clean, soft towel.
This is often the go-to for everyday kitchen cabinet maintenance.
Commercial Cabinet Degreasers
If you’re looking for a faster, more potent solution, commercial degreasers can be very effective.
- All-Purpose Kitchen Cleaners: Many are formulated to tackle grease. Look for ones labeled “degreaser.”
- Specialty Cabinet Cleaners: Some brands offer cleaners specifically designed for kitchen cabinets. Read labels carefully to ensure compatibility with your cabinet finish.
How to Use Commercial Degreasers:
- Always read and follow the manufacturer’s instructions.
- Wear gloves.
- Spray the cleaner onto a cloth, not directly onto the cabinets, to avoid overspray and potential damage to surrounding areas.
- Wipe the cabinets in small sections.
- Wipe down with a clean, damp cloth to remove residue.
- Dry thoroughly.
Note: Some heavy-duty degreasers can be harsh. Always test first.
The Step-by-Step Guide to Fast & Effective Degreasing
Now that you have your arsenal of cleaning solutions, let’s break down the process for maximum efficiency. This approach is designed for removing oil from cabinets and achieving excellent results quickly.
Step 1: Clear the Decks
- Remove everything from the cabinet doors and drawer fronts. This includes knobs, handles, and any decorative items.
- Lay down old towels or drop cloths below the cabinets you’ll be working on to catch drips.
Step 2: The Gentle Wipe-Down (Light Grease)
For cabinets with light grease buildup, a simple wipe-down might be all you need.
- Choose your preferred mild cleaning solution (dish soap and water or vinegar solution are great for this).
- Dampen a soft cloth with the solution. Wring it out thoroughly so it’s not dripping.
- Wipe down the cabinet surfaces in smooth, overlapping strokes.
- As the cloth picks up grease, rinse it in your rinse water bucket or switch to a clean cloth.
- Follow up immediately with a second cloth dampened with plain water to rinse away any cleaner residue.
- Dry the cabinets immediately with a clean, dry cloth to prevent streaks and water spots.
Step 3: Tackling Tougher Grease (Stubborn Buildup)
For areas with sticky, caked-on grease, you’ll need a bit more elbow grease and potentially a stronger solution.
- Apply the Cleaner: Spray your chosen degreaser (vinegar solution, baking soda paste, or commercial cleaner) onto a soft cloth. For tough spots, you can apply it directly to the greasy area.
- Let it Sit: Allow the cleaner to sit on the grease for a few minutes. This gives it time to break down the oily residue.
- Gentle Scrubbing: Use a soft cloth or a non-abrasive sponge to gently scrub the greasy areas. For corners, seams, and around hardware, a toothbrush or small cleaning brush is invaluable.
- Wipe Away: Use a clean, damp cloth to wipe away the loosened grease and cleaner. You may need to rinse your cloth multiple times.
- Rinse: Wipe the entire section with a cloth dampened with plain water to ensure all cleaner residue is removed. This is crucial to prevent damage or dullness from leftover chemicals.
- Dry Thoroughly: Immediately dry the cabinet with a clean, soft towel. This prevents streaks and water damage.
Step 4: Don’t Forget the Details!
- Hardware: Remove knobs and handles and clean them separately. A soak in warm, soapy water often works well. For stubborn grime, a toothbrush can help clean around the screws. Polish them before reattaching.
- Crevices and Edges: Use a toothbrush or a cotton swab dipped in your cleaning solution to get into tight spots where grease and dirt tend to accumulate.
- Cabinet Doors and Drawer Fronts: Work on one cabinet door or drawer front at a time to ensure you can rinse and dry it properly before moving on.
Step 5: Reassembly and Admiration
Once all cabinets are clean and dry, reattach your hardware. Step back and admire your work – your kitchen cabinets will look revitalized!
Maintaining that Gleaming Finish: Kitchen Cabinet Maintenance
Regular kitchen cabinet maintenance is key to preventing heavy grease buildup in the first place. A quick wipe-down after cooking can save you hours of scrubbing later.
- Daily Wipes: Keep a microfiber cloth handy to wipe up any splatters or grease as soon as they occur.
- Weekly Touch-Ups: A quick wipe with a damp cloth and a mild cleaner (like dish soap and water) can keep everyday grime at bay.
- Deep Cleaning Schedule: Aim for a more thorough degreasing session every 1-3 months, depending on your cooking habits.
Troubleshooting Common Cabinet Cleaning Issues
Sometimes, despite your best efforts, you might encounter specific challenges.
Cleaning Sticky Cabinets
Sticky cabinets are often a result of accumulated grease that has started to harden.
- Best Approach: Use a degreaser that can penetrate the stickiness. The vinegar solution or a dish soap solution are excellent starting points. For very stubborn stickiness, a commercial cabinet degreaser might be necessary.
- Technique: Apply the cleaner, let it sit for a few minutes to soften the sticky residue, and then gently scrub with a non-abrasive sponge or cloth. Repeat if necessary. Patience is key here.
Removing Oil from Cabinets (Specific Areas)
Sometimes, only a small area might have a concentrated amount of oil, like near the stove.
- Spot Treatment: Apply your chosen degreaser directly to a cloth or sponge. Gently work on the affected area, ensuring you don’t over-saturate the surrounding surfaces.
- Multiple Passes: You might need to repeat the cleaning process a few times for heavily oiled spots. Always rinse and dry thoroughly.
Addressing Unpleasant Odors
Sometimes, along with grease, lingering cooking odors can be absorbed by cabinets.
- Vinegar Power: The vinegar solution is excellent for neutralizing odors as well as grease.
- Baking Soda: Leaving an open box of baking soda in your kitchen or using the paste can also help absorb lingering smells.
Cabinet Cleaning by Material: A Quick Reference
Here’s a simplified guide for different cabinet types.
| Cabinet Material | Recommended Cleaners | What to Avoid |
|---|---|---|
| Solid Wood | Mild dish soap and water, specialized wood cleaners, diluted vinegar solution (test first). | Abrasive cleaners, harsh chemicals, excessive water, furniture polish (can build up) |
| Wood Veneer | Very mild dish soap and water, specialized wood cleaners. Use minimal moisture. | Harsh chemicals, excessive water, abrasive scrubbing, vinegar (can lift veneer) |
| Laminate | Mild dish soap and water, all-purpose cleaners, diluted vinegar solution. | Abrasive cleaners, ammonia, bleach, high-heat steam cleaners |
| Thermofoil | Mild dish soap and water, all-purpose cleaners. | Abrasive cleaners, solvents, heat (e.g., from appliances or steam cleaners) |
| Painted (Glossy) | Mild dish soap and water, all-purpose cleaners. | Abrasive cleaners, solvents |
| Painted (Matte/Eggshell) | Very mild dish soap and water, specialized cabinet cleaners. Use minimal pressure. | Abrasive cleaners, harsh chemicals, vigorous scrubbing |
Kitchen Cabinet Restoration: Beyond Cleaning
While degreasing can make cabinets look like new, sometimes the finish itself might be worn. Degreasing is often the first step in kitchen cabinet restoration. After thoroughly cleaning and drying, you might consider:
- Touch-up Paint: For minor chips or scratches.
- Refinishing: For cabinets with significant wear, sanding and applying a new finish might be necessary.
However, for most situations, a good degreasing session is all that’s needed to bring back the luster.
Frequently Asked Questions (FAQ)
Here are some common questions people have about degreasing kitchen cabinets.
Q1: Can I use Windex on my kitchen cabinets?
A1: While Windex is a good glass cleaner, it’s generally not recommended for kitchen cabinets, especially wood or painted ones. It can contain ammonia or alcohol, which can dull or damage certain finishes over time. Stick to milder solutions designed for cabinets.
Q2: How often should I degrease my kitchen cabinets?
A2: This depends on your cooking habits. If you frequently fry or sauté, you might need to degrease monthly. For lighter cooking, every 3-6 months might suffice. Regular light cleaning will extend the time between deep degreasing sessions.
Q3: My cabinets have a sticky residue that won’t come off. What should I do?
A3: For sticky residue, patience and a good degreaser are key. Try a dish soap solution or a vinegar and water mixture. Let the solution sit on the residue for 5-10 minutes to soften it before gently scrubbing with a soft cloth or sponge. You may need to repeat the process. Avoid abrasive scrubbers, which can damage the finish.
Q4: Is it safe to use bleach on kitchen cabinets?
A4: No, bleach is generally too harsh for most kitchen cabinet finishes. It can strip color, dull the finish, and even damage the material itself, especially wood. It’s best to avoid bleach entirely for kitchen cabinet cleaning.
Q5: What is the best way to clean greasy cabinet hardware?
A5: Remove hardware first. Soak knobs and handles in warm, soapy water for a few minutes. Use a toothbrush to scrub away any stubborn grime or grease. Rinse thoroughly and dry before reattaching.
Q6: Can I use a magic eraser on my cabinets?
A6: Magic Erasers are melamine foam sponges, which are technically micro-abrasive. While they can be effective at removing tough marks, they can also dull or even remove the finish on some cabinets, especially high-gloss or delicate painted surfaces. Use them with extreme caution and test in an inconspicuous area first.
Q7: How do I prevent grease buildup on my cabinets?
A7: The best prevention is regular cleaning. Wipe down cabinets with a damp cloth after cooking. Use your range hood consistently when cooking to vent grease and steam away from your cabinets. Keep a microfiber cloth handy for immediate wipe-ups of any splatters.
By following these steps and tips, you can effectively degrease your kitchen cabinets, restoring their shine and ensuring they remain in good condition for years to come. Happy cleaning!