
Yes, you can absolutely clean your kitchen cupboards effectively. This guide will show you how to tackle everything from greasy build-up to restoring their original shine. We’ll cover different materials and the best methods for a sparkling clean kitchen.
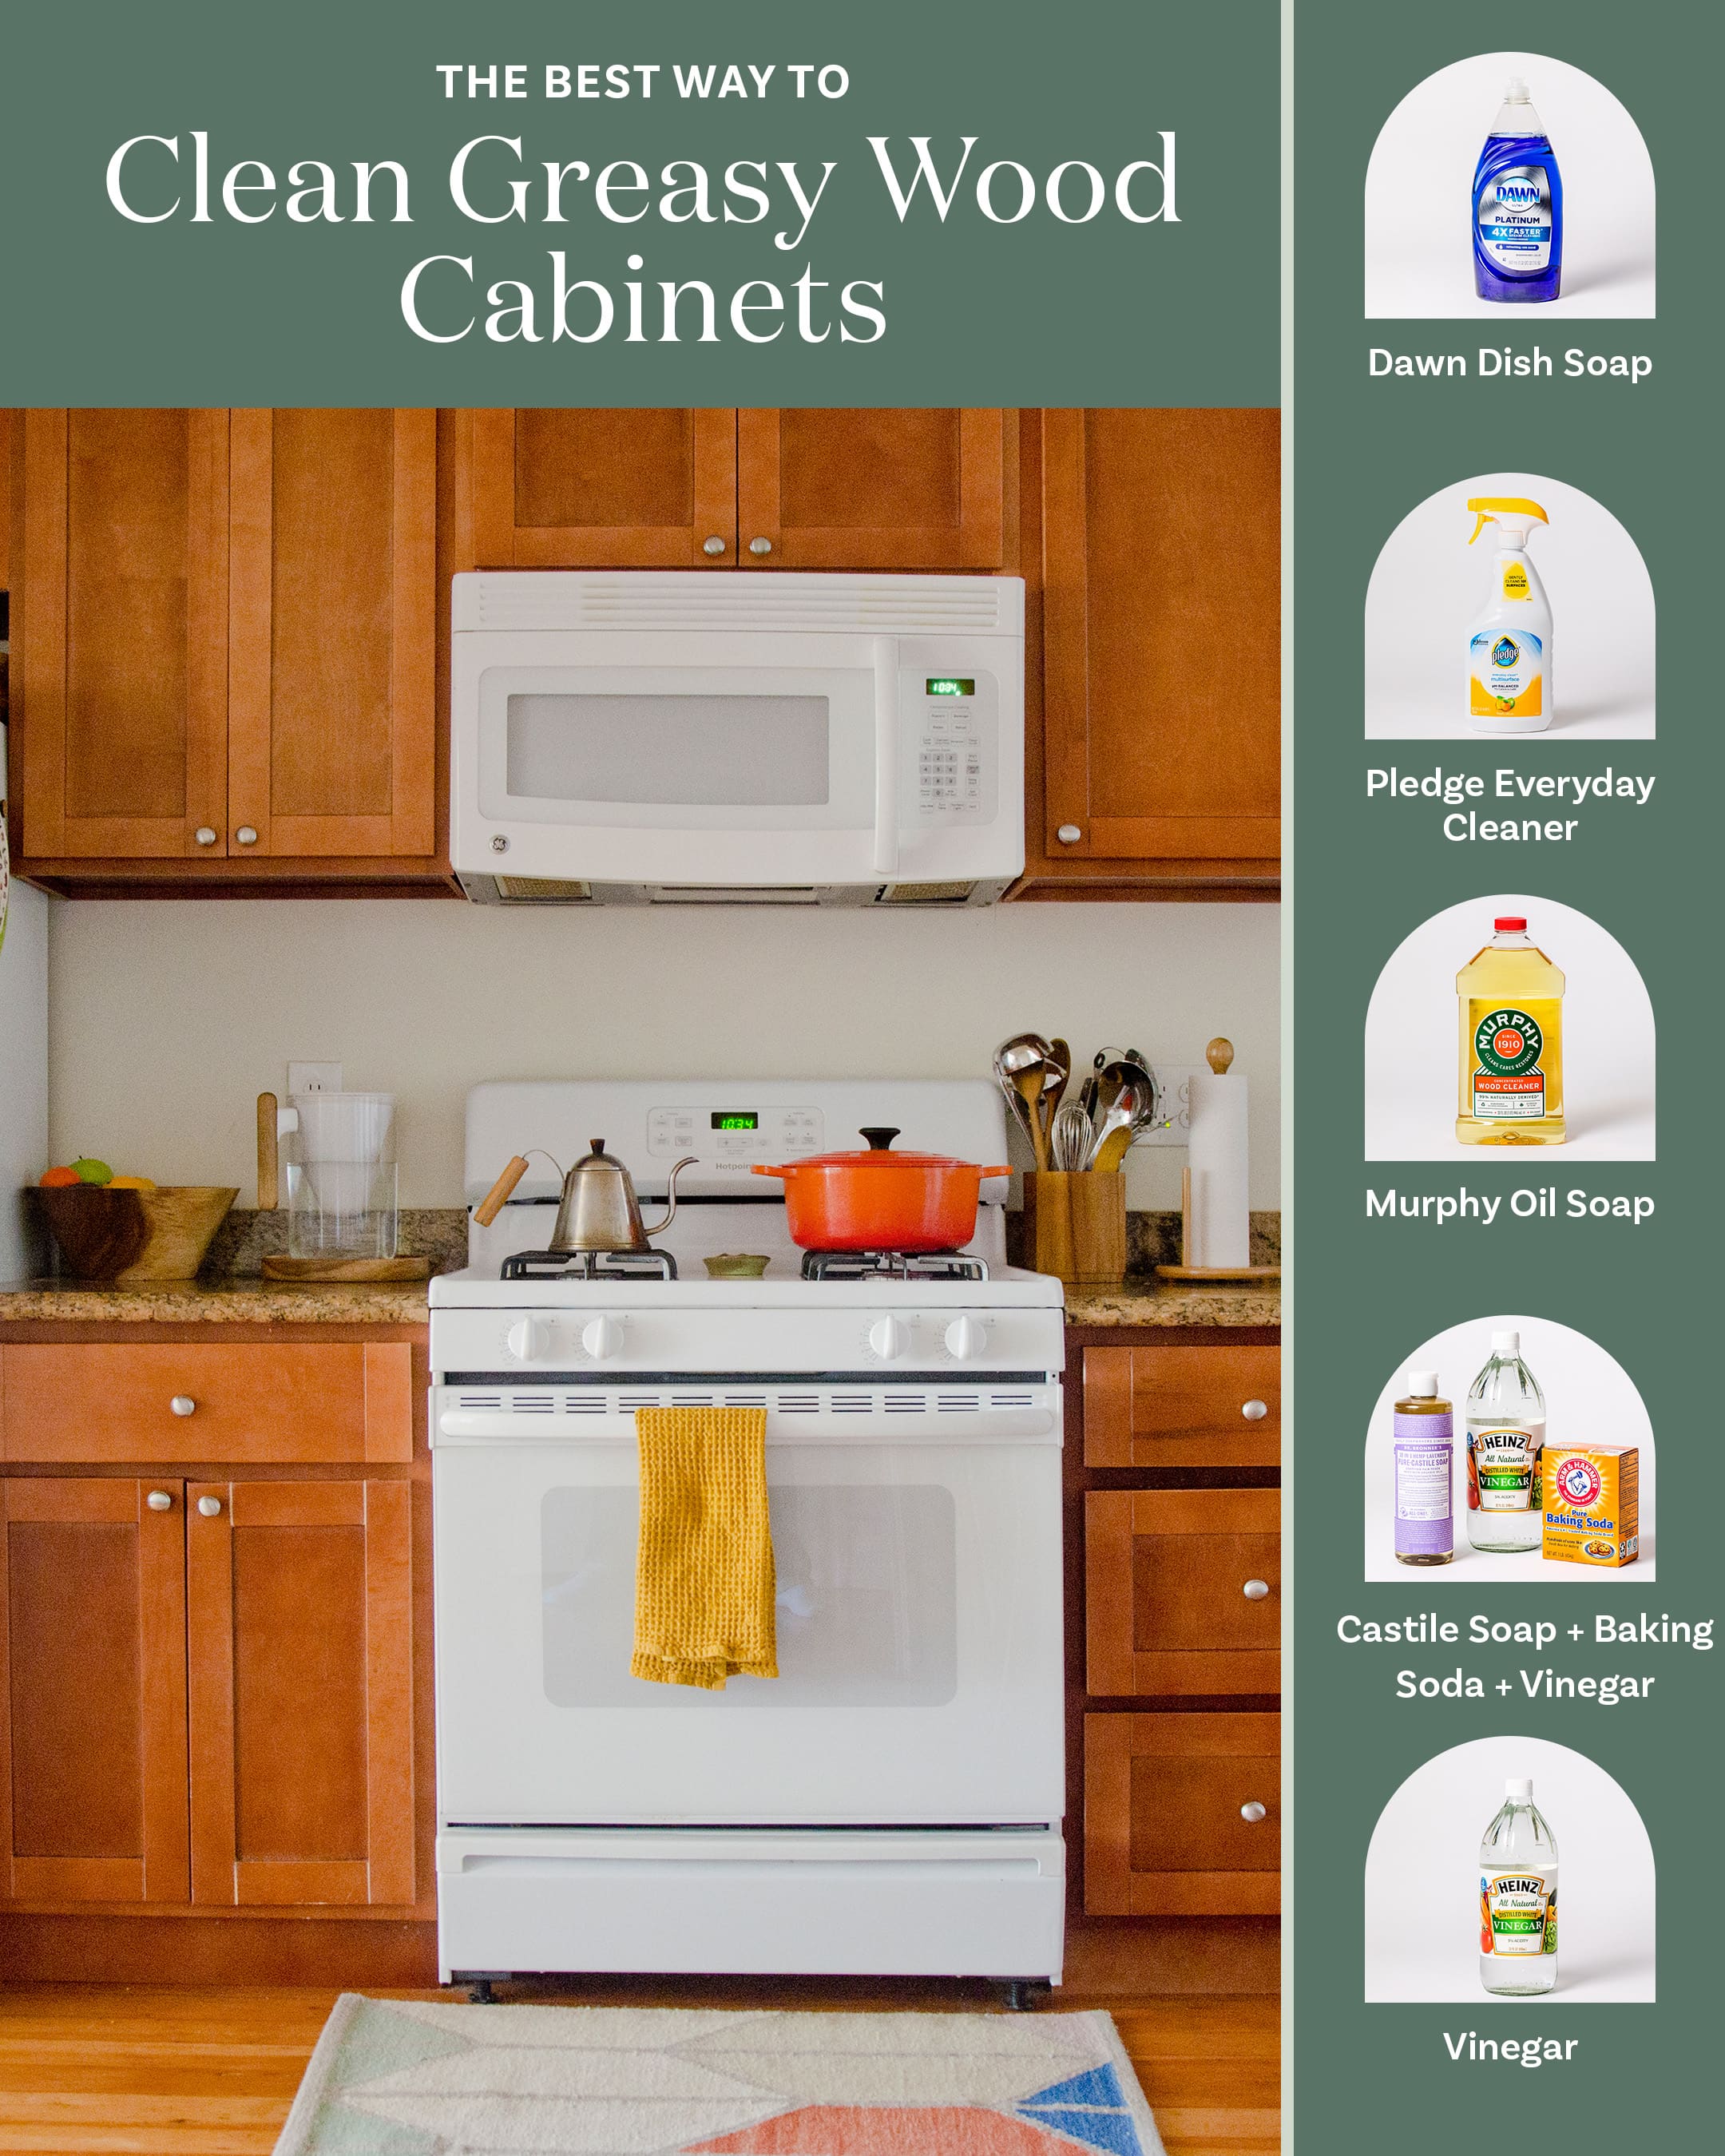
Image Source: cdn.apartmenttherapy.info
Why Regular Kitchen Cupboard Cleaning Matters
Kitchen cupboards are the workhorses of your kitchen. They store your food, dishes, and cooking tools. Over time, they can accumulate grease, grime, food splatters, and dust. Regular cleaning not only keeps your kitchen looking good but also promotes a more hygienic environment. Dirty cupboards can harbor bacteria and unpleasant odors. A good clean can also revive the look of your kitchen, making it feel fresh and inviting. It’s a crucial part of deep clean kitchen cabinets.
Preparing for Your Cupboard Cleaning Mission
Before you start cleaning, a little preparation goes a long way.
Decluttering Your Cupboards
- Empty everything out: Take all items out of the cupboards. This gives you a clear view of what you’re dealing with and allows you to clean the interiors properly.
- Sort and organize: While cupboards are empty, it’s a perfect time to sort through items. Discard expired foods, broken dishes, or items you no longer use.
- Wipe down items: Quickly wipe down jars, cans, and containers before putting them back. This prevents transferring dirt to clean surfaces.
Gathering Your Cleaning Supplies
Having the right tools and solutions makes the job easier.
Essential Supplies:
- Soft cloths (microfiber is ideal)
- Sponges (non-abrasive)
- Warm water
- Mild dish soap
- Baking soda
- White vinegar
- Spray bottles
- Old toothbrushes (for nooks and crannies)
- Gloves (to protect your hands)
- Vacuum cleaner with brush attachment (optional, for dusting interiors)
Mastering Different Cupboard Materials
Kitchen cupboards come in various materials, and each needs a slightly different approach.
Laminate Cupboard Cleaning
Laminate is a popular, durable, and affordable choice.
How to Clean Laminate Cupboards:
- Gentle Wipe: For light dirt, a damp cloth with a little mild dish soap is usually enough. Wipe in the direction of the grain if visible.
- Stubborn Grime: Mix equal parts warm water and white vinegar in a spray bottle. Spray on a cloth (not directly on the cupboard to avoid excess moisture) and wipe the surfaces. Vinegar is a great natural cabinet cleaner.
- Greasy Spots: For tougher grease, a paste of baking soda and water can be effective. Apply the paste, let it sit for a few minutes, then gently wipe away with a damp cloth. This is excellent for greasy cupboard removal.
- Rinsing and Drying: Always wipe down with a clean, damp cloth to remove any cleaning solution residue. Then, dry thoroughly with a soft, dry cloth to prevent water spots.
What to Avoid with Laminate:
- Harsh abrasive cleaners or scrubbers.
- Excessive water, as it can seep into seams and cause damage.
- Ammonia-based cleaners.
Wood Cabinet Care
Wood cabinets can range from sealed and varnished to painted.
Natural Wood Cupboards (Sealed/Varnished)
DIY Cupboard Cleaning for Wood:
- Dusting: Start by dusting with a soft, dry cloth. A microfiber cloth works well to trap dust.
- Mild Cleaning Solution: Mix 1 cup of warm water with 1 tablespoon of mild dish soap. Dip a soft cloth into the solution, wring it out thoroughly so it’s just damp, and wipe down the cabinets.
- Vinegar Solution: For slightly more persistent dirt, a solution of 1 part white vinegar to 4 parts warm water can be used. Again, use a barely damp cloth.
- Wood Cabinet Polish: After cleaning and drying, you can apply a good quality wood polish or a natural oil like mineral oil (for unfinished or oiled wood) to restore shine and protect the wood. Apply sparingly with a clean cloth and buff. This is key for wood cabinet polish.
Important for Wood:
- Always wipe with the grain of the wood.
- Never use excessive water.
- Avoid all-purpose cleaners that can strip the finish.
Painted Cupboard Maintenance
Painted cabinets offer a different aesthetic and require careful handling.
Maintaining Painted Cupboards:
- Gentle Cleaning: For everyday cleaning, a soft cloth dampened with plain water is often sufficient.
- Mild Soap: If there’s light grease or grime, use a cloth with a tiny amount of mild dish soap and warm water.
- Tough Stains: For stubborn spots, a solution of baking soda and water paste can be gently applied and then wiped off with a damp cloth.
- Rinse and Dry: Ensure you rinse the surface with a clean, damp cloth to remove soap residue, and then dry immediately with a soft, lint-free cloth.
- Touch-ups: Small chips or scratches can often be touched up with matching paint.
Things to Consider for Painted Finishes:
- Avoid abrasive cleaners that can scratch or dull the paint.
- Be cautious with solvents, as they can damage some paint finishes.
- If you’re unsure about the paint type, test any cleaner in an inconspicuous area first.
Stainless Steel Cupboard Cleaning
Stainless steel looks sleek but can show fingerprints and smudges easily.
Cleaning Stainless Steel Cupboards:
- Wipe with the Grain: Always wipe in the direction of the stainless steel grain to avoid scratches and achieve a uniform look.
- Mild Soap and Water: A damp cloth with a few drops of mild dish soap is excellent for everyday cleaning.
- Vinegar Solution: For water spots or streaks, spray a 1:1 water-to-vinegar solution onto a cloth and wipe down.
- Specialized Cleaners: There are commercial stainless steel cleaners available that can also provide a protective polish.
- Drying: Buff with a dry, soft cloth to prevent water spots and streaks.
Key for Stainless Steel:
- Never use steel wool, abrasive powders, or harsh chemicals like bleach, as they can scratch and damage the finish.
- Microfiber cloths are best for polishing.
Tackling Tough Grime and Grease
Grease is a common enemy in the kitchen. Here’s how to win the battle for greasy cupboard removal.
The Power of Baking Soda Paste
- How to Make: Mix about 3 parts baking soda with 1 part water to form a thick paste.
- Application: Apply the paste directly to greasy areas. Let it sit for 5-10 minutes.
- Removal: Gently scrub with a soft cloth or non-abrasive sponge. Wipe clean with a damp cloth and dry thoroughly. Baking soda is a fantastic mild abrasive and deodorizer.
White Vinegar: Your Natural Ally
- Why it Works: Vinegar’s acidity cuts through grease and grime effectively.
- Using it Safely: Mix 1 part white vinegar with 1 part warm water in a spray bottle. Spray onto a cloth and wipe the greasy surfaces. For very tough grease, you can spray directly and let it sit for a few minutes before wiping.
- Important: Always rinse with a clean, damp cloth afterward and dry to prevent the vinegar smell from lingering.
Dish Soap: The Everyday Hero
- Simple Solution: A few drops of mild dish soap in warm water is your first line of defense against everyday grease and spills.
- Method: Dip a soft cloth or sponge into the soapy water, wring it out well, and wipe down the cupboards. Rinse with a clean, damp cloth and dry.
Natural Cabinet Cleaner Recipes
For those who prefer a more eco-friendly approach, these natural cabinet cleaner recipes are perfect.
All-Purpose Natural Kitchen Cleaner
- Ingredients:
- 1 cup warm water
- 1 cup white vinegar
- 10-15 drops essential oil (lemon, orange, or tea tree oil for added cleaning power and scent)
- Instructions: Combine all ingredients in a spray bottle. Shake well before each use. Spray onto a cloth and wipe surfaces.
Gentle Degreaser
- Ingredients:
- 1/2 cup baking soda
- 1/4 cup warm water
- (Optional) 5 drops lemon essential oil
- Instructions: Mix into a paste. Apply to greasy areas, let sit, then gently scrub and wipe away.
Tips for Kitchen Cabinet Restoration
Sometimes, your cabinets need more than just a clean. They might need a little kitchen cabinet restoration.
Addressing Scratches on Wood
- Minor Scratches: For light scratches on wood, you can try using a walnut or pecan. Rub the nutmeat into the scratch; the natural oils can help disguise it.
- Wood Polish/Wax: A good quality wood polish or wax can often hide minor surface scratches.
- Touch-up Pens/Stains: For deeper scratches, wood touch-up pens or stain markers that match your cabinet color can be very effective. Apply carefully with a fine brush or the pen tip.
- Sand and Refinish: For significant damage, you might need to lightly sand the area and reapply a finish or paint.
Reviving Dull Finishes
- Wood Polish: Regular use of a good wood cabinet polish can bring back the shine and depth of color to wooden cabinets.
- Mineral Oil: For unfinished or oiled wood, a light application of mineral oil can restore moisture and sheen.
- Car Wax (for some finishes): A very thin layer of carnauba wax can sometimes add a protective sheen to sealed wooden cabinets, but test in an inconspicuous spot first.
How to Keep Your Kitchen Cupboards Clean Longer
Prevention is as important as the cleaning itself.
- Wipe Spills Immediately: Don’t let spills sit. A quick wipe with a damp cloth can prevent stains and sticky residue.
- Use Cabinet Liners: Consider using liners on shelves. They catch crumbs and spills, making cleaning much easier.
- Regular Dusting: A quick dusting every week can prevent dust from building up into harder-to-remove grime.
- Use Cabinet Handles: Always use cabinet handles and knobs. Touching the cupboard doors directly with greasy hands transfers oils.
- Ventilate: Good kitchen ventilation helps reduce the build-up of cooking grease and steam.
Deep Clean Kitchen Cabinets: A Step-by-Step Approach
When it’s time for a thorough overhaul, follow these steps.
Step 1: Empty and Prepare
- Remove everything from the cupboards and drawers.
- Wipe down all items before placing them aside.
- Protect your countertops and floor with old towels or newspaper.
Step 2: Dusting and Vacuuming
- Use a soft brush attachment on your vacuum cleaner to remove loose dust and debris from inside cupboards and drawers.
- For shelves and door interiors, a dry microfiber cloth can be used.
Step 3: Interior Cleaning
- For shelves and drawer interiors, a mild dish soap and water solution or the vinegar/water spray is usually sufficient.
- For tougher stains inside, use the baking soda paste.
- Always wipe with a clean, damp cloth and dry thoroughly.
Step 4: Exterior Cleaning (Material Specific)
- Follow the specific cleaning advice for your cupboard material (laminate, wood, painted, stainless steel) as outlined earlier.
- Pay attention to handles and hinges, which often accumulate grime. Use an old toothbrush for intricate areas.
Step 5: Dealing with Greasy Cupboard Removal
- For heavily greased areas, let your chosen degreaser (baking soda paste or vinegar solution) sit for a few minutes before wiping. You may need to repeat this process.
Step 6: Rinsing and Drying
- After cleaning the exterior, wipe down all surfaces with a clean, damp cloth to remove any residue from your cleaning solutions.
- Dry all surfaces completely with a soft, dry cloth. This is crucial to prevent water damage or streaks.
Step 7: Polishing and Protection
- For wood cabinets, apply a wood cabinet polish or appropriate oil.
- For stainless steel, use a stainless steel polish if desired.
- Consider using cabinet liners for easier future cleaning.
Frequently Asked Questions About Cleaning Kitchen Cupboards
Here are some common questions answered:
Q1: What are the safest cupboard cleaners to use?
The safest cupboard cleaners are typically mild dish soap, warm water, white vinegar diluted with water, and baking soda paste. These are safe cupboard cleaners because they are non-toxic and generally gentle on most surfaces when used correctly. Always test in an inconspicuous area first.
Q2: Can I use furniture polish on my kitchen cabinets?
For sealed wood cabinets, a good quality furniture polish designed for wood can be used sparingly to add shine and protection. However, avoid using it on laminate, painted, or high-gloss finishes unless the product specifically states it is safe for those surfaces. Always check the product label.
Q3: How often should I clean my kitchen cupboards?
It’s a good idea to do a quick wipe-down of cupboard fronts weekly to tackle minor spills and fingerprints. A deep clean kitchen cabinets routine should be done every 3-6 months, depending on your cooking habits and how quickly grime builds up.
Q4: My cabinets have a sticky residue from grease. How do I remove it?
A paste of baking soda and water, or a solution of 1 part white vinegar to 1 part warm water, works very well for greasy cupboard removal. For stubborn residue, let the solution sit for a few minutes before gently scrubbing with a non-abrasive sponge or cloth.
Q5: How do I clean the inside of my kitchen cupboards?
Empty the cupboards completely. Then, use a damp cloth with mild dish soap or a vinegar-water solution to wipe down the shelves and interior walls. For persistent stains or sticky spots, use the baking soda paste. Always dry the interior thoroughly afterward.
Q6: Can I use all-purpose cleaners on my kitchen cabinets?
It’s best to avoid generic all-purpose cleaners unless the label specifically states they are safe for your cabinet material. Many contain harsh chemicals that can strip finishes, dull paint, or damage laminate. Sticking to natural cabinet cleaner options or mild soap and water is usually safer.
By following this comprehensive guide, you can effectively clean, maintain, and even restore your kitchen cupboards, ensuring your kitchen remains a clean and inviting space.