
Are your kitchen cabinet doors looking a little crooked? Do they rub against each other, or perhaps sag in the middle? Yes, you can absolutely adjust your kitchen cabinet doors yourself! With a few simple tools and some patience, you can restore their proper alignment and give your kitchen a neater, more polished look. This guide will walk you through the entire process of kitchen cabinet adjustments, focusing on cabinet door alignment and how to adjust cabinet hinges effectively.
When your cabinet doors aren’t sitting right, it’s not just an aesthetic issue. Misaligned doors can be difficult to open and close, and they can even wear down the cabinet door hardware over time. Fortunately, most modern cabinets use adjustable hinges that allow for precise control over door position. This DIY guide will help you tackle common problems like fix sagging cabinet doors, doors that are too high, too low, too far in, or too far out.
Let’s get your cabinets looking and working like new!
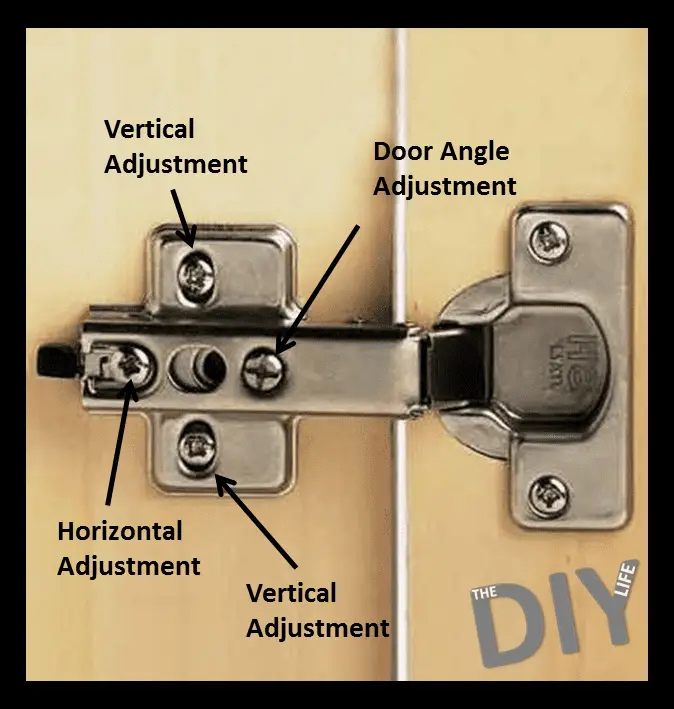
Image Source: www.the-diy-life.com
Deciphering Your Cabinet Hinges
Before you can adjust anything, you need to know what kind of hinges you have. Most kitchen cabinets use one of two common types of hinges:
- Concealed Hinges (European Hinges): These are the most common type found on modern cabinets. The hinge mechanism is mostly hidden when the door is closed, fitting into a circular cutout in the back of the door. They offer excellent adjustability in multiple directions.
- Surface-Mounted Hinges (Old-Style Hinges): These hinges are visible on the outside of the cabinet door and frame. They are often simpler and may offer less adjustability, typically controlled by screws that attach the hinge to the door and the cabinet frame.
Knowing your hinge type will dictate the adjustment process. For this guide, we’ll focus primarily on concealed hinges, as they are the most prevalent and offer the most straightforward adjustments.
How to Identify Your Hinge Type:
- Open the Cabinet Door: Look at the back of the door and the cabinet frame.
- Examine the Hinge:
- If the hinge appears to be a single piece that attaches to both the door and the cabinet, and you can see most of its mechanism, it’s likely a surface-mounted hinge.
- If you see a cup-shaped recess in the back of the door where the hinge arm inserts, and the main body of the hinge is attached to the cabinet frame, you have concealed hinges. These often have two screws holding the hinge plate to the frame and one or two screws attaching the hinge cup to the door.
This guide will primarily address concealed hinges. If you have surface-mounted hinges, the process might involve loosening and retightening the cabinet door screws that attach the hinge to the frame, which can also allow for some repositioning.
Tools You’ll Need for the Job
Gathering the right tools beforehand makes the process much smoother. Here’s what you’ll typically need:
- Screwdriver Set: A Phillips head screwdriver is essential. Many hinge adjustment screws are Phillips head. A flathead screwdriver might also be useful for some older hinge types or for gently prying.
- Measuring Tape or Ruler: To accurately gauge how much a door needs to move.
- Pencil: For marking positions if needed.
- Level: To ensure doors are perfectly horizontal and vertical.
- Gloves (Optional): To keep your hands clean.
- A Helper (Optional but Recommended): Especially when working with heavier doors or multiple doors, an extra pair of hands is invaluable for holding doors steady.
The Three Dimensions of Cabinet Door Adjustment
Concealed hinges are designed with a remarkable amount of adjustability, typically allowing you to move the door in three directions:
- In/Out (Depth Adjustment): This moves the door closer to or further away from the cabinet frame. It’s crucial for ensuring doors are flush with each other and don’t rub.
- Up/Down (Height Adjustment): This corrects doors that are too high or too low relative to neighboring doors or the cabinet opening.
- Left/Right (Side-to-Side Adjustment): This is used to align the gap between doors or to center a door within its opening.
Let’s explore how to tackle each of these adjustments.
Step 1: Diagnosing the Problem and Identifying Adjustment Screws
Before you start turning screws, take a good look at the problem.
- Observe Closely: Open and close the doors. Do they hit each other? Is there an uneven gap between them? Does one door sag?
- Check the Gaps: The ideal gap between cabinet doors is typically between 1/8 inch and 1/4 inch. The gap between the door and the cabinet frame should also be consistent.
- Locate the Hinges: Each cabinet door will have at least two hinges. Examine the back of the door and the cabinet frame to see the hinge hardware.
Most concealed hinges have at least two, often three, adjustment screws. Here’s a common breakdown of what these screws do:
- Screw 1 (Closest to the cabinet frame): This screw typically controls the in/out (depth) adjustment. Turning it will move the door closer or further from the cabinet.
- Screw 2 (Further from the cabinet frame): This screw usually controls the left/right (side-to-side) adjustment.
- Screw 3 (Often on the hinge arm): Some hinges have a third screw that controls the up/down (height) adjustment. In other cases, this adjustment is made by loosening the screws that attach the hinge mounting plate to the cabinet frame.
Table: Common Hinge Adjustment Screw Functions
| Screw Location/Appearance | Primary Adjustment |
|---|---|
| Screw closest to the cabinet frame attachment plate | In/Out (Depth) |
| Screw further from the cabinet frame attachment plate | Left/Right (Side) |
| Screw on the hinge arm itself (if present) | Up/Down (Height) |
| Screws attaching the mounting plate to the cabinet frame | Up/Down (Height) |
Important Note: The exact placement and function of screws can vary slightly between hinge manufacturers. If you’re unsure, it’s always best to consult the manufacturer’s documentation if possible, or experiment carefully.
Step 2: Adjusting for Side-to-Side Alignment (Left/Right)
This is often the most common adjustment needed to create even gaps between doors.
- Identify the Side Adjustment Screw: On the hinge, find the screw that controls the side-to-side movement. It’s usually the screw located further from the mounting plate.
- Make Small Adjustments: Turn the screw incrementally. A half-turn is usually sufficient for a noticeable change.
- To move the door to the left: Turn the screw clockwise.
- To move the door to the right: Turn the screw counter-clockwise.
- Check Progress: Close the door gently and observe the gap. Has it improved? You’re aiming for an even gap between this door and its neighbor.
- Repeat as Necessary: Continue making small adjustments, checking the door’s position after each turn, until the gap is consistent and pleasing to the eye.
- Adjust Both Hinges: If the door is significantly out of alignment, you may need to adjust both hinges on that door. Often, one hinge will require a slightly different adjustment than the other to achieve perfect cabinet door alignment.
Step 3: Adjusting for Up/Down Alignment (Height)
This adjustment is needed if your cabinet doors are sitting too high or too low, or if you notice fix sagging cabinet doors.
Method 1: Using a Dedicated Height Adjustment Screw
Some hinges have a third screw specifically for height adjustment, often located on the hinge arm itself.
- Locate the Height Screw: Find this specific screw on the hinge.
- Make Gradual Turns:
- To raise the door: Turn this screw clockwise.
- To lower the door: Turn this screw counter-clockwise.
- Test and Refine: Close the door to see the effect. Make small adjustments until the door is level with its neighbors.
Method 2: Adjusting the Mounting Plate Screws
If your hinges don’t have a dedicated height adjustment screw, you’ll typically adjust the height by slightly loosening the screws that attach the hinge’s mounting plate to the cabinet frame.
- Locate the Mounting Plate Screws: These are the screws that hold the bracket (the mounting plate) to the cabinet’s side. There are usually two of these.
- Loosen Slightly: Using your screwdriver, loosen these screws just enough so that the mounting plate can slide up or down slightly within the pre-drilled holes. Do not remove them completely.
- Adjust Height: Gently push the door up or down to the desired position.
- Tighten Screws: While holding the door in the correct position, carefully retighten the mounting plate screws.
- Check Alignment: Close the door and check if the height is correct. You might need to repeat this process, adjusting the mounting plate screws on both hinges of the door, to achieve perfect cabinet door leveling. This method requires a bit more finesse, as you need to hold the door steady while tightening. Having a helper is very useful here.
Step 4: Adjusting for In/Out Alignment (Depth)
This adjustment is used to bring doors flush with the cabinet frame or to correct doors that stick out too far or are recessed too deeply.
- Identify the Depth Adjustment Screw: This is usually the screw closest to the cabinet frame on the hinge.
- Turn the Screw:
- To move the door further in (recess it): Turn the screw clockwise.
- To move the door further out (bring it forward): Turn the screw counter-clockwise.
- Observe the Door: Close the door and see how it aligns with the cabinet face or surrounding doors.
- Fine-Tune: Make small adjustments until the door is flush or at the desired depth relative to the cabinet. This is especially important for tighten cabinet doors that might be loose or sticking out.
Bringing it all Together: Achieving Perfect Cabinet Door Alignment
Often, you’ll need to make adjustments in more than one direction to get your doors perfectly aligned. The key is to work systematically.
- Start with the biggest issue: If a door is clearly too high or too low, address the height first.
- Then tackle side-to-side gaps: Once the height is corrected, focus on making the gaps between doors even.
- Finally, adjust for depth: Use the in/out adjustment to ensure all doors are flush with the cabinet face.
Pro Tip: When adjusting cabinet door screws, make small changes, about a quarter to a half turn at a time. It’s much easier to add more adjustment than to undo too much.
Fixing Sagging Cabinet Doors
Sagging cabinet doors are a common issue that can be caused by gravity, heavy doors, or loose hinges over time. The good news is that adjustable hinges can often correct this.
- Check the Hinges: Examine the hinges on a sagging door. Are they loose? Are the cabinet door screws that attach the hinge to the cabinet frame or the door itself tight?
- Tighten Visible Screws: If any screws appear loose, gently tighten them. Be careful not to overtighten, which can strip the wood or damage the hinge.
- Adjust for Sag: If tightening screws doesn’t help, the sagging might be due to the door hanging too low. You’ll likely need to use the up/down adjustment.
- Using Mounting Plate Screws: If your hinges rely on adjusting the mounting plate, loosen the screws slightly, push the door up on the hinge side, and retighten. You might need to adjust both hinges to lift the entire door evenly and fix sagging cabinet doors.
- Using Dedicated Height Screws: If you have height adjustment screws on the hinge arm, turning these clockwise will lift the door. Adjust both hinges to lift the door level.
Important Consideration for Sagging: Sometimes, a door sags because the cabinet itself has warped, or the shelf supporting the hinge is no longer level. In these rarer cases, hinge adjustments might only offer a temporary fix. You might need to reinforce the cabinet or shelf.
Working with Different Types of Cabinet Door Hardware
While this guide focuses on concealed hinges, it’s worth mentioning other cabinet door hardware you might encounter.
-
Overlay vs. Inset Doors:
- Overlay Doors: These doors cover a significant portion of the cabinet frame when closed. They typically use concealed hinges.
- Inset Doors: These doors sit within the cabinet frame. They often use specialized hinges that might have different adjustment screws or require a more precise installation. If you have inset doors and they aren’t aligned, the adjustment process is similar, but you’re aiming for a flush fit within the frame.
-
Decorative Hinges: Some cabinets feature decorative surface-mounted hinges. Adjusting these usually involves loosening the screws that attach the hinge to the cabinet frame and repositioning. This can be trickier, as there might not be dedicated adjustment screws, and you’re relying on the play in the screw holes.
Tips for a Smooth DIY Cabinet Repair Experience
- Patience is Key: Don’t rush the process. Make small adjustments and check your work frequently.
- One Door at a Time: It’s best to focus on one door until it’s perfectly aligned before moving to the next.
- Take Pictures: Before you start, take a photo of the problematic door and its alignment. This can be helpful if you get stuck or need to revert your changes.
- Don’t Force Anything: If a screw won’t turn easily or something feels like it’s going to break, stop. You might be trying to adjust the wrong screw, or there might be a more significant problem.
- Clean as You Go: Wipe down the cabinet doors and hardware as you finish each adjustment to remove fingerprints and dust.
- Consider All Doors: If one door is out of alignment, it’s a good idea to check the alignment of all your cabinet doors to ensure consistency throughout your kitchen. This is part of overall kitchen cabinet adjustments.
Frequently Asked Questions (FAQ)
Q1: How often should I adjust my kitchen cabinet doors?
A1: You don’t need to adjust them regularly. Adjustments are typically only needed when you notice a problem like doors not closing properly, rubbing, or sagging. This might happen after a house settles, due to humidity changes, or if the hinges loosen over time.
Q2: Can I adjust cabinet doors that have been painted?
A2: Yes, you can, but be extra careful. Paint can build up around hinges and screws, making them stiff. You might need to gently scrape away excess paint from the adjustment screws or hinge slots with a utility knife before you can turn them. Be cautious not to chip the paint on the cabinet door itself.
Q3: My cabinet doors have a lot of wiggle. How do I tighten cabinet doors?
A3: Wiggle can often be fixed by tightening the screws that attach the hinge to the cabinet frame or the door itself. If the hinge is still loose after tightening, the screw hole might be stripped. You can repair stripped screw holes by inserting a wooden dowel or a toothpick with wood glue into the hole, letting it dry, and then re-drilling a pilot hole for the screw.
Q4: What if adjusting the hinges doesn’t fix my sagging cabinet doors?
A4: If hinge adjustments don’t solve sagging, the issue might be with the cabinet itself. The shelf supporting the hinge might be warped or sagging, or the cabinet box might be out of square. In such cases, you might need to reinforce the shelf with brackets or consider shimming the hinge mounting plate to compensate for the sag.
Q5: How do I know which screw adjusts which direction on my cabinet hinges?
A5: While there’s a general rule (screw closest to frame is in/out, further screw is left/right), it’s best to test. Gently turn one screw a quarter turn and see how the door moves. Note its function before proceeding to the next screw. Having a helper to hold the door steady can make this testing easier.
By following these steps, you can effectively perform DIY cabinet repair and bring your kitchen cabinet doors back into perfect alignment, enhancing both the look and function of your kitchen. Happy adjusting!