
Image Source: images.seattletimes.com
How Often Should I Switch Kitchen Sponge? Your Guide
So, how often should you switch your kitchen sponge? Most experts recommend replacing your kitchen sponge every one to two weeks to maintain good kitchen sponge hygiene.
Your kitchen sponge is a workhorse. It tackles grease, grime, and food scraps daily, making your dishes sparkle. But this constant battle against dirt also makes it a breeding ground for kitchen sponge germs. If you’re wondering when to get a new sponge and how to keep your current one cleaner, you’ve come to the right place. This guide will delve into kitchen sponge lifespan, the science behind bacterial growth on sponges, effective methods for cleaning kitchen sponge and sponge sanitation, and the best practices for frequency of kitchen sponge replacement. Let’s dive into keeping your kitchen as clean as possible.
The Unseen World: Bacterial Growth on Sponges
It might seem harmless, but your trusty kitchen sponge can harbor millions of bacteria. Think about it: sponges are porous, absorbent, and often kept in damp environments – the perfect recipe for microbial party.
Why Sponges Get Dirty
- Moisture Retention: After you use your sponge, it holds onto water. This dampness is essential for bacterial life.
- Food Particles: Even after rinsing, tiny food particles can get trapped within the sponge’s fibers. These particles are a food source for bacteria.
- Warmth: Kitchen sinks and countertops are often at room temperature, providing a cozy environment for bacteria to multiply.
- Surface Area: The vast surface area of a sponge, with all its nooks and crannies, offers plenty of places for bacteria to attach and grow.
Common Culprits: What Lives on Your Sponge?
Studies have found a wide variety of bacteria on kitchen sponges, including:
- E. coli: Often found in raw meat and can cause serious food poisoning.
- Salmonella: Another common culprit linked to raw poultry and eggs.
- Staphylococcus aureus: Can lead to skin infections and other illnesses.
- Coliform bacteria: Indicative of fecal contamination.
The sheer volume of bacteria can be staggering. Research has shown that a single kitchen sponge can contain more bacteria than a toilet seat! This is why consistent kitchen sponge hygiene is so crucial.
Deciphering Kitchen Sponge Lifespan: When to Say Goodbye
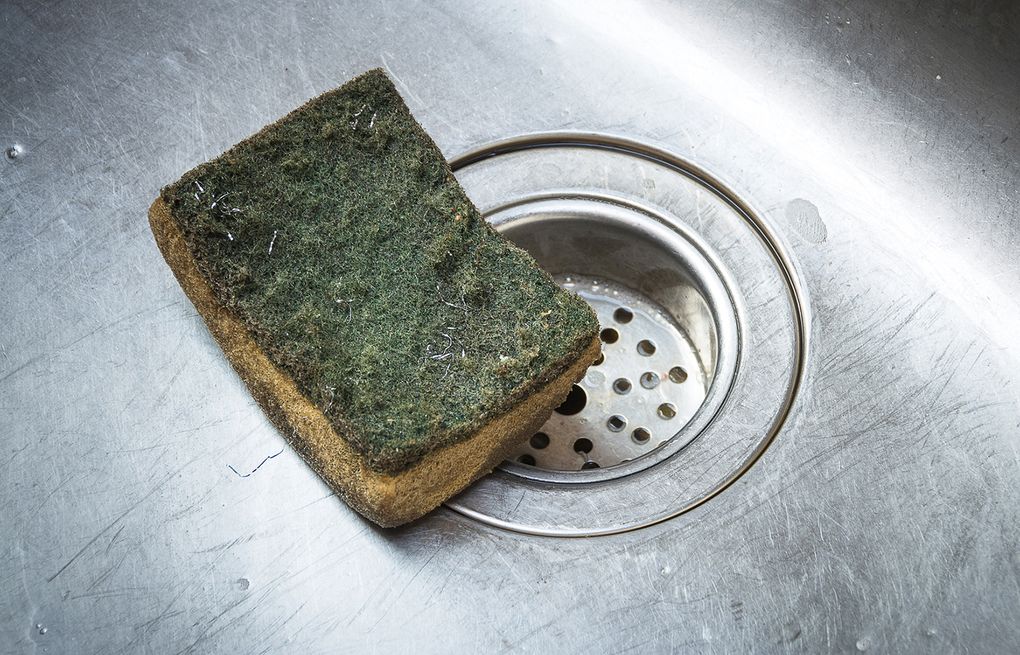
Determining the precise kitchen sponge lifespan can be tricky, as it depends on usage and how well it’s maintained. However, there are clear indicators that signal it’s time to replace kitchen sponge.
Signs Your Sponge Needs Replacing
- Unpleasant Odor: If your sponge smells even after rinsing or attempts at cleaning, it’s a strong sign of bacterial buildup that’s likely beyond simple cleaning.
- Disintegration: When the sponge starts to fall apart, losing its shape or shedding pieces, it’s lost its effectiveness and is ready for retirement.
- Grease Buildup: If the sponge feels permanently greasy or doesn’t lather well anymore, it’s saturated with oils and grime.
- Stains: While not always a sign of germ danger, persistent stains can indicate that the sponge is saturated and difficult to clean thoroughly.
- Frequent Use: Even if it looks okay, a sponge used multiple times a day for washing dishes will reach the end of its useful life faster than one used less frequently.
General Timeframes for Replacement
While visual cues are important, a general rule of thumb for frequency of kitchen sponge replacement is:
- For everyday dishwashing: Replace every 1-2 weeks.
- For general kitchen cleaning (counters, spills): Replace every 2-3 weeks.
- If using a sponge for raw meat surfaces: Replace it immediately after use, or at least every few days.
It’s better to err on the side of caution. Forgetting to replace kitchen sponge can lead to spreading more germs than you’re cleaning.
Sponge Sanitation: Keeping Your Sponge Cleaner
While replacing your sponge regularly is key, proper care can extend its usability and reduce the microbial load. Effective sponge sanitation is vital.
Methods for Cleaning Kitchen Sponge
There are several ways to clean your kitchen sponge. The goal is to kill as many bacteria as possible.
-
Microwave Method: This is one of the most effective methods.
- Rinse the sponge thoroughly to remove food particles.
- Dampen the sponge (do not submerge).
- Place it in the microwave.
- Heat on high power for 1-2 minutes.
- Let it cool completely before handling, as it will be very hot.
* Caution: Never microwave a dry sponge, as it can catch fire. Ensure it is completely wet. This method is highly effective at killing bacteria.
-
Dishwasher Method: The hot water and detergent in a dishwasher can help.
- Place the sponge in the top rack of your dishwasher.
- Run the dishwasher on a hot wash and heated dry cycle.
- Ensure the sponge is placed securely so it doesn’t fall and block the drain.
-
Boiling Method: Boiling water can also effectively kill germs.
- Bring a pot of water to a rolling boil.
- Carefully place the sponge in the boiling water using tongs.
- Boil for at least 5 minutes.
- Remove with tongs and let it cool completely.
-
Bleach Solution: For a more hands-on approach, a diluted bleach solution can work.
- Mix a solution of 3/4 cup bleach with 1 gallon of water.
- Submerge the sponge in the solution for at least 5 minutes.
- Rinse thoroughly.
* Caution: Wear gloves when handling bleach. Ensure good ventilation.
Best Practices for Sponge Care
Beyond these sanitizing methods, incorporating good habits into your daily routine can make a big difference in kitchen sponge hygiene.
- Rinse Thoroughly: Always rinse your sponge after each use, squeezing out as much water and debris as possible.
- Squeeze Dry: Wring out the sponge thoroughly and place it in a well-ventilated area to dry. Avoid leaving it in a soggy heap.
- Use Separate Sponges: Consider having different sponges for different tasks. One for dishes, another for countertops, and a separate one for raw meat areas. This prevents cross-contamination.
- Consider Alternatives: Explore other cleaning tools that might be more hygienic, such as silicone scrubbers or microfiber cloths.
Choosing the Right Sponge: Material Matters
Not all sponges are created equal when it comes to kitchen sponge hygiene and kitchen sponge lifespan. The material can influence how quickly it harbors bacteria and how easy it is to clean.
Common Sponge Materials
- Cellulose Sponges: Made from plant fibers, these are highly absorbent but can also retain moisture, making them prone to bacterial growth if not dried properly. They tend to break down faster.
- Synthetic Sponges (Polyurethane): These are common and often have a scrubbing side. They are generally more durable than cellulose but can still harbor bacteria.
- Microfiber Sponges: Made from synthetic fibers, microfiber is less absorbent than traditional sponges. It can be effective at trapping dirt and bacteria and is often more durable. Many microfiber sponges are also machine washable, which is a great advantage for sponge sanitation.
- Silicone Scrubbers: These are non-porous and easy to clean. They don’t absorb water or food particles, making them inherently more hygienic. They are also very durable, potentially extending their useful life significantly compared to traditional sponges.
Material and Hygiene
When considering how often should I switch kitchen sponge, the material plays a role.
- Cellulose and Polyurethane: Due to their porous nature and absorbency, these types generally have a shorter kitchen sponge lifespan and require more frequent replacement or rigorous sponge sanitation. Aim for the 1-2 week replacement rule.
- Microfiber: If properly washed and dried after each use (and ideally machine washed weekly), a microfiber sponge might last a bit longer, perhaps 3-4 weeks.
- Silicone: These are the most hygienic options. With proper rinsing and occasional sanitizing (e.g., in the dishwasher or with boiling), a silicone scrubber can last for several months.
The Bigger Picture: Kitchen Sponge Germs and Your Health
The presence of kitchen sponge germs isn’t just an unpleasant thought; it can have real implications for your health.
Cross-Contamination Risks
When you use a contaminated sponge to wash dishes, you can transfer bacteria from one item to another. This is particularly concerning if you’re cleaning dishes used for raw meat, poultry, or eggs. Even if you wash fruits and vegetables, a dirty sponge could reintroduce harmful bacteria.
When to Be Extra Vigilant
- After Handling Raw Meat: Always use a dedicated sponge or paper towels when cleaning up after preparing raw meat, poultry, or fish. Immediately discard the sponge if it’s a disposable type.
- During Illness: If someone in your household is sick, be extra diligent about kitchen sponge hygiene. Consider using disposable cloths or paper towels during this period to avoid spreading germs.
- When Cleaning Baby Items: For bottles, pacifiers, or dishes used by infants, use a separate, meticulously clean sponge or brush, and replace it more frequently.
The Importance of Regular Replacement
Understanding that you can’t always see or smell the kitchen sponge germs is crucial. Even if your sponge looks clean, it can still harbor significant bacterial populations. This is why adhering to a regular frequency of kitchen sponge replacement is the most reliable way to ensure good kitchen sponge hygiene.
Making the Switch: Practical Tips for Replacement
Knowing when and how to replace kitchen sponge is a simple yet effective step towards a healthier kitchen.
Creating a Replacement Schedule
The easiest way to ensure you don’t forget is to set a reminder.
- Calendar Alerts: Set recurring calendar alerts on your phone or computer for every two weeks.
- Shopping List Integration: Add sponges to your regular grocery shopping list. When you buy them, make a note of when you opened the new pack.
- Visual Cues: Keep a spare sponge near your sink. When you pull out a new one, place the old one in the trash.
Proper Disposal
When it’s time to say goodbye to your old sponge, dispose of it properly. Simply throwing it directly into a trash can where it can continue to harbor bacteria isn’t ideal. Consider double-bagging it or rinsing it one last time before disposal.
Frequently Asked Questions About Kitchen Sponges
Q1: Can I reuse a sponge that I’ve cleaned?
While cleaning and sanitizing methods can reduce bacterial load, they rarely eliminate all bacteria. For optimal kitchen sponge hygiene, it’s best to replace sponges frequently rather than relying solely on cleaning.
Q2: How can I tell if my sponge is truly clean?
It’s very difficult to tell by sight or smell alone. Even if a sponge appears clean, bacterial growth on sponges can occur rapidly. Relying on the recommended frequency of kitchen sponge replacement is the most reliable method.
Q3: Are those “long-lasting” or “antibacterial” sponges worth the extra cost?
Some sponges are treated with antimicrobial agents. While they might slow down bacterial growth, they are not a substitute for regular replacement. Silicone scrubbers are a more consistently hygienic option that doesn’t rely on chemical treatments.
Q4: What’s the best way to dry a sponge?
After rinsing, squeeze out as much water as possible and place the sponge upright or on its side in a well-ventilated area. Avoid leaving it flat in a puddle of water.
Q5: Can I use paper towels instead of sponges?
Paper towels are a good alternative for single-use situations, especially when dealing with raw meat or during times of illness. However, for everyday dishwashing, reusable sponges are often more economical and environmentally friendly if maintained properly.
By following these guidelines, you can ensure your kitchen remains a clean and healthy environment, free from the hidden dangers lurking on a worn-out sponge. Remember, a little effort in kitchen sponge hygiene goes a long way in protecting your family’s health.