
How do you install a kitchen backsplash? You install a kitchen backsplash by properly preparing your walls, planning your layout, choosing the right materials and adhesives, cutting your tiles precisely, adhering them to the wall, and finally, grouting and sealing. This comprehensive guide will walk you through each step.
Installing a kitchen backsplash is a rewarding DIY project that can dramatically transform your kitchen’s look. It adds a protective layer to your walls and a splash of style. Whether you’re drawn to the classic appeal of subway tile or the intricate patterns of a mosaic backsplash, this guide covers everything you need to know.
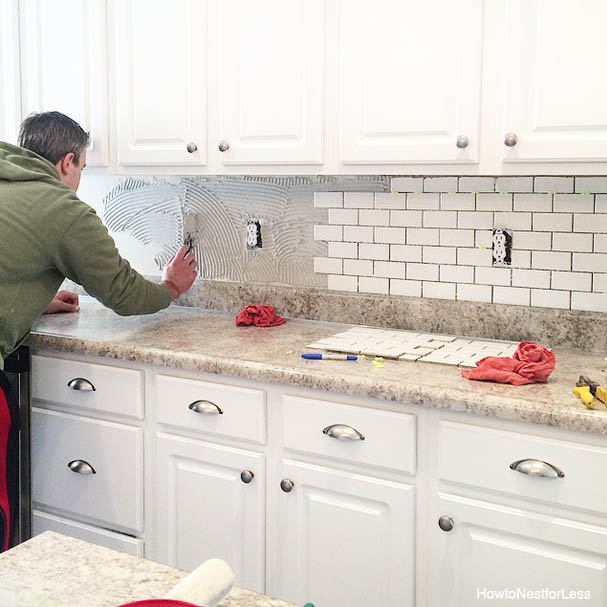
Image Source: howtonestforless.com
Getting Ready: Wall Preparation
Before any tile installation begins, meticulous wall prep is crucial. A clean, smooth, and dry surface ensures your backsplash adheres properly and looks its best.
Cleaning the Walls
- Remove existing backsplash: If you have an old backsplash, carefully remove it. Use a putty knife or scraper to lift edges. For stubborn adhesive, you might need a heat gun or a specialized adhesive remover.
- Scrape away old adhesive: Any remaining glue needs to be scraped off.
- Wash the walls: Use a sponge with warm water and a mild detergent. Rinse thoroughly and let the walls dry completely.
- Repair imperfections: Fill any holes or cracks with spackling compound. Sand smooth once dry.
Checking for Level and Square
- Use a level: Ensure your countertop edge is level. If it’s not, your tile will look crooked. You may need to build out the wall slightly with shims.
- Check for plumb: Ensure your wall corners are straight.
Priming the Walls
- Apply primer: Once the walls are clean and dry, apply a coat of primer. This helps the adhesive bond better, especially on painted surfaces. Choose a primer suitable for tile adhesion.
Planning Your Layout: The Blueprint for Success
Layout planning is a vital step that can prevent costly mistakes and ensure a professional-looking finish. It’s where you visualize your design and plan how the tiles will fit.
Dry Laying Your Tile
- Visualize the pattern: Before you apply any adhesive, lay out your tiles on the counter or floor in the pattern you intend. This helps you see how the colors and shapes will work together and identify any potential issues with cuts.
- Consider the center point: For a balanced look, aim to have the most visually appealing tile or pattern centered behind your main focal points, like the stove or sink.
Measuring and Marking
- Measure your space: Accurately measure the height and width of the area you’ll be tiling.
- Mark guidelines: Use a level and pencil to draw horizontal and vertical lines. A horizontal line along the top edge of your countertop is essential. Vertical lines can help you maintain straight rows.
Edge and Outlet Considerations
- Tile edges: Plan how your tiles will terminate at the edges of the backsplash area. Will they be finished with a trim piece, or will you use full tiles that naturally end?
- Electrical outlets: You’ll need to cut openings for outlets and switches. Plan your tile layout so that cuts around outlets are as symmetrical as possible. It’s often best to have full tiles on either side of an outlet if your layout allows.
Choosing Your Materials: The Building Blocks
The materials you choose significantly impact the final look and the installation process.
Tile Selection
- Subway Tile: Classic and versatile, subway tile is a popular choice. It’s available in ceramic, porcelain, glass, and natural stone.
- Mosaic Backsplash: Mosaic backsplash tiles offer intricate designs and a lot of visual interest. They can be made of glass, stone, metal, or a combination. Mosaics often come on mesh sheets for easier installation.
- Other Options: Consider ceramic, porcelain, natural stone (marble, granite, travertine), glass, metal tiles, or even peel-and-stick options for a simpler approach.
Adhesive Choices
The right adhesive is critical for a secure and long-lasting backsplash. Your choice depends on the tile material and the wall surface.
| Adhesive Type | Best For | Notes |
|---|---|---|
| Thin-Set Mortar | Ceramic, porcelain, stone, glass, mosaics | Offers superior bond strength, requires mixing, best for most jobs. |
| Tile Mastic (Glue) | Ceramic, porcelain (non-porous surfaces) | Pre-mixed, easy to use, but less durable than thin-set. |
| Epoxy Adhesive | Glass, metal, demanding applications | Strong, waterproof, and chemical resistant, but can be messy. |
| Mastic Adhesive | Larger format tiles, moderate environments | Good for DIYers, but check suitability for your specific tile. |
- Read the Tile Manufacturer’s Recommendations: Always check what the tile manufacturer suggests for adhesive.
- Consider the Back of the Tile: Porous tiles may require a different adhesive than non-porous glass tiles.
Grout Selection
Grout fills the gaps between tiles, adding structural integrity and a finished look.
- Sanded Grout: Best for grout lines 1/8 inch or wider. The sand provides strength.
- Unsanded Grout: Used for grout lines narrower than 1/8 inch, typically for delicate materials like glass or polished stone that could be scratched by sand.
- Epoxy Grout: Highly durable, stain-resistant, and waterproof. It’s more expensive and trickier to install but excellent for high-moisture areas.
Sealing Grout
- Sealing grout is essential to protect it from stains and moisture, especially in the kitchen. Use a good quality penetrating grout sealer.
Essential Backsplash Tools
Having the right backsplash tools makes the job easier and more efficient.
- Safety Gear: Safety glasses, gloves, dust mask.
- Measuring Tools: Tape measure, ruler, level, chalk line.
- Marking Tools: Pencil, marker.
- Cutting Tools:
- Tile Cutter: Manual or electric for straight cuts.
- Wet Saw: For more complex cuts and various materials like stone or thicker porcelain.
- Nippers: For small, irregular cuts and detail work.
- Glass Cutter: If working with glass tiles.
- Adhesive Application: Notched trowel (size depends on tile), putty knife.
- Grouting and Finishing: Grout float, sponges, buckets, utility knife, painter’s tape.
- Cleaning: Rags, water.
- Mixing: Mixing paddle for drill (if using thin-set).
The Installation Process: Step-by-Step
Now for the actual tile installation. Patience and precision are key.
Step 1: Applying the Adhesive
- Mix thin-set (if using): Follow the manufacturer’s instructions carefully. You want a peanut-butter-like consistency.
- Spread adhesive: Using the flat side of your notched trowel, spread a thin, even layer of adhesive onto a small section of the wall (about 2-3 square feet). Then, use the notched side to create ridges. Hold the trowel at a 45-degree angle.
- Don’t cover your guidelines: Be careful not to obscure your pencil lines.
Step 2: Setting the Tiles
- Start at your reference point: Typically, you’ll start along the countertop, working upwards.
- Press tiles firmly: Place the first tile into the adhesive with a slight twisting motion. This ensures good contact.
- Use spacers: Place tile spacers between each tile to maintain consistent grout lines.
- Work in small sections: Apply adhesive only to areas you can tile before it begins to dry.
- Check for level and plumb: Regularly check your rows to ensure they are straight and level.
Step 3: Cutting Tile
Cutting tile is one of the most challenging parts for DIYers.
- Straight cuts: Use a manual tile cutter for most straight cuts. Score the tile firmly and snap it.
- Complex cuts (outlets, corners): A wet saw is ideal for making notches for outlets, L-shaped cuts for corners, or angled cuts. For mosaic sheets, you might need to cut the mesh backing with scissors or a utility knife.
- Measure twice, cut once: Always double-check your measurements before making a cut.
- Test cuts: If you’re unsure, make a test cut on a scrap piece of tile.
Step 4: Grouting the Backsplash
Grout application happens after the adhesive has fully cured (usually 24-48 hours).
- Mix grout: Mix your grout according to the manufacturer’s instructions.
- Apply grout: Use a grout float to spread the grout over the tiles, pressing it into the gaps. Hold the float at a 45-degree angle. Work diagonally across the tiles to push grout into the joints.
- Remove excess grout: Scrape off as much excess grout as possible with the float, again working diagonally.
Step 5: Cleaning and Curing
- Initial wipe-down: After about 15-20 minutes (or when the grout starts to firm up), use a damp sponge to gently wipe the tile surface. Rinse the sponge frequently in a separate bucket of clean water. Avoid pressing too hard, which can pull grout out of the joints.
- Second cleaning: After another 30-60 minutes, use a clean, damp cloth or sponge for a second cleaning. You want to remove any remaining grout haze.
- Final haze removal: Once the grout is mostly dry, a dry cloth can be used to buff away any remaining haze.
- Allow to cure: Let the grout cure completely according to the manufacturer’s instructions (usually 24-72 hours).
Step 6: Sealing the Grout
- Apply grout sealer: Once the grout is fully cured, apply a good quality penetrating grout sealer. This is crucial for protecting your backsplash from stains and moisture.
- Application: Use a small brush or applicator to apply the sealer to the grout lines. Wipe off any excess sealer from the tile surface immediately with a clean cloth.
- Multiple coats: Some sealers may require multiple coats. Follow the product directions.
Frequently Asked Questions (FAQ)
Can I install a backsplash over existing tiles?
Yes, in many cases, you can install a new backsplash over existing tiles, provided the old tiles are securely adhered to the wall and the surface is clean and free of grease. You may need to use a special adhesive or apply a bonding primer for best results.
How far up the wall should the backsplash go?
This is a design choice. Most backsplashes go from the countertop to the underside of the cabinets. Some people extend it higher for a more dramatic effect, or even up to the ceiling behind the stove.
How do I clean tile grout?
Regular cleaning with a mild soap and water solution is best. For tougher stains, use a dedicated grout cleaner, but always test it on an inconspicuous area first. Avoid abrasive cleaners that can damage the grout or tiles.
Is it difficult to cut mosaic tiles?
Cutting mosaic tiles can be easier than individual tiles if they are mounted on mesh backing. You can often cut the mesh with scissors or a utility knife to create custom shapes or fit around outlets. Individual mosaic pieces might need nippers or a wet saw for precise cuts.
How long does it take to install a kitchen backsplash?
For a standard kitchen backsplash, you can expect the actual installation (applying tiles, grouting) to take anywhere from a weekend to several days, depending on your experience level, the complexity of the design, and the number of cuts required. Wall preparation and curing times add to the overall project duration.
What is the difference between thin-set and mastic?
Thin-set mortar is a cement-based adhesive that is mixed with water. It offers superior strength, durability, and water resistance, making it ideal for most tile installations, especially in wet areas or for heavier tiles like natural stone. Tile mastic is a pre-mixed adhesive, often made from a vinyl base. It’s easier to use but is generally less durable and not recommended for areas with high moisture or for tiles prone to staining.
By following these detailed steps and paying attention to the specifics of your chosen materials, you can successfully install a beautiful and durable kitchen backsplash that enhances your kitchen’s style and functionality.