
Image Source: i.ytimg.com
Your Guide: How To Fix A Leaky Kitchen Faucet With Two Handles
Can you fix a leaky kitchen faucet with two handles yourself? Yes, you absolutely can! Fixing a leaky two-handle kitchen faucet is a common and achievable DIY task that can save you money and prevent water waste. The primary causes are usually worn-out internal parts like washers, O-rings, or cartridges.
A persistent drip from your kitchen faucet can be more than just an annoyance; it’s a silent drain on your resources and a testament to a problem that needs addressing. For those with a two-handle faucet, the culprit often lies within the intricate workings of those handles. This comprehensive guide will walk you through the steps to diagnose and repair your leaky faucet, transforming a dripping nuisance into a smoothly functioning fixture.
Why Your Faucet Drips: Fathoming the Causes
Before we grab our tools, it’s helpful to understand why your faucet might be leaking. Two-handle faucets typically use either a compression valve system or a cartridge system to control water flow.
Compression Faucets: These older types use rubber washers that press against a valve seat to stop water. Over time, these washers can wear out, harden, or crack, leading to leaks. The metal valve stem can also become rough, damaging the washer.
Cartridge Faucets: More modern faucets often employ cartridges. These are self-contained units that manage both water flow and temperature. A leak in a cartridge faucet usually means the internal seals or the entire cartridge unit needs to be replaced.
Other Common Issues:
- Worn O-rings: These small rubber rings create seals around various parts of the faucet, including the stem. If they degrade, water can seep out.
- Loose Parts: Sometimes, the leak is as simple as a loose packing nut or a faucet stem that has come slightly undone.
- Corroded Valve Seat: In compression faucets, the metal surface where the washer sits (the valve seat) can corrode, preventing a tight seal.
Gathering Your Tools and Supplies: The Essential Toolkit
Having the right tools on hand makes the repair process smoother and less frustrating. Here’s a checklist of what you’ll likely need:
- Adjustable Wrench: For gripping and turning nuts and bolts of various sizes.
- Phillips and Flathead Screwdrivers: For removing screws that hold the handles and other parts.
- Pliers: Needle-nose pliers can be helpful for gripping small parts.
- Allen Wrenches (Hex Keys): Many faucet handles are secured with a small set screw that requires an Allen wrench.
- Utility Knife or Putty Knife: For gently prying off decorative caps.
- Rag or Towel: To protect surfaces and catch drips.
- Plumber’s Grease (Silicone Grease): To lubricate O-rings and stems for easier operation and better sealing.
- Replacement Parts: This is crucial! You might need a faucet repair kit, specific washers, O-rings, or a replacement cartridge. It’s often best to disassemble the faucet first to identify the exact parts needed if you don’t have a universal kit.
- Small Bowl or Container: To keep track of removed parts.
- Old Toothbrush: For cleaning mineral deposits.
Step-by-Step: Dismantling Your Leaky Faucet
Safety First: Shutting Off the Water Supply
Before you begin any work, the most critical step is to turn off the water supply.
- Locate Shutoff Valves: Look under the sink for two small valves (usually oval or round handles) connected to the hot and cold water lines leading to your faucet.
- Turn Off the Water: Turn both valves clockwise until they are snug. Do not overtighten.
- Test: Turn on the faucet handles (both hot and cold) to drain any remaining water in the lines and confirm that the water is indeed shut off. Water should stop flowing after a few seconds.
Disassembly Process
Now that the water is off, let’s get to work on those handles. The exact process can vary slightly depending on your faucet’s make and model, but the general principles remain the same.
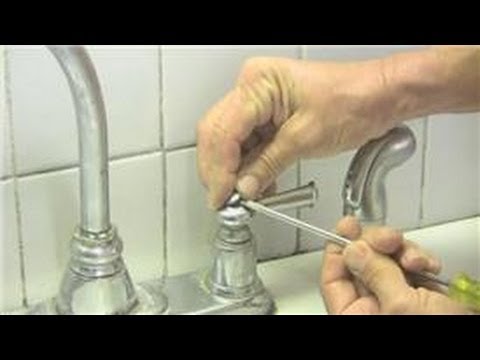
H3: Removing the Faucet Handle
This is often the first hurdle. Most handles are secured by a decorative cap that hides a screw.
- Locate the Decorative Cap: This is usually a small, circular piece on the top or front of the handle, often marked with a red (hot) or blue (cold) indicator.
- Gently Pry Off the Cap: Use a utility knife or a thin, flathead screwdriver to carefully pry off the cap. Be gentle to avoid scratching the finish.
- Unscrew the Handle Screw: Once the cap is off, you’ll see a screw. Use the appropriate screwdriver (Phillips or flathead) or an Allen wrench to remove this screw.
- Lift Off the Handle: With the screw removed, the handle should now lift straight up and off the faucet stem. If it’s stuck, try gently wiggling it or using a handle puller tool (available at hardware stores). Avoid excessive force.
H3: Accessing the Internal Components
Once the handle is off, you’ll see more of the faucet’s inner workings.
- Remove the Escutcheon or Bonnet Nut: Beneath the handle, you might find a decorative escutcheon (a metal sleeve) or a larger nut called a bonnet nut.
- Escutcheon: If there’s an escutcheon, it may simply lift off or screw off.
- Bonnet Nut: This nut secures the valve stem or cartridge in place. Use your adjustable wrench to carefully loosen and remove the bonnet nut by turning it counter-clockwise.
H3: Identifying and Removing the Valve Stem or Cartridge
This is where the magic (or the leak) happens.
-
For Compression Faucets (Valve Stem):
- Once the bonnet nut is removed, you should be able to see the faucet stem.
- Grasp the stem with your adjustable wrench and turn it counter-clockwise. It should unscrew and lift out of the faucet body.
- At the bottom of the stem, you’ll find a rubber washer held in place by a screw. This is a prime suspect for leaks.
- You may also find a small O-ring around the stem itself.
-
For Cartridge Faucets:
- After removing the bonnet nut, you’ll see the cartridge. It might have a retaining clip or nut holding it in place.
- Retaining Clip: Many cartridges have a small metal clip that needs to be pulled out with needle-nose pliers.
- Retaining Nut: Some cartridges are held in by another nut that needs to be unscrewed with your wrench.
- Once any clips or nuts are removed, you should be able to pull the cartridge straight up and out of the faucet body. You might need to wiggle it gently or use pliers to grip the stem if it’s tight.
Table 1: Identifying Your Faucet Type
| Feature | Compression Faucet | Cartridge Faucet |
|---|---|---|
| Handle Action | Turns multiple times to fully open or close | Usually a single quarter or half turn |
| Internal Parts | Rubber washer, screw, valve stem, O-rings | Self-contained cartridge unit |
| Leak Cause | Worn washer, damaged seat, worn stem O-ring | Worn cartridge seals, faulty cartridge unit |
| Replacement | Washer replacement, O-ring repair, faucet stem repair | Replace entire cartridge (replace faucet cartridge) |
Fixing the Leak: Repairing and Replacing Parts
Now that you have access to the faulty components, it’s time to fix the leak.
H3: Washer Replacement (Compression Faucets)
This is a common repair for older faucets.
- Remove the Old Washer: The rubber washer at the bottom of the valve stem is usually held by a brass screw. Use a screwdriver to remove this screw. The old washer will then come off.
- Clean the Valve Stem: Inspect the stem for any roughness or mineral deposits. Clean it with an old toothbrush and mild cleaner.
- Replace the Washer: Place a new, identical washer onto the bottom of the stem.
- Secure with Screw: Reinsert and tighten the brass screw to hold the new washer in place. Don’t overtighten, as this can damage the new washer.
- Check the O-ring: While the stem is out, inspect the O-ring(s) around the stem. If they look worn, cracked, or flattened, this is a good time for O-ring repair. Carefully pry off the old O-ring with a small screwdriver and roll on a new one. Lubricate the new O-ring with plumber’s grease.
- Inspect the Valve Seat: Look down into the faucet body where the stem sits. The valve seat is the brass opening. If it feels rough or corroded, you might need a valve seat dresser tool to smooth it, or in some cases, you can replace the seat itself with a new one.
H3: Cartridge Replacement
If you have a cartridge faucet, you’ll need to replace the entire cartridge.
- Purchase the Correct Cartridge: It’s essential to get the exact replacement cartridge for your faucet model. You can often find brand and model numbers on the faucet itself or by taking the old cartridge to a plumbing supply store. A faucet repair kit sometimes includes common cartridge types.
- Install the New Cartridge:
- Ensure the new cartridge is oriented correctly. There might be notches or tabs that need to align with the faucet body.
- Gently push the new cartridge into place.
- If there was a retaining clip, insert it back into its groove.
- If there was a retaining nut, screw it back on and tighten it snugly with your wrench.
- If there was a retaining nut on the cartridge itself, screw that back on.
H3: O-ring Repair and Other Seals
Even if you have a compression faucet, worn O-rings on the stem can cause leaks around the handle.
- Locate O-rings: As mentioned, O-rings are typically found around the faucet stem, just below the handle mechanism.
- Careful Removal: Use a small pick or screwdriver to gently pry off the old O-ring.
- Installation: Roll the new O-ring onto the stem. Make sure it sits snugly in its groove.
- Lubrication: Apply a thin layer of plumber’s grease to the new O-ring. This helps it seal properly and makes future disassembly easier.
H3: Faucet Stem Repair (Compression Faucets)
If the faucet stem itself is damaged or corroded, you might need to replace it.
- Removal: Follow the steps above to remove the stem.
- Inspection: Look for nicks, corrosion, or a worn-out seat area where the washer attaches.
- Replacement: If the stem is damaged, take the old one to a plumbing supply store to find an exact match. Install the new stem as you would the old one.
Reassembly: Putting It All Back Together
Once you’ve replaced the faulty parts, it’s time to put everything back in its place.
- Reassemble Faucet Stem/Cartridge: If you replaced a washer, screw it securely onto the valve stem. For cartridges, ensure they are seated correctly.
- Install the Stem/Cartridge: Carefully insert the repaired valve stem or the new cartridge back into the faucet body. For stems, turn them clockwise a few times to ensure they are threading correctly.
- Tighten the Bonnet Nut: Screw the bonnet nut back into place, tightening it with your adjustable wrench. Make it snug, but don’t overtighten, as this can make the handle difficult to turn or damage the stem.
- Replace the Escutcheon (if applicable): Slide or screw the decorative escutcheon back into place.
- Reattach the Handle: Place the handle back onto the stem, aligning it correctly.
- Secure the Handle: Insert and tighten the handle screw.
- Replace the Decorative Cap: Snap the decorative cap back onto the handle.
Testing Your Repair: The Moment of Truth
- Turn the Water Supply Back On: Slowly turn the shutoff valves under the sink counter-clockwise to restore the water supply.
- Check for Leaks: Turn on both the hot and cold water handles. Let the water run for a moment, then turn it off.
- Inspect Closely: Look for any drips from the spout or around the base of the handles. Gently feel around the faucet and under the sink for any signs of moisture.
- Tighten Faucet Base: If you notice any slight movement or looseness around the base of the faucet where it meets the sink, use your adjustable wrench to gently tighten the mounting nuts from underneath the sink. This can sometimes help seal leaks at the base.
Common Troubleshooting and Tips
- Leaking After Repair: If the faucet still leaks, you may have missed a damaged part, cross-threaded a component, or not tightened a nut sufficiently. Double-check your work. Ensure the correct parts were used.
- Stuck Parts: If a part is extremely difficult to remove, excessive force can break it. Sometimes, a penetrating lubricant (like WD-40, but be cautious around rubber parts) can help loosen corroded threads.
- Identifying Parts: If you’re unsure about the parts you need, taking photos of your faucet and the removed components to a hardware store is highly recommended. Many stores sell universal faucet repair kits that contain a variety of washers, O-rings, and seals.
- Mineral Deposits: Hard water can leave mineral deposits that interfere with seals. Cleaning these off with vinegar or a descaling solution can be beneficial.
- Professional Help: If you’ve tried these steps and the leak persists, or if you encounter significant damage or complexity, don’t hesitate to call a licensed plumber.
Frequently Asked Questions (FAQ)
Q1: How often should I replace faucet parts?
A1: There’s no set schedule. You should replace faucet parts when you notice leaks or difficulty operating the handles. Wear and tear depend on water quality and usage.
Q2: What is a faucet stem repair kit?
A2: A faucet stem repair kit typically contains replacement washers, O-rings, and sometimes a new valve seat for compression-style faucets.
Q3: Can I fix a leaky sink handle without turning off the water?
A3: It’s strongly advised against this. Turning off the water supply is a crucial safety step to prevent water damage and ensure a clean workspace.
Q4: My faucet drips from the spout, but the handles seem fine. What could be wrong?
A4: A drip from the spout usually indicates a problem with the internal valve mechanism, most commonly a worn washer in a compression faucet or a faulty cartridge in a cartridge faucet.
Q5: How do I know if I need to replace the cartridge or just the O-rings?
A5: If your faucet is a cartridge type and is leaking, replacing the entire cartridge is the most reliable solution, as the internal seals within the cartridge are often the source of the problem. If you have a compression faucet and the leak is around the handle stem, O-ring repair is likely what you need.
By following these detailed steps, you can confidently tackle a leaky two-handle kitchen faucet. It’s a rewarding DIY project that not only saves water and money but also restores peace and quiet to your kitchen.