
Can you unclog a kitchen sink with a garbage disposal yourself? Yes, you absolutely can! Most kitchen sink clogs involving garbage disposals can be fixed with simple, readily available tools and a little know-how. This guide will walk you through every step to get your sink draining freely again, quickly and easily.
A clogged kitchen sink with a garbage disposal can be a real headache. Water backing up, unpleasant odors, and the inability to do simple tasks like washing dishes can quickly disrupt your kitchen routine. But don’t despair! Before you call a plumber, remember that many garbage disposal clogged situations are manageable with DIY solutions. This in-depth guide is designed to help you tackle a garbage disposal backup and clear your kitchen sink disposal blockage efficiently. We’ll cover everything from initial troubleshooting to detailed steps for unclogging a garbage disposal and ensuring your drain stays clear.
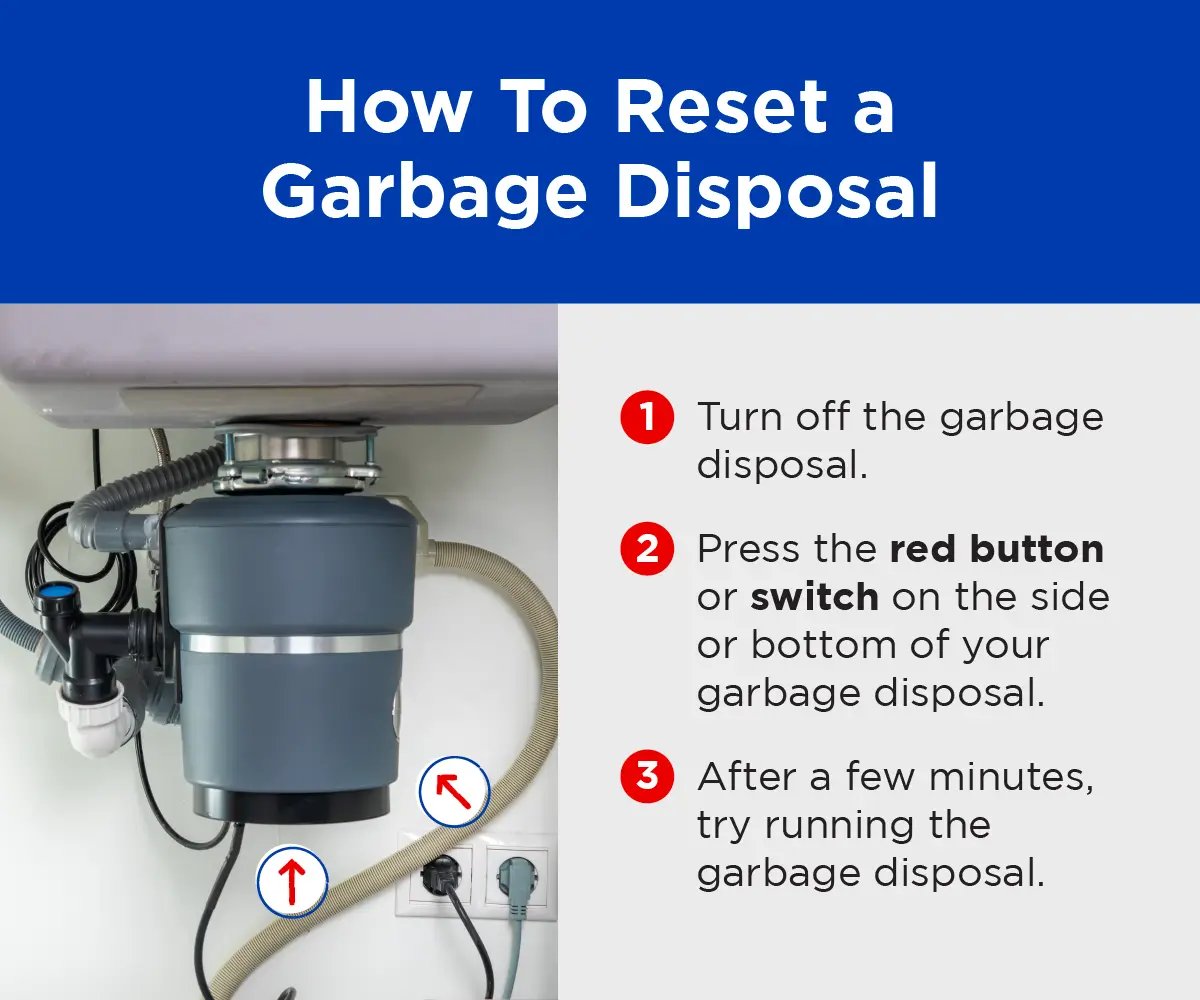
Image Source: www.mrrooter.com
Identifying the Cause of Your Clogged Sink
Before you can fix a clog, it’s helpful to know what might have caused it. Understanding the common culprits can also help you prevent future issues.
Common Offenders for Garbage Disposal Clogs
- Fibrous Foods: Celery, corn husks, onion skins, and artichokes can wrap around the disposal’s blades and jam them.
- Starchy Foods: Pasta, rice, and potato peels can swell and expand, creating blockages.
- Grease and Oil: Pouring grease, fats, or oils down the drain is a major no-no. They solidify as they cool, coating pipes and trapping other debris.
- Coffee Grounds and Eggshells: While often thought to be okay, these can accumulate and form a gritty paste that’s hard to dislodge.
- Non-Food Items: Accidentally dropping silverware, bottle caps, or small plastic items into the disposal can cause a jam.
- Overloading the Disposal: Trying to put too much food waste down at once can overwhelm the unit and lead to clogs.
Signs Your Garbage Disposal is the Culprit
- Slow Draining: Water drains very slowly from the sink.
- Water Backs Up: Water backs up into the sink when the disposal is run.
- Unusual Noises: Grinding or humming noises without proper shredding, or a complete lack of noise, indicate a problem.
- Smells: Persistent foul odors often point to food waste stuck in the disposal or drain pipes.
Safety First: Essential Precautions Before You Start
Working with a garbage disposal requires a commitment to safety. Always prioritize your well-being to avoid injury or damage to the unit.
Crucial Safety Steps
- NEVER Put Your Hand Down the Disposal: This is the golden rule. Even when the unit is off, the blades are sharp.
- Turn Off the Power: Locate the circuit breaker that controls your garbage disposal and switch it OFF. For added safety, you can also unplug the unit if it’s accessible. This prevents accidental activation while you’re working.
- Wear Protective Gear:
- Gloves: Heavy-duty rubber gloves will protect your hands from grime and sharp objects.
- Eye Protection: Safety glasses or goggles are essential to shield your eyes from splashes or debris.
Troubleshooting Your Garbage Disposal: Initial Steps
Before diving into aggressive unclogging methods, let’s go through some basic garbage disposal troubleshooting steps.
Checking the Disposal Reset Button
Many garbage disposals have a small red or black reset button on the bottom or side of the unit. If the disposal hums but doesn’t spin, or simply won’t turn on, this button might have popped out due to an overload.
How to Check and Reset:
- Ensure the power to the disposal is OFF at the breaker.
- Look for the reset button on the underside of the disposal unit.
- Press the button firmly. If it clicks, it has reset.
- Turn the power back on at the breaker and test the disposal with cold water running.
Using the Hex Wrench (Allen Wrench)
Most garbage disposals come with a special hex wrench (often an Allen wrench) that fits into a hole in the center of the bottom of the unit. This tool is used to manually turn the motor shaft and dislodge jams.
How to Manually Unclog with a Hex Wrench:
- Confirm Power is OFF: Double-check the circuit breaker is off.
- Locate the Wrench Hole: Look for a hexagonal opening in the very center of the disposal’s underside.
- Insert the Hex Wrench: Insert the correct size hex wrench into the hole.
- Rotate Back and Forth: Firmly rotate the wrench back and forth. You might feel resistance. Continue working it in both directions to free up the grinding plates. You might need to do this several times.
- Remove Debris: After freeing the mechanism, use tongs or pliers (never your hand!) to carefully remove any visible debris from the disposal chamber.
- Reset and Test: Press the reset button if it popped out, then turn the power back on and test with cold water.
This manual garbage disposal unclog technique is often the most effective first step for internal jams.
Clearing the Kitchen Sink Drain: Step-by-Step
If the disposal itself isn’t the primary issue, or if manual turning doesn’t solve the problem, the clog might be further down the drainpipe.
Method 1: Plunging the Sink
Plunging a kitchen sink is a classic and often effective method for clearing drain blockages. The key is to create a strong suction and pressure to dislodge the clog.
What You’ll Need:
- A flange plunger (with a cup that extends down, better for sinks than a toilet plunger)
- Water
- Rags or old towels
Steps for Effective Plunging:
- Seal the Overflow Drain: If your sink has an overflow drain (a small hole near the top of the sink basin), stuff it tightly with a wet rag. This prevents air from escaping, ensuring maximum plunging power goes directly to the clog.
- Fill the Sink with Water: Add enough water to the sink basin to cover the plunger cup. This helps create a seal.
- Position the Plunger: Place the plunger cup directly over the drain opening, ensuring it forms a tight seal.
- Plunge Vigorously: Push down and pull up sharply and repeatedly for about 20-30 seconds. The goal is to create a forceful push and pull of water.
- Break the Seal and Check: Lift the plunger quickly. Listen for gurgling sounds. If the water starts to drain, you’ve likely cleared the clog. Repeat plunging if necessary.
- Run Hot Water: Once the water is draining, run hot water down the drain for a few minutes to flush away any remaining debris.
Important Note: If you have a double sink, you’ll need to seal the drain on the other sink basin before plunging to create sufficient pressure.
Method 2: Boiling Water Flush
For grease-based clogs, a simple flush with boiling water can be surprisingly effective.
What You’ll Need:
- Boiling Water
- A Kettle or Pot
Steps:
- Carefully Boil Water: Heat a kettle or pot of water until it reaches a rolling boil.
- Pour Slowly: Slowly and carefully pour the boiling water directly down the drain opening.
- Wait and Observe: Allow the hot water to sit in the drain for a few minutes. It can help dissolve grease and loosen other blockages.
- Flush with Cold Water: After a few minutes, run cold water down the drain to solidify any remaining grease that might have been loosened and to flush it away.
Caution: Avoid this method if you have very old or brittle PVC pipes, as extreme heat could potentially damage them. If you’re unsure, opt for slightly cooler, very hot tap water instead of boiling.
Method 3: Baking Soda and Vinegar
This natural and eco-friendly method can help break down grease and mild clogs.
What You’ll Need:
- 1/2 cup Baking Soda
- 1/2 cup White Vinegar
- Boiling Water
- A Stopper or Rag
Steps:
- Clear Standing Water: Ensure there’s minimal standing water in the sink. If there’s a lot, try to bail out as much as possible first.
- Pour Baking Soda: Pour the 1/2 cup of baking soda directly into the drain opening.
- Add Vinegar: Follow with the 1/2 cup of white vinegar. It will fizz and bubble. This reaction helps to loosen debris.
- Seal the Drain: Immediately cover the drain opening with a stopper or a tightly packed rag to direct the action downwards.
- Let it Sit: Allow the mixture to work for at least 15-30 minutes, or even longer if possible.
- Flush with Boiling Water: After the waiting period, carefully pour boiling water down the drain to flush away the loosened clog.
This is an excellent way to perform drain cleaning kitchen sink without harsh chemicals.
Method 4: Using a Drain Snake (Auger)
A drain snake, or auger, is a flexible metal cable that can physically break up or pull out stubborn clogs. This is a more advanced DIY tool but very effective for deeper blockages.
What You’ll Need:
- Drain Snake (manual or electric)
- Gloves
- Rags
Steps:
- Power Off Disposal: Ensure the disposal is OFF at the breaker.
- Feed the Snake: Insert the end of the drain snake into the drain opening.
- Push and Rotate: Gently push the snake into the pipe. When you feel resistance (the clog), begin to rotate the handle of the snake. This rotation helps the snake’s tip bore into the clog.
- Break Through or Retrieve: Continue rotating and pushing gently. You might feel the clog break up, or you might be able to hook onto it and pull it back out.
- Retract and Clean: Once you’ve cleared the obstruction, slowly retract the snake, cleaning it as you go.
- Flush with Water: Run hot water down the drain for several minutes to ensure everything is cleared.
Table: Drain Snake vs. Plunger
| Feature | Plunger | Drain Snake (Auger) |
|---|---|---|
| Mechanism | Suction & Pressure | Mechanical Force (Breaking or Retrieving) |
| Best For | Minor to moderate clogs | Stubborn, deeper clogs, hair, solid objects |
| Ease of Use | Very Easy | Moderate |
| Disposal Use | Can be used with disposal | Feed around disposal trap if necessary |
| Chemicals | No chemicals needed | No chemicals needed |
| Accessibility | Widely available, inexpensive | Available at hardware stores, can be pricey |
Dealing with Specific Kitchen Sink Disposal Blockage Scenarios
Sometimes, the type of clog dictates the best approach for clearing kitchen sink drain issues.
When Food Waste is Stuck in the Disposal Chamber
If you suspect food is jammed inside the disposal unit itself (and the reset button and hex wrench haven’t worked), you need to be extra careful.
What You’ll Need:
- Tongs or Pliers
- Flashlight
- Gloves
- Safety Glasses
Steps:
- POWER OFF: Absolutely ensure the breaker is off.
- Illuminate: Use a flashlight to look down into the disposal chamber from the sink opening.
- Remove Debris: Using long-handled tongs or pliers, carefully reach in and remove any visible pieces of food or foreign objects. Be thorough.
- Check the Splash Guard: Food can get lodged in the rubber splash guard. Pull it back carefully and clear any debris trapped there.
- Try the Hex Wrench Again: After removing visible debris, try the hex wrench method again.
- Test: Restore power and test with cold water.
If Water is Backing Up in Both Sink Basins (Double Sink)
If you have a double sink and both sides are backing up, the clog is likely in the main drainpipe after the two sides have joined.
Steps:
- Identify the P-Trap: Look under the sink for the U-shaped pipe, known as the P-trap. This is a common spot for clogs to form.
- Place a Bucket: Put a bucket directly under the P-trap to catch any water and debris.
- Loosen the P-Trap: Most P-traps have slip nuts that can be loosened by hand or with pliers. Unscrew these.
- Clean the P-Trap: Carefully remove the P-trap and empty its contents into the bucket. Clean it thoroughly with a brush and hot soapy water.
- Reassemble: Reattach the P-trap, ensuring the slip nuts are snug but not overtightened.
- Test: Run water to check for leaks and drainage.
If cleaning the P-trap doesn’t work, the clog is further down the line, and you’ll need to use a drain snake or consider other methods.
When to Call a Professional Plumber
While many garbage disposal clogged issues are DIY-friendly, there are times when professional help is necessary.
Signs You Need a Plumber
- Persistent Clogs: If you’ve tried multiple DIY methods and the sink still won’t drain.
- Water Leaks: If you notice water leaking from pipes under the sink or around the disposal unit.
- Disposal Not Working at All: If the unit won’t turn on, won’t grind, or makes strange noises after you’ve tried the reset and hex wrench.
- Multiple Fixtures Affected: If toilets are backing up or other drains in your house are slow, it indicates a main sewer line blockage, which requires professional attention.
- Uncertainty: If you’re not comfortable performing any of these steps, it’s always best to call a professional.
Preventive Maintenance: Keeping Your Disposal Clear
The best way to deal with a garbage disposal backup is to prevent it from happening in the first place. Regular maintenance can save you time and frustration.
Best Practices for Disposal Care
- Run Cold Water: Always run cold water before, during, and for about 15-30 seconds after using the disposal. Cold water solidifies grease, allowing it to be flushed away, rather than coating the pipes.
- Scrape Plates Clean: Scrape food scraps directly into the disposal.
- Avoid Problematic Foods: Do NOT put fibrous foods, starchy foods, grease, oil, coffee grounds, eggshells, or large amounts of bones into the disposal.
- Use Citrus Peels: Occasionally grind up citrus peels (like lemon or orange) to help freshen the disposal and clear out residue.
- Regular Flush: Run cold water and the disposal periodically, even if you haven’t used it, to keep the pipes clear.
- Occasional Cleaning: You can clean the disposal by grinding ice cubes (helps knock off residue) followed by baking soda and vinegar.
Frequently Asked Questions (FAQ)
What should I do if my garbage disposal is humming but not grinding?
If your garbage disposal hums but isn’t grinding, it’s likely jammed. Turn off the power at the breaker, and then use the hex wrench (Allen wrench) that came with your disposal. Insert it into the hole on the bottom center of the unit and rotate it back and forth to manually dislodge the jam. After freeing it, press the reset button and test with cold water.
Can I pour bleach down my garbage disposal to unclog it?
It’s generally not recommended to pour bleach down a garbage disposal to unclog it. Bleach is a harsh chemical and can damage the disposal’s components or pipes. Furthermore, mixing bleach with other drain cleaners or acidic substances can create toxic fumes. Safer, more effective methods like plunging, baking soda and vinegar, or a drain snake are preferred for clearing kitchen sink drain issues.
How often should I clean my garbage disposal?
You can clean your garbage disposal monthly or as needed. Grinding ice cubes followed by baking soda and vinegar is a good way to keep it fresh and clear of build-up. Regular flushing with cold water during use also helps prevent clogs.
What is the best way to fix a garbage disposal backup?
The best way to fix a garbage disposal backup depends on the cause. If it’s a jam, use the hex wrench. If the clog is in the drainpipe, try plunging, boiling water, baking soda and vinegar, or a drain snake. Always ensure the power to the disposal is OFF before attempting any manual clearing.
How do I know if the clog is in the disposal or the pipes?
If the disposal runs but the water doesn’t drain, the clog is likely in the drainpipes. If the disposal itself is making unusual noises, won’t spin, or water backs up immediately upon turning it on, the issue is likely within the disposal unit itself.
Can I use chemical drain cleaners for my kitchen sink disposal blockage?
While chemical drain cleaners can sometimes work, they are generally not recommended for use with garbage disposals. Harsh chemicals can damage the rubber seals and metal components of the disposal. They can also create dangerous fumes if mixed with other substances or if they don’t fully clear the clog and leave a residue in the disposal. Stick to mechanical methods and natural cleaners for safer and more effective results when dealing with a kitchen sink disposal blockage.
By following these steps and preventive measures, you can effectively tackle most kitchen sink clogs involving your garbage disposal and keep your kitchen flowing smoothly.