
Yes, you can redo your kitchen cabinets yourself! A DIY cabinet makeover can transform your kitchen’s look without a huge budget. What is refinishing kitchen cabinets? It’s a process that brings back the original beauty of your cabinets, often through cleaning, sanding, and applying a new finish. Can I reface my cabinets? Absolutely, refacing kitchen cabinets involves replacing the doors and drawer fronts while keeping the existing cabinet boxes intact. This guide will walk you through the most popular methods for updating kitchen cabinets, from kitchen cabinet painting to cabinet staining, and even cabinet resurfacing. We’ll cover everything you need for a successful kitchen cabinet renovation.
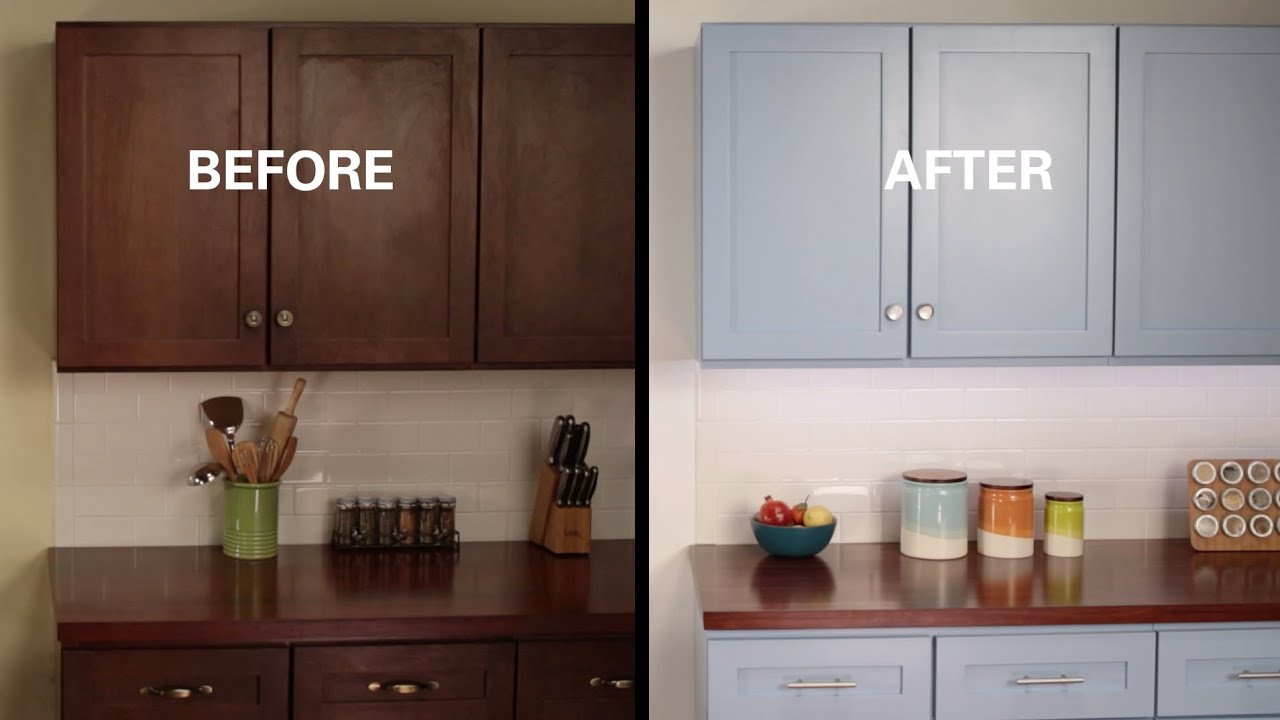
Image Source: i.ytimg.com
Your Kitchen Cabinet Refresh: Choosing the Right Path
When you look at your kitchen cabinets, do they feel tired, outdated, or just not your style anymore? Many homeowners face this dilemma. The good news is that a full kitchen cabinet renovation doesn’t always mean tearing everything out and starting from scratch. There are several effective DIY approaches to give your cabinets a stunning new look. Let’s explore your options for a fantastic DIY cabinet makeover.
Refinishing Kitchen Cabinets: Bringing Back the Glow
Refinishing kitchen cabinets is all about restoring the existing wood to a beautiful state. This is a great choice if your cabinets are structurally sound but have lost their luster due to wear and tear, scratches, or a dated finish.
The Process of Refinishing
1. Preparation is Key: This is the most crucial step for any cabinet redo.
* Empty Cabinets: Take everything out of your cabinets. This makes them easier to work with.
* Remove Doors and Drawers: Carefully take off all cabinet doors, drawer fronts, and drawer boxes. Label them so you know exactly where they go back. Use painter’s tape and a pen.
* Clean Thoroughly: Wipe down all surfaces with a degreaser. Kitchen grease builds up quickly! A solution of TSP (trisodium phosphate) or a strong degreaser works well. Rinse with clean water and let them dry completely.
* Repair Imperfections: Fill any holes or deep scratches with wood filler. Let it dry, then sand it smooth.
2. Sanding for a Smooth Surface:
* Initial Sanding: Start with medium-grit sandpaper (around 100-120 grit) to remove the old finish and smooth out any rough spots.
* Finer Sanding: Follow up with finer grit sandpaper (150-220 grit) for a super smooth surface. This helps the new finish adhere better. Always sand in the direction of the wood grain.
* Dust Removal: After sanding, vacuum up all the dust. Then, wipe down all surfaces with a tack cloth or a damp (not wet!) cloth.
3. Applying the New Finish:
* Staining: If you want to change the color of your wood cabinets, staining is the way to go.
* Pre-Stain Conditioner: For pine or other softwoods, apply a pre-stain conditioner. This helps the stain penetrate evenly.
* Applying Stain: Apply the stain with a brush or rag, working in the direction of the wood grain. Wipe off excess stain after a few minutes, as per the product instructions. Multiple thin coats often yield better results than one thick coat.
* Allow Drying: Let each coat of stain dry completely according to the manufacturer’s recommendations.
* Sealing and Topcoat: Once the stain is dry, apply a clear protective topcoat. Polyurethane, varnish, or lacquer are common choices.
* Application: Apply thin, even coats with a high-quality brush or sprayer.
* Sanding Between Coats: Lightly sand between coats with very fine-grit sandpaper (220-320 grit) to ensure a smooth finish. Wipe away dust with a tack cloth after each sanding.
* Multiple Coats: Apply at least two to three coats for durability, especially on high-traffic surfaces like cabinet doors.
Pros of Refinishing:
- Retains the natural beauty of the wood grain.
- Can revive cabinets that are in good structural condition.
- Often less labor-intensive than a full replacement.
Cons of Refinishing:
- Cannot hide significant damage or structural issues.
- Requires careful sanding and prep work.
- Can be time-consuming.
Refacing Kitchen Cabinets: A Fresh Facade
Refacing kitchen cabinets is a smart alternative to a complete overhaul. It involves keeping your existing cabinet boxes (the frames) but replacing the visible parts like doors, drawer fronts, and sometimes the visible sides of the cabinets.
The Refacing Process
1. Planning and Ordering:
* Measure Precisely: Measure your existing cabinet doors and drawer fronts. Note the style, size, and hinge type.
* Choose Materials: Select new doors and drawer fronts. You can choose from wood, laminate, or thermofoil. You can also opt for new edge banding if needed.
* Order New Parts: Order your new cabinet doors and drawer fronts, ensuring they match the style and measurements.
2. Preparing the Existing Boxes:
* Clean: Thoroughly clean the existing cabinet boxes, especially the edges where new veneer or doors will attach.
* Repair: Fill any holes or damage on the cabinet boxes.
* Sanding (if needed): If you’re applying a veneer to the exposed sides of the cabinet boxes, you’ll need to sand those surfaces smooth.
3. Applying New Surfaces:
* Veneer Application: If your cabinet boxes have exposed plywood sides, you can cover them with a new veneer that matches your new doors. This is done by applying adhesive and then carefully pressing the veneer onto the surface, trimming any excess.
* Attaching New Doors and Drawer Fronts: Once the boxes are prepped and any veneer is applied, it’s time to attach the new doors and drawer fronts.
* Hinges: If your new doors come with pre-drilled holes for hinges, align them carefully. If not, you’ll need to drill new holes, ensuring they are precise for proper door alignment.
* Drawer Fronts: These usually attach directly to the existing drawer boxes.
Pros of Refacing:
- Gives a completely new look without replacing the entire cabinet structure.
- Can be faster than a full gut and remodel.
- More cost-effective than full cabinet replacement.
Cons of Refacing:
- The underlying cabinet boxes remain the same. If they are in poor condition, this might not be the best option.
- Requires careful measurement and ordering.
- DIY refacing can be tricky with precise alignment of doors and drawers.
Kitchen Cabinet Painting: A Transformative Hue
Kitchen cabinet painting is perhaps the most popular DIY method for updating kitchen cabinets. It offers a dramatic transformation for a relatively low cost.
The Painting Process
1. Deep Cleaning: As with any cabinet project, cleaning is paramount. Use a good degreaser to remove all grease, grime, and food splatters. Rinse and dry thoroughly.
2. Repair and Prep:
* Fill Holes: Fill any holes from old hardware or imperfections with wood filler. Sand smooth once dry.
* Sand: Lightly sand all cabinet surfaces. Use 150-grit sandpaper to create a surface the paint can grip. Don’t oversand, especially if you have stained wood you might want to expose later.
* Dust Removal: Use a vacuum and then a tack cloth to remove all sanding dust.
3. Priming for Perfection:
* Choose the Right Primer: Use a high-quality bonding primer. For laminate or previously painted cabinets, a primer specifically designed for slick surfaces is crucial. For stained wood, an oil-based or stain-blocking primer is best to prevent bleed-through.
* Application: Apply the primer evenly with a brush for corners and edges, and a foam roller for flat surfaces. Aim for thin, even coats.
* Drying: Allow the primer to dry completely according to the manufacturer’s instructions.
4. Painting for a Flawless Finish:
* Paint Type: Use a durable paint formulated for cabinets. Alkyd enamel or a high-quality latex enamel with a hardener are good choices. Cabinet-specific paints are also available.
* Application Methods:
* Spraying: This offers the smoothest, most professional finish but requires special equipment and practice.
* Rolling and Brushing: For DIYers, a combination of brushing for detail areas and a high-density foam roller for flat surfaces works well.
* Thin Coats: Apply multiple thin coats of paint rather than one thick one. This prevents drips and brush marks and builds a more durable finish.
* Drying Time: Allow adequate drying time between coats, as recommended by the paint manufacturer.
* Sanding Between Coats (Optional but Recommended): Lightly sand between coats with very fine-grit sandpaper (220-320 grit) for an ultra-smooth finish. Always wipe away dust with a tack cloth.
5. Topcoat for Durability:
* Consider a clear protective topcoat (polyurethane or a cabinet lacquer) for added durability, especially in high-traffic areas. Apply it thinly and evenly.
Pros of Painting:
- Dramatic transformation at a relatively low cost.
- Wide range of color options available.
- Can hide imperfections in the cabinet material.
Cons of Painting:
- Requires meticulous prep work for a lasting finish.
- Can be time-consuming.
- Risk of brush strokes or drips if not done carefully.
Kitchen Cabinet Staining: Enhancing Natural Beauty
If your cabinets are solid wood and you love the look of wood grain, kitchen cabinet staining can be a beautiful way to update them. This is a key part of refinishing kitchen cabinets.
The Staining Process
1. Preparation is Paramount: This mirrors the preparation steps for refinishing.
* Disassembly: Remove doors and drawers.
* Cleaning: Thoroughly clean with a degreaser.
* Sanding: Sand to remove the old finish. Start with medium-grit (100-120) and progress to finer grits (150-220). Ensure you sand with the grain.
* Dust Removal: Vacuum and use a tack cloth.
2. Pre-Stain Treatment:
* Conditioner: For softer woods like pine or maple, a pre-stain wood conditioner is highly recommended. It helps the stain penetrate evenly, preventing blotchiness. Apply it according to the product’s instructions and let it sit for the recommended time.
3. Applying the Stain:
* Choose Your Stain: Select the color you desire. Oil-based stains penetrate deeper and offer richer color, while water-based stains dry faster and have lower VOCs.
* Application: Apply the stain with a high-quality natural bristle brush or a lint-free rag. Work in the direction of the wood grain.
* Wipe Excess: Allow the stain to penetrate for a few minutes (check product directions, as times vary). Then, wipe off the excess stain with a clean, lint-free cloth, again, following the grain.
* Building Color: For a darker or richer color, apply additional coats of stain. Allow each coat to dry completely between applications.
4. Sealing and Topcoat:
* Clear Coat: Once the stain has dried to your satisfaction, apply a clear protective topcoat. Polyurethane (oil-based or water-based), lacquer, or varnish are common choices.
* Application: Use a high-quality brush or sprayer. Apply thin, even coats.
* Sanding Between Coats: Lightly sand between coats with very fine-grit sandpaper (220-320 grit) and wipe with a tack cloth to ensure a smooth finish.
* Durability: Apply at least two to three coats for maximum protection against moisture and wear.
Pros of Staining:
- Highlights the natural beauty and grain of wood.
- Offers a classic and timeless look.
- Can achieve a wide range of wood tones.
Cons of Staining:
- Requires well-maintained wood cabinets to look its best.
- Blotchy results can occur on certain wood types if not properly conditioned.
- Can be messy and requires good ventilation.
Cabinet Resurfacing: A Quick Facelift
Cabinet resurfacing is a broader term that can encompass painting, staining, or applying new veneers to the visible surfaces of your cabinets. It’s about giving the existing structure a new outward appearance. This is closely related to refacing but might also involve updating the finish on the existing doors and drawer fronts rather than replacing them.
Methods for Cabinet Resurfacing
- Painting: As detailed above, painting is a form of cabinet resurfacing.
- Staining: As detailed above, staining is another form of cabinet resurfacing.
- Veneer Application: Applying thin sheets of real wood veneer to the visible surfaces of cabinet boxes and even existing doors can give a whole new look. This is a more advanced DIY technique.
- Contact Paper/Peel-and-Stick Options: For a very budget-friendly and temporary change, decorative contact paper or peel-and-stick veneers can be applied. However, durability can be a concern.
Cabinet Hardware Replacement: The Finishing Touch
Regardless of the method you choose for your DIY cabinet makeover, updating your cabinet hardware replacement can make a huge difference. New knobs, pulls, or handles can instantly modernize your kitchen.
Choosing and Installing New Hardware
1. Style and Finish:
* Consider Your Kitchen’s Style: Are you going for modern, farmhouse, traditional, or eclectic?
* Match Finishes: Think about matching your hardware to other finishes in your kitchen, like faucets or lighting. Common finishes include brushed nickel, polished chrome, matte black, brass, and oil-rubbed bronze.
2. Functionality:
* Pulls vs. Knobs: Pulls are generally easier to grip, especially for those with limited dexterity. Knobs are classic and can be more decorative.
* Drawer Pulls: Ensure the length of drawer pulls is proportionate to the drawer size.
3. Installation:
* Measure Existing Holes: If you’re replacing existing hardware, measure the distance between the screw holes (center to center) to ensure the new hardware fits.
* Drilling New Holes: If you need to drill new holes, use a template or a jig for accuracy. A power drill with a sharp drill bit suitable for your cabinet material (wood, laminate, etc.) is essential.
* Hardware Placement: For doors, knobs are typically placed on one side, while pulls can be placed vertically or horizontally. For drawers, pulls are usually placed horizontally.
* Tools: You’ll need a drill, drill bits, a screwdriver, and potentially a measuring tape and a jig.
The DIY Cabinet Makeover: A Step-by-Step Summary
Here’s a general roadmap for your DIY cabinet redo, no matter which method you choose:
Phase 1: Planning and Preparation
- Decide Your Method: Refinishing, refacing, painting, or staining?
- Choose Your Color/Finish: Select your paint color, stain shade, or door style.
- Gather Supplies: Purchase all necessary materials and tools.
- Empty and Disassemble: Remove contents and carefully take off doors, drawers, and hardware. Label everything.
- Thorough Cleaning: Degrease all surfaces.
- Repair Imperfections: Fill holes and gouges with wood filler.
Phase 2: Surface Treatment
- Sanding: Sand all surfaces to create a smooth base for your new finish.
- Dust Removal: Ensure all surfaces are dust-free.
- Priming (for painting): Apply a high-quality primer.
- Staining (for staining): Apply stain, potentially with a conditioner.
Phase 3: Finishing
- Painting: Apply thin, even coats of cabinet paint.
- Topcoating: Apply clear protective coats for durability.
- Drying: Allow adequate drying time between all coats.
Phase 4: Reassembly and Final Touches
- Reattach Hardware: Install new or existing hardware.
- Rehang Doors and Reinsert Drawers: Carefully put everything back in its place.
- Clean Up: Tidy your workspace.
Table: Comparing DIY Cabinet Redo Methods
| Feature | Refinishing Kitchen Cabinets | Refacing Kitchen Cabinets | Kitchen Cabinet Painting | Kitchen Cabinet Staining |
|---|---|---|---|---|
| Goal | Restore existing wood | Replace visible parts | Change color/look | Enhance wood grain |
| Best For | Good condition wood cabinets | Worn doors/drawer fronts | Any cabinet type | Solid wood cabinets |
| Cost | Moderate | Moderate to High | Low to Moderate | Moderate |
| Labor Intensity | Moderate to High | Moderate | High | High |
| Transformation | Subtle to Moderate | Dramatic | Dramatic | Moderate |
| Skill Level | Intermediate | Intermediate to Advanced | Intermediate to Advanced | Intermediate to Advanced |
| Durability | Varies with finish | Varies with materials | High (with good paint) | High (with good topcoat) |
Frequently Asked Questions (FAQ)
How long does it take to redo kitchen cabinets?
The time it takes varies greatly depending on the method chosen and your experience level.
* Painting: Typically takes 3-7 days, spread out due to drying times.
* Staining/Refinishing: Similar to painting, 3-7 days due to multiple coats and drying.
* Refacing: If ordering new doors, factor in delivery time. Installation might take 1-3 days.
What is the easiest way to redo kitchen cabinets?
Kitchen cabinet painting is often considered the easiest DIY method because you have a wide range of color options and can easily hide minor imperfections. However, it requires thorough prep. Refacing can be easier if you order pre-made doors and drawer fronts, as the main work is the installation.
Can I redo my laminate cabinets?
Yes, you can redo laminate cabinets. The best method is typically cleaning, light sanding or scuff-sanding to create adhesion, priming with a good bonding primer designed for laminate, and then painting.
What’s the difference between refinishing and refacing?
Refinishing means restoring the original cabinet surfaces, usually by cleaning, sanding, and reapplying a stain or clear coat. Refacing involves replacing the visible parts of the cabinets – like doors and drawer fronts – with new ones, while keeping the existing cabinet boxes.
Do I need to remove my cabinet doors to paint them?
Yes, for the best and most professional finish, you should remove your cabinet doors and drawers. This allows you to paint all surfaces evenly, including the edges and the insides of the doors if desired, and also makes it easier to work with.
What grit sandpaper should I use for kitchen cabinets?
For initial sanding to remove old finishes, start with 100-120 grit. Follow up with 150-220 grit for a smooth surface. For sanding between coats of paint or topcoat, use 220-320 grit.
How do I choose the right primer for my cabinets?
The type of primer depends on your cabinet material and the finish you’re applying.
* For previously painted or laminate cabinets: Use a high-adhesion bonding primer.
* For stained wood: Use a stain-blocking primer, often oil-based, to prevent wood tannins from bleeding through your new finish.
How many coats of paint are needed for cabinets?
Typically, two to three thin coats of paint are recommended for cabinets. This ensures even coverage, durability, and a smooth finish without drips or brush marks. Always allow adequate drying time between coats.
Is it worth it to repaint kitchen cabinets?
Absolutely! Repainting kitchen cabinets is one of the most cost-effective ways to significantly update your kitchen’s appearance. It can dramatically change the style and feel of the room without the expense of full cabinet replacement.
What’s the best way to clean greasy kitchen cabinets?
A good degreaser is essential. TSP (trisodium phosphate) is very effective, though it requires caution. Commercial degreasers specifically designed for kitchen cabinets or a strong solution of dish soap and warm water can also work, followed by a rinse with clean water. Ensure thorough drying afterward.
This comprehensive guide should equip you with the knowledge to tackle your kitchen cabinet redo with confidence. Happy renovating!