
What is the best way to organize a kitchen pantry? The best way to organize your kitchen pantry is to start by decluttering, then categorize your items, choose suitable storage solutions, and finally, label everything clearly. This systematic approach ensures a functional and efficient pantry.
A well-organized kitchen pantry is a game-changer for any home cook. It not only makes finding ingredients a breeze but also helps reduce food waste and save money by preventing duplicate purchases. If your pantry is currently a chaotic jumble of cans, boxes, and bags, don’t worry! This guide will walk you through the steps to declutter and maximize your kitchen pantry storage, transforming it into a streamlined space. We’ll cover essential pantry organization ideas, smart pantry shelving solutions, and effective food storage containers.
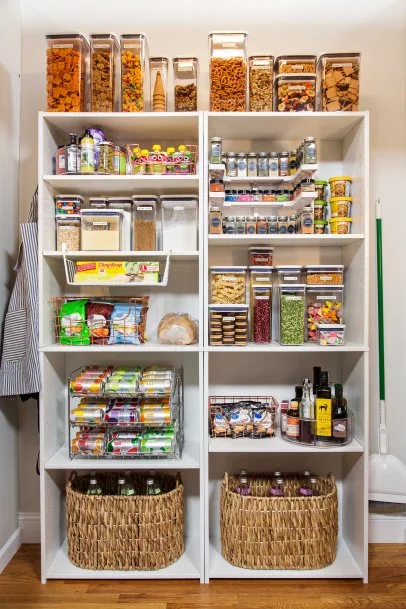
Image Source: hgtvhome.sndimg.com
The Foundation: Pantry Decluttering
Before you can organize, you need to declutter. This is the most crucial step for achieving a truly functional pantry.
Step 1: Empty Everything Out
Yes, everything! Pull every single item from your pantry. This might seem daunting, but it’s the only way to get a clear picture of what you have and what you need. Spread items out on your kitchen counter or a large table.
Step 2: Sort and Purge
As you pull items out, start sorting them into categories:
- Keep: Items that are fresh, within their expiry date, and that you actually use.
- Donate: Non-perishable food items that are unopened and not expired, which you won’t use. Local food banks are usually grateful for these.
- Discard: Anything that is expired, moldy, stale, or has damaged packaging. Also, discard any opened items that are no longer good.
Table: Pantry Decluttering Checklist
| Item Type | Check for Expiry | Condition of Packaging | Usefulness to You | Action |
|---|---|---|---|---|
| Canned Goods | Yes | Dented, Rusted, Bulging | High | Keep |
| Dry Goods (Pasta, Rice) | Yes | Torn, Damaged Seals | High | Keep |
| Baking Supplies | Yes | Stale, Lumpy, Opened | Medium | Discard if unusable, Keep if good |
| Spices | Yes | Faded color, Little scent | Low | Discard if no longer flavorful |
| Snacks | Yes | Stale, Unwanted flavors | Medium | Donate if unopened and good, Keep if not |
| Oils & Vinegars | Yes | Rancid smell, Cloudy | High | Keep if good, Discard if off |
Step 3: Clean the Pantry Space
With the pantry completely empty, it’s time for a deep clean. Wipe down shelves, walls, and the floor. Use a damp cloth with a mild cleaner. For stubborn spots, a paste of baking soda and water can work wonders. Ensure everything is completely dry before putting items back.
Maximizing Pantry Space: Smart Storage Solutions
Now that you’ve decluttered, it’s time to think about how to best utilize the space you have. Maximizing pantry space is all about smart storage solutions and intelligent placement.
Choosing the Right Pantry Shelving Solutions
The shelves themselves are your primary real estate. Consider these options to enhance your pantry organization systems:
- Adjustable Shelving: If your pantry has fixed shelves, consider if they can be adjusted to better suit your needs. If not, you might want to invest in shelf risers or stackable shelves.
- Shelf Risers and Stackable Shelves: These are fantastic for creating vertical space. You can double or triple the usable shelf area for items like cans or jars.
- Pull-Out Shelves or Drawers: For deeper pantries, pull-out shelves make it easier to access items at the back. This is particularly helpful for heavy items or those you use frequently.
- Wire Shelving: While common, wire shelving can be problematic for smaller items that can fall through. Consider placing trays or containers on these shelves to create a flat surface.
- Door Organizers: The back of your pantry door is often overlooked real estate. Over-the-door organizers with pockets or shelves can hold spices, small jars, or cleaning supplies.
Investing in Effective Food Storage Containers
Using the right food storage containers is key to keeping items fresh, organized, and easy to see.
- Airtight Containers: For dry goods like flour, sugar, pasta, rice, cereal, and snacks, airtight containers are a must. They keep food fresh, prevent pests, and create a uniform look. Opt for clear, stackable containers for optimal visibility and space-saving.
- Clear Bins and Baskets: Use these to group similar items. Think of categories like “Baking Supplies,” “Breakfast Items,” “Snacks,” or “Canned Goods.” Bins with handles make it easy to pull out a whole category when needed.
- Lazy Susans (Turntables): Perfect for corner pantries or deep shelves. They allow you to spin and access items easily, especially oils, vinegars, sauces, and jars.
- Can Dispensers: These tiered dispensers make it easy to see all your canned goods and automatically rotate them, ensuring older items are used first.
- Spice Racks: Keep your spices organized and easily accessible. Options include tiered racks, drawer inserts, or magnetic strips.
Utilizing Pantry Shelf Dividers
Pantry shelf dividers are unsung heroes in the battle for pantry organization. They help create distinct zones on your shelves, preventing items from toppling over and mixing together.
- Create Sections: Use dividers to separate bags of chips from boxes of pasta, or baking mixes from grains.
- Support Stacking: Dividers can help support items that are stacked on top of each other, preventing them from falling.
- Categorization: Assign a section for each category of food, making it clear where everything belongs.
Pantry Organization Systems: Putting It All Together
With your decluttered pantry and chosen storage solutions, it’s time to implement your pantry organization systems.
Grouping Like Items Together
This is the cornerstone of any good pantry organization. Grouping similar items makes it much easier to find what you need quickly.
- Baking Supplies: Flour, sugar, baking soda, baking powder, chocolate chips, extracts.
- Grains and Pasta: Rice, quinoa, oats, spaghetti, macaroni.
- Canned Goods: Vegetables, fruits, soups, beans.
- Snacks: Chips, crackers, cookies, nuts, dried fruit.
- Breakfast Items: Cereal, granola, pancake mix, syrup.
- Oils and Vinegars: Olive oil, vegetable oil, balsamic vinegar, white vinegar.
- Sauces and Condiments: Ketchup, mustard, soy sauce, hot sauce.
- Spices and Seasonings: Keep these together, ideally in a dedicated spice rack or drawer.
- “Quick Meals” or “Dinner Starters”: Group ingredients for easy weeknight dinners.
Implementing the “First-In, First-Out” (FIFO) Method
To minimize food waste, practice the FIFO method. When you buy new items, place them behind older items of the same kind. This ensures you use up older ingredients before they expire. This is particularly important for items like canned goods, dairy, and pantry staples.
Deciphering Placement for Accessibility
Think about how you use your pantry and place items accordingly:
- Frequently Used Items: Place these at eye level and within easy reach. This includes everyday snacks, breakfast items, and staple ingredients you grab regularly.
- Less Frequently Used Items: Store these on higher shelves or in lower, less accessible areas. Think seasonal baking ingredients or specialty items.
- Heavy Items: Store heavy items like bags of flour or large jars of oil on lower shelves to prevent them from falling and to make them easier to handle.
Table: Pantry Zone Examples
| Pantry Zone | Examples of Items | Storage Solutions |
|---|---|---|
| Baking Central | Flour, sugar, baking soda, spices, chocolate chips | Airtight containers, clear bins, spice rack |
| Grain & Pasta Hub | Rice, pasta, quinoa, oats | Airtight containers, shelf dividers |
| Canned Goods Corner | Soups, vegetables, fruits, beans | Can dispensers, tiered shelves, bins |
| Snack Station | Chips, crackers, cookies, nuts | Bins with handles, clear baskets |
| Breakfast Nook | Cereal, granola, pancake mix | Airtight containers, clear bins |
| Oils & Vinegars | Olive oil, balsamic vinegar, cooking sprays | Lazy Susans, tiered shelves, bins |
| Sauce & Condiment Shelf | Ketchup, mustard, soy sauce, hot sauce | Lazy Susans, small bins, door organizer pockets |
Mastering Your Pantry: Ongoing Pantry Organization Tips
Organizing your pantry isn’t a one-time task. To maintain order, incorporate these ongoing pantry organization tips.
The Power of Pantry Labels
Clear pantry labels are essential for a well-functioning pantry. They not only tell you what’s inside a container but also where it belongs.
- Label Everything: Label not only your containers but also the shelves or bins. This creates a visual system that everyone in the household can follow.
- Be Specific: Instead of “Flour,” label “All-Purpose Flour” or “Whole Wheat Flour.” For sugar, label “Granulated Sugar” or “Brown Sugar.”
- Use Clear Fonts: Choose a font that is easy to read. You can use a label maker, printable labels, or even handwritten labels with a permanent marker.
- Include Expiration Dates (Optional): For items that don’t come in their original packaging (like bulk grains transferred to containers), you might consider adding the expiration date to the label.
Regular Maintenance Checks
Schedule regular check-ins to keep your pantry in top shape:
- Weekly Quick Scan: Take a quick look each week to ensure items are in their designated spots and that nothing is about to expire.
- Monthly Deep Dive: Once a month, do a slightly more thorough check. Wipe down shelves, rearrange items if needed, and check for any food that might be past its prime.
- Quarterly Purge: Every three months, perform a mini-decluttering session. This helps prevent chaos from accumulating again.
Adapting Your System
Your pantry needs may change over time. Perhaps you’ve started baking more, or your family’s eating habits have shifted. Be willing to adapt your pantry organization systems as needed. If a particular bin isn’t working or a shelf arrangement is awkward, change it!
Creative Pantry Organization Ideas for Every Space
Whether you have a walk-in pantry, a small cabinet, or just a few shelves, these creative pantry organization ideas can help.
For Walk-In Pantries:
- Zone Creation: Divide your walk-in pantry into distinct zones for different types of food. Use shelving units, baskets, and labels to clearly define these areas.
- Vertical Storage Maximization: Install shelving as high as safely possible and use stackable containers to utilize every inch of vertical space.
- Lighting: Ensure your walk-in pantry is well-lit. Under-shelf lighting or small battery-operated puck lights can make a huge difference in visibility.
For Cabinet Pantries:
- Tiered Shelving: These are a lifesaver for standard cabinet shelves, allowing you to see items at the back.
- Under-Shelf Baskets: These slide onto existing shelves and provide extra storage for smaller items like spice packets or small jars.
- Door Organizers: Maximize the back of the cabinet doors with organizers for spices, foil, plastic wrap, or even small cleaning supplies.
For Small Apartment Pantries (or limited space):
- Maximize Wall Space: Use wall-mounted shelves, spice racks, or magnetic strips to get items off your countertops and existing shelves.
- Over-the-Door Organizers: These are invaluable for small spaces. They can hold a surprising amount of food.
- Stackable and Collapsible Containers: Opt for containers that stack efficiently and consider collapsible baskets that can be tucked away when not in use.
- Floating Shelves: Add extra storage in unexpected places with floating shelves.
Frequently Asked Questions (FAQ)
Q: How often should I declutter my pantry?
A: It’s a good practice to do a quick scan weekly, a more thorough check monthly, and a full declutter at least every three to six months.
Q: What are the best types of containers for dry goods?
A: Airtight, clear, stackable containers are ideal for dry goods like flour, sugar, pasta, and rice. They keep food fresh and allow for easy visibility.
Q: My pantry shelves are deep. How can I make items at the back accessible?
A: Use pull-out shelves, turntables (Lazy Susans), or bins that you can easily slide out. This makes reaching items at the back much simpler.
Q: I have a lot of small packets (like seasoning mixes or small snacks). How can I organize them?
A: Small bins, baskets, or drawer organizers are perfect for corralling these items. Over-the-door organizers with clear pockets are also great for small packets.
Q: Should I keep spices in my pantry?
A: Yes, as long as the pantry is cool, dark, and dry. Keep them together in a dedicated spice rack or drawer to maintain order. Avoid placing them near the stove or in direct sunlight.
By following these steps and implementing smart pantry organization ideas, you can transform your kitchen pantry from a source of frustration into a functional, efficient, and beautiful space. Happy organizing!