
Want to give your kitchen a fresh, modern look without breaking the bank? You can absolutely modernize kitchen cabinets on a budget! The quickest and most impactful ways include updating cabinet hardware, repainting or refinishing existing cabinets, and exploring cabinet refacing options.
Your kitchen cabinets are the backbone of your kitchen. They hold your dishes, your pantry staples, and so much more. Over time, even the most stylish cabinets can start to look dated or worn. But replacing them entirely can be a huge expense. Thankfully, there are many ways to update your kitchen cabinets without a complete overhaul. This guide will walk you through budget-friendly methods to transform your kitchen. We’ll cover everything from simple DIY tricks to more involved projects that still save you money compared to full cabinet replacement.
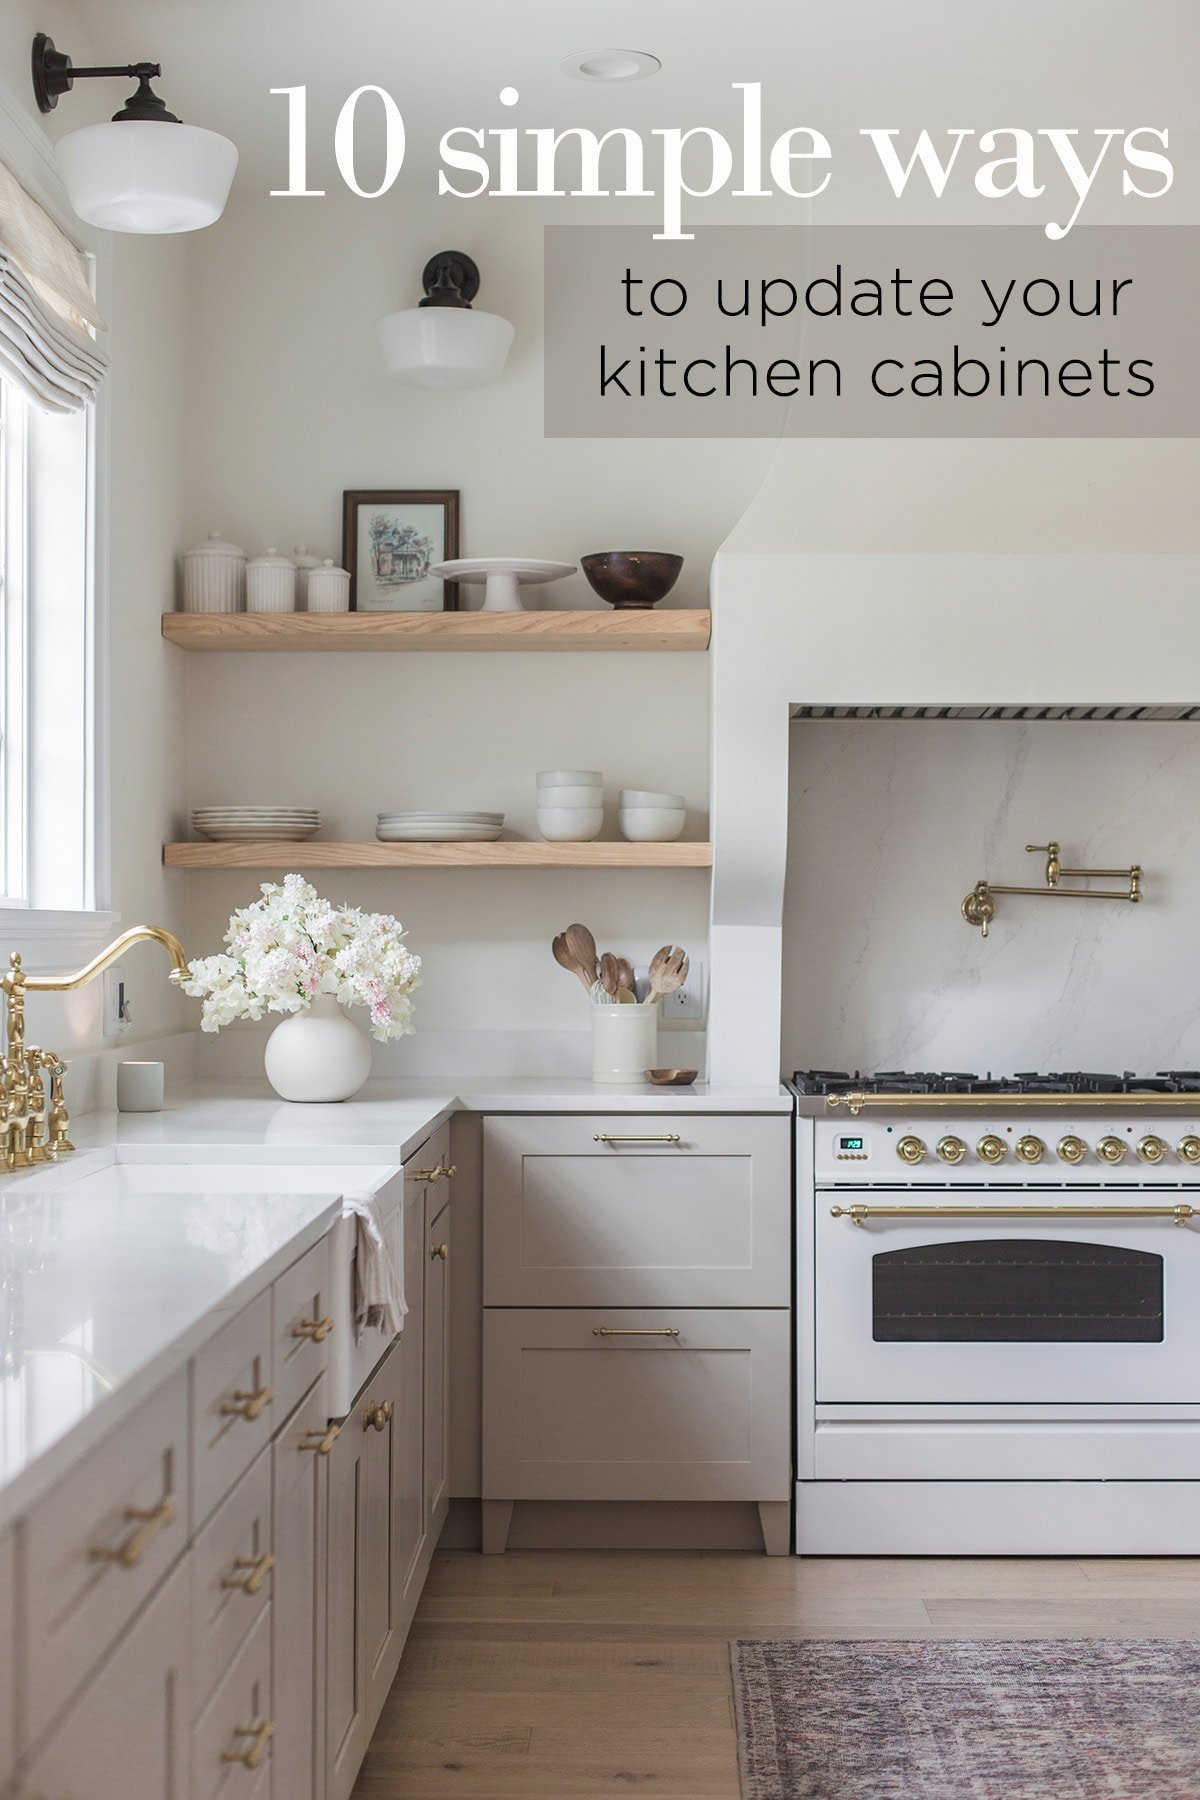
Image Source: www.jennasuedesign.com
Breathing New Life into Your Kitchen: Budget-Friendly Cabinet Modernization
A dated kitchen can feel drab and uninspiring. Often, the cabinets are the biggest culprit. They take up a lot of visual space. When they look tired, the whole kitchen suffers. But changing them doesn’t have to mean a massive renovation. Many projects are totally doable yourself, saving you a lot on labor costs. Let’s explore how to make your kitchen cabinets look brand new, even with a tight budget.
Giving Cabinets a Fresh Coat: The Power of Cabinet Painting
Cabinet painting is one of the most popular and effective ways to modernize kitchen cabinets. It’s a DIY-friendly project that can dramatically change the look of your kitchen.
Choosing the Right Paint
- Type of Paint: For cabinets, you want a durable paint that can withstand grease, moisture, and frequent cleaning. Alkyd enamel or acrylic latex paints are excellent choices. Look for paints specifically designed for cabinets or furniture.
- Finish: A satin or semi-gloss finish is usually best for cabinets. These finishes are more durable and easier to clean than matte finishes. They also reflect light, making your kitchen feel brighter.
- Primer: Don’t skip the primer! A good quality primer will help the paint adhere better, prevent bleed-through (especially from dark wood tones), and create a smooth, even surface.
The Cabinet Painting Process: A Step-by-Step Guide
This is a DIY cabinet makeover that can truly transform your space.
-
Preparation is Key:
- Empty Cabinets: Take everything out of your cabinets.
- Remove Doors and Drawers: Carefully label each door and drawer front so you know exactly where they go. Use painter’s tape and a marker.
- Remove Hardware: Unscrew all hinges, knobs, and pulls.
- Clean Thoroughly: Wash all cabinet surfaces, doors, and drawer fronts with a degreaser. Kitchen grease can be stubborn! TSP (Trisodium Phosphate) or a strong kitchen cleaner works well. Rinse thoroughly.
- Sand: Lightly sand all surfaces. Use 120-150 grit sandpaper to create a surface for the primer to grip. If you have a very glossy finish, you might need a finer grit. Wipe away all dust with a tack cloth or damp microfiber cloth.
- Repair Imperfections: Fill any holes or gouges with wood filler. Let it dry, then sand smooth.
-
Priming:
- Apply one to two coats of high-quality primer. Allow each coat to dry completely according to the manufacturer’s instructions. Sand lightly between coats with a fine-grit sandpaper (220 grit) and wipe clean with a tack cloth.
-
Painting:
- Application Methods:
- Sprayer: For the smoothest, most professional finish, a paint sprayer is ideal. It requires practice, but the results are worth it.
- Roller: Use a high-density foam roller for a smooth finish. Work in thin, even coats.
- Brush: Use a high-quality synthetic brush for cutting in edges and details.
- Multiple Coats: Apply thin, even coats of your chosen paint. Aim for two to three coats, allowing adequate drying time between each.
- Drying Time: Allow at least 24 hours for the paint to cure before reassembling. Full hardness can take up to a month.
- Application Methods:
-
Reassembly:
- Once everything is dry and cured, reattach the doors, drawers, and new hardware.
Cabinet Refinishing: Restoring the Natural Beauty
If your cabinets are solid wood and in good structural condition, cabinet refinishing can be a fantastic option. This process involves stripping away the old finish and applying a new one, revealing the natural wood grain.
When Refinishing is a Good Choice
- Solid wood cabinets (oak, maple, cherry, etc.)
- Cabinets with minor scratches or wear that you want to repair.
- You prefer a natural wood look over painted cabinets.
The Refinishing Process
-
Strip the Old Finish:
- Use a chemical paint stripper or a heat gun. Wear protective gear: gloves, eye protection, and a respirator.
- Scrape away the softened finish with a putty knife or scraper. Work in a well-ventilated area.
- Use steel wool or fine-grit sandpaper to remove any remaining residue.
-
Sand the Wood:
- Start with medium-grit sandpaper (100-120 grit) to remove any imperfections and smooth the wood.
- Follow up with fine-grit sandpaper (150-180 grit) for a smooth finish.
- Always sand in the direction of the wood grain.
- Wipe away all dust with a tack cloth.
-
Stain the Cabinets:
- Apply wood stain with a brush or rag, wiping off excess with a clean cloth.
- Test the stain on a scrap piece of wood or an inconspicuous area first to ensure you like the color.
- Allow the stain to dry completely.
-
Apply a Protective Topcoat:
- A clear topcoat (polyurethane, varnish, or lacquer) protects the wood and stain.
- Apply two to three thin coats, sanding lightly with very fine-grit sandpaper (220-320 grit) between coats. Wipe away dust after each sanding.
Cabinet Refacing: A Step Up in Transformation
Cabinet refacing is a more involved process than painting or refinishing, but it’s still significantly cheaper than full cabinet replacement. Refacing means you keep your existing cabinet boxes (the frames) but replace the doors, drawer fronts, and apply a new veneer or laminate to the visible parts of the cabinet boxes.
What’s Involved in Cabinet Refacing?
- New Doors and Drawer Fronts: You can choose from a wide variety of cabinet door styles and materials.
- Veneer or Laminate: The exposed cabinet boxes are covered with a matching wood veneer or durable laminate.
- New Hardware: This is usually included or can be easily updated.
Pros and Cons of Cabinet Refacing
| Pros | Cons |
|---|---|
| Significant aesthetic upgrade | More expensive than painting or refinishing |
| Faster than full cabinet replacement | Limited to existing cabinet box layout |
| Wide range of cabinet finishes available | Some DIY knowledge required if not hiring professionals |
| Can update cabinet door styles | Quality can vary depending on the provider |
Is Refacing Right for You?
If your cabinet boxes are in good condition but the doors and drawer fronts are dated or damaged, refacing is a strong contender. It offers a completely new look without the cost and disruption of a full tear-out.
A Touch of Glamour: The Impact of Cabinet Hardware Update
Perhaps the easiest and most budget-friendly way to modernize kitchen cabinets is by simply updating the hardware. New knobs and pulls can instantly change the style and feel of your kitchen.
Choosing the Right Hardware
- Style: Consider the overall style of your kitchen.
- Modern: Sleek, minimalist designs, brushed nickel, matte black, chrome.
- Farmhouse: Rustic finishes, oil-rubbed bronze, matte black, bin pulls.
- Traditional: Ornate designs, polished brass, antique bronze.
- Finish: Match or complement other finishes in your kitchen (faucets, lighting).
- Size and Placement: Ensure the size and placement of your new hardware complement the size of your cabinet doors and drawers. Measure the “center-to-center” distance for pulls if you’re replacing existing ones to ensure they fit the pre-drilled holes.
Installation is a Breeze
Replacing hardware typically involves unscrewing the old and screwing in the new. If you’re changing the style or size, you might need to drill new holes. A template can help ensure accurate placement.
Enhancing Functionality: Smart Cabinet Organization
Modernizing isn’t just about looks; it’s also about how your kitchen functions. Good cabinet organization can make your kitchen feel more spacious and efficient.
Budget-Friendly Organization Solutions
- Drawer Dividers: Keep utensils and gadgets tidy. You can find inexpensive plastic or bamboo dividers.
- Shelf Risers: Double your storage space on cabinet shelves.
- Lazy Susans: Perfect for corner cabinets or for organizing spices and oils.
- Pull-Out Shelves: Make it easier to access items in deep cabinets. These can be a bit more of an investment, but they significantly improve usability.
- Stackable Bins: Use clear bins to group items and make them easy to see and grab.
Illuminating Your Kitchen: The Power of Cabinet Lighting
Good lighting can make a huge difference in how your kitchen looks and feels. Under-cabinet lighting is a popular and effective way to modernize and improve functionality.
Types of Cabinet Lighting
- LED Strip Lights: Easy to install and energy-efficient. Many come with adhesive backing.
- Puck Lights: Small, round lights that can be mounted with screws or adhesive. Often battery-operated or plug-in.
- Hardwired Fixtures: Offer a more integrated and polished look but require electrical work.
Benefits of Under-Cabinet Lighting
- Task Lighting: Illuminates countertops for food prep.
- Ambiance: Creates a warm, inviting atmosphere.
- Highlights Countertops: Showcases your countertop material.
- Modern Look: Adds a sleek, contemporary touch.
Exploring New Cabinet Door Styles and Finishes
If your budget allows for a bit more than just paint or hardware, consider updating your cabinet door styles and exploring different cabinet finishes.
Popular Cabinet Door Styles
- Shaker: Simple, clean lines with a recessed center panel. Very versatile and works in many kitchen styles.
- Slab (Flat Panel): A completely flat door. Modern and minimalist.
- Raised Panel: Features a center panel that is raised higher than the surrounding frame. More traditional.
- Beadboard: Has vertical grooves for a cottage or farmhouse feel.
Modern Cabinet Finishes to Consider
- Matte Finishes: Offer a sophisticated, modern look.
- Two-Tone Cabinets: Pairing different colors or wood tones for upper and lower cabinets, or for islands.
- Wood Grains: Natural wood finishes can bring warmth and texture.
- Bold Colors: Deep blues, greens, or even black can make a strong modern statement.
When is Cabinet Replacement the Only Option?
While this guide focuses on budget-friendly modernization, there are times when cabinet replacement is necessary.
Signs You Might Need New Cabinets
- Structural Damage: Rot, significant warping, or water damage to the cabinet boxes themselves.
- Pest Infestation: Termites or other wood-destroying insects have compromised the cabinets.
- Poor Construction: Original cabinets were poorly built and offer very little structural integrity.
- Layout Issues: The current layout of your kitchen is severely inefficient, and new cabinet placement is needed.
- Mold or Mildew: Persistent mold or mildew that cannot be remediated.
If you’re facing these issues, a full cabinet replacement is likely the safest and most effective long-term solution. However, even then, exploring semi-custom or stock cabinet options can help manage costs.
Budgeting for Your Cabinet Modernization Project
When planning your DIY cabinet makeover or other modernization efforts, it’s important to create a realistic budget.
Cost Breakdown (Estimates)
| Project | DIY Cost (Estimate) | Professional Cost (Estimate) |
|---|---|---|
| Cabinet Painting | $100 – $300 | $1,500 – $5,000+ |
| Cabinet Refinishing | $200 – $500 | $2,000 – $6,000+ |
| Cabinet Hardware Update | $50 – $200+ | $150 – $500+ |
| Cabinet Refacing | $1,000 – $3,000+ | $3,000 – $10,000+ |
| Cabinet Organization | $50 – $200+ | $200 – $1,000+ |
| Under Cabinet Lighting (LED) | $50 – $200+ | $200 – $600+ |
| Cabinet Door Style Update | $500 – $1,500+ | $1,500 – $5,000+ |
| Full Cabinet Replacement | Varies Widely | $5,000 – $25,000+ |
- Costs are approximate and can vary greatly based on kitchen size, materials chosen, and local labor rates.
Tips for Saving Money
- DIY as much as possible: Painting, hardware updates, and organization are great DIY projects.
- Buy supplies in bulk: If possible, purchase paint, brushes, and other supplies from places that offer discounts for larger quantities.
- Shop sales: Keep an eye out for sales on hardware, lighting, and organization products.
- Prioritize: Decide which updates will have the biggest impact on your kitchen and focus your budget there first.
Frequently Asked Questions About Modernizing Kitchen Cabinets
Q1: Can I paint over stained cabinets?
A1: Yes, you can paint over stained cabinets, but proper preparation is crucial. You’ll need to clean, degrease, sand, and prime the cabinets thoroughly before painting to ensure the paint adheres well and lasts.
Q2: How long does painted cabinet finish last?
A2: With proper preparation and the use of high-quality paint and primer, a painted cabinet finish can last for many years, often 10-15 years or more. Regular cleaning and avoiding harsh abrasive cleaners will help extend its life.
Q3: Is cabinet refacing cheaper than replacing cabinets?
A3: Yes, generally, cabinet refacing is significantly cheaper than full cabinet replacement. Refacing typically costs about half to two-thirds the price of new cabinets because you are reusing the existing cabinet boxes.
Q4: What is the most durable cabinet finish?
A4: For durability, finishes like catalyzed conversion varnish or baked enamel are very strong and resistant to scratches and moisture. Among DIY-friendly options, a good quality enamel paint with a semi-gloss or satin finish offers good durability.
Q5: Should I replace my cabinet doors if I repaint them?
A5: If your current cabinet doors are in good condition and you like their style, repainting them is a great budget-friendly option. If the doors are warped, damaged, or you dislike the cabinet door styles, then replacing them (as part of refacing) might be a better choice if your budget allows.
Q6: How do I choose the right cabinet hardware?
A6: Consider the style of your kitchen and cabinets. Look at the finish of your faucet and appliances. Measure the distance between screw holes (center-to-center) for pulls to ensure they fit. For knobs, it’s usually a single screw. Browse online or in stores for inspiration, and consider getting a few samples to see how they look on your cabinets.
Q7: Can I update my cabinet lighting myself?
A7: Yes, many types of under-cabinet lighting, especially LED strip lights and battery-operated puck lights, are designed for easy DIY installation. Hardwired options usually require some electrical knowledge or the help of an electrician.
Q8: What are the benefits of cabinet organization?
A8: Good cabinet organization makes your kitchen more efficient, reduces clutter, helps you find items easily, and can make cabinets feel more spacious. It improves the overall functionality and usability of your kitchen space.
By implementing these budget-friendly strategies, you can achieve a beautifully modernized kitchen that reflects your style and meets your needs. Whether you opt for a fresh coat of paint, a hardware update, or clever organization solutions, transforming your kitchen cabinets is an achievable goal without a hefty price tag.