
Image Source: en.lesso.com
How to Install a Faucet in Your Kitchen: A Step-by-Step DIY Guide
Can you install a kitchen faucet yourself? Yes, with the right tools and a little patience, you can absolutely install a kitchen faucet yourself. This guide will walk you through the entire process, from gathering supplies to enjoying your brand-new kitchen sink faucet installation. Whether you’re looking to replace an old, leaky faucet or upgrade to a more modern design, this DIY faucet replacement tutorial is for you. We’ll cover everything you need to know about kitchen faucet plumbing basics to ensure a smooth and successful new kitchen faucet setup.
Why Replace Your Kitchen Faucet?
Over time, your kitchen faucet can become a source of frustration. Leaks, drips, poor water pressure, or a dated style can all signal that it’s time for a change. A new kitchen faucet can dramatically improve the look and functionality of your kitchen. It’s a rewarding DIY project that can save you money on plumbing services.
When is it Time for a New Faucet?
- Leaks and Drips: Constant dripping wastes water and can be annoying.
- Corrosion and Mineral Buildup: This can affect water flow and the faucet’s appearance.
- Difficulty Operating: Stiff handles or loose parts can make the faucet hard to use.
- Outdated Style: A new faucet can instantly update your kitchen’s aesthetic.
- Poor Water Pressure: Internal wear can reduce water flow.
- Damage: Cracks or breaks in the faucet body.
Tools and Materials You’ll Need
Before you start, gather all your tools and materials. Having everything ready will make the process much smoother.
Essential Tools:
- Adjustable wrench (or two)
- Basin wrench (highly recommended for tight spaces)
- Plumber’s putty
- Teflon tape (pipe thread tape)
- Bucket
- Rags or old towels
- Safety glasses
- Flashlight or headlamp
- Pliers (channel-lock pliers can be useful)
- Screwdriver set (Phillips and flathead)
- Bucket or basin (to catch water)
- Utility knife or putty knife
- Penetrating oil (like WD-40, if parts are stuck)
New Faucet Components:
- Your new kitchen faucet kit (should include mounting hardware, supply lines)
- Optional: New flexible water supply lines (highly recommended for a fresh install)
- Optional: New shut-off valves (if your current ones are old or leaky)
Step 1: Preparation is Key – Shutting Off the Water
This is the most crucial first step in any plumbing project. You don’t want to be swimming in your kitchen!
- Locate Shut-Off Valves: Look under your kitchen sink. You should see two valves connected to pipes coming out of the wall – one for hot water and one for cold water.
- Turn Off the Valves: Turn the handles of both valves clockwise until they are firmly closed.
- Test: Turn on the old faucet handles (both hot and cold) to ensure the water supply is indeed off. Let any residual water drain out.
If you can’t find or operate these valves, you’ll need to shut off the main water supply to your house. Locate the main shut-off valve, usually in the basement, garage, or near your water meter.
Step 2: Removing the Old Faucet
Now it’s time to disconnect and remove the old faucet. This can sometimes be the trickiest part, especially if the faucet has been in place for a long time.
Disconnecting the Water Supply Lines
- Position Bucket: Place a bucket or basin directly under the old faucet’s supply line connections to catch any remaining water.
- Disconnect Supply Lines: Using your adjustable wrench, loosen the nuts connecting the flexible water supply lines to the shut-off valves. Turn counter-clockwise. If they are stuck, try a little penetrating oil.
- Disconnect from Faucet: Next, disconnect the other end of the supply lines from the faucet itself. These are usually located directly above the shut-off valves, connected to the faucet shanks.
Detaching the Faucet Mounting
This is where a basin wrench becomes your best friend. It’s designed to reach into tight spaces behind the sink.
- Locate Mounting Nuts: Look up behind the sink bowl, where the faucet base is attached. You’ll see large nuts or mounting brackets holding the faucet in place.
- Loosen Mounting Nuts: Use your basin wrench or adjustable wrench to loosen and remove these nuts. Again, penetrating oil might be needed if they are corroded or stuck.
- Remove Faucet: Once the nuts are off, the old faucet should lift straight out from the top of the sink. If it feels stuck, gently try to wiggle it. You might need to use a utility knife or putty knife to carefully break any sealant around the base.
Dealing with Spray Attachments (If Applicable)
If your old faucet had a side sprayer, you’ll need to disconnect its hose as well.
- Locate Sprayer Hose: Trace the hose from the sprayer to its connection point under the sink.
- Disconnect Hose: Usually, this hose connects to a special fitting on the faucet body or a diverter. Unscrew this connection.
Step 3: Preparing the Sink for the New Faucet
Once the old faucet is out, clean the area around the faucet holes on your sink.
- Clean the Surface: Use a putty knife or utility knife to scrape away any old plumber’s putty or sealant. Wipe the area clean with a damp cloth.
- Inspect the Holes: Make sure the mounting holes are clean and free of debris. This ensures a good seal for the new faucet.
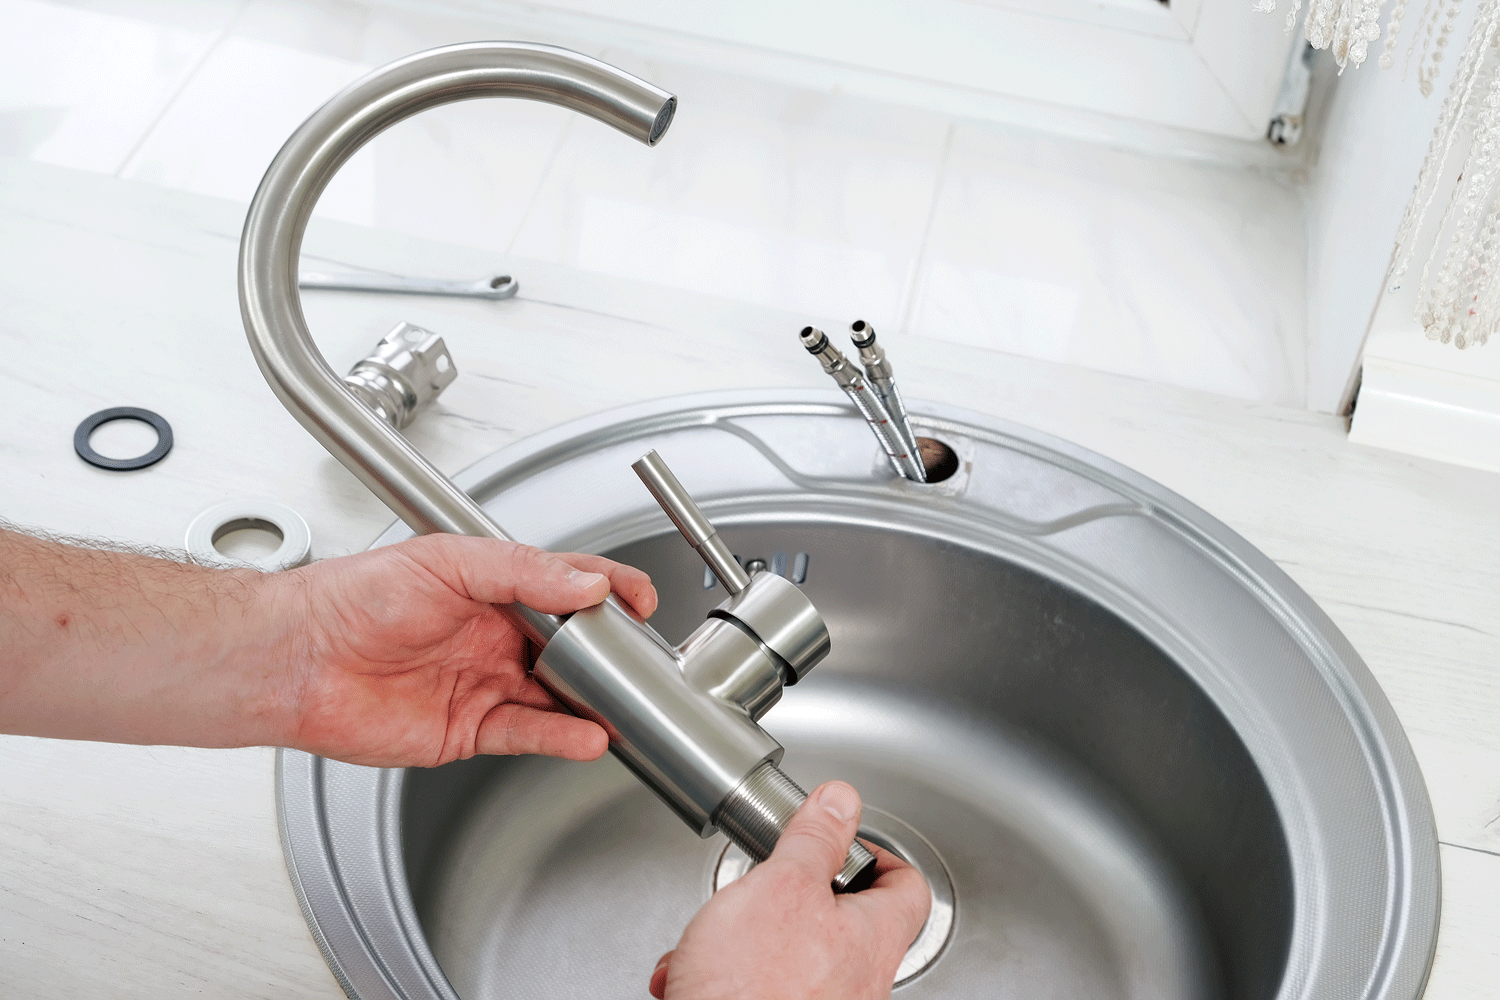
Step 4: Installing the New Faucet
This is where your new kitchen faucet setup begins! Follow the specific instructions that came with your new faucet, as designs can vary slightly.
Attaching the Faucet Body
- Apply Plumber’s Putty/Gasket: Most new faucets come with a rubber gasket or base plate. If yours doesn’t, or if you want an extra layer of protection against leaks, roll a rope of plumber’s putty and place it around the underside of the faucet base. This will create a watertight seal against the sink.
- Position the Faucet: Carefully lower the new faucet through the mounting holes on the sink from the top. Ensure it’s aligned correctly.
- Secure from Below: From underneath the sink, slide any provided washers or mounting plates onto the faucet shanks. Then, screw on the mounting nuts.
- Tighten Mounting Nuts: Hand-tighten the nuts first, ensuring the faucet is straight. Then, use your basin wrench or adjustable wrench to snug them up. Be careful not to overtighten, as this can damage the sink or faucet.
Connecting the Water Supply Lines
This part covers how to connect water supply kitchen faucet securely.
- Attach New Supply Lines: If your new faucet didn’t come with integrated supply lines, or if you bought new ones, attach them to the corresponding hot and cold inlets on the faucet shanks. Hand-tighten, then give them a quarter-turn with a wrench. Avoid overtightening.
- Connect to Shut-Off Valves: Attach the other end of the flexible supply lines to the shut-off valves. Ensure the hot line connects to the hot valve and the cold line to the cold valve.
- Hot: Usually on the left.
- Cold: Usually on the right.
- Tighten Connections: Use your adjustable wrench to tighten these connections. Again, snug is good; overtightening can strip threads or crack fittings.
Plumbing for Kitchen Faucet Basics: Important Notes on Supply Lines
- Flexibility is Key: Always use flexible supply lines. They are easier to work with and less prone to cracking than rigid copper lines.
- Replace Old Lines: If your old supply lines are stiff, corroded, or showing signs of wear, replace them. It’s good practice during a faucet replacement.
- Check Connections: Ensure the rubber gaskets inside the supply line nuts are present and properly seated before tightening.
Installing the Sprayer Hose (If Applicable)
If your new faucet has a pull-out or side sprayer, you’ll need to connect its hose.
- Connect Hose to Faucet: The sprayer hose typically connects to a specific diverter fitting on the faucet body. Follow your faucet’s instructions for this connection. Often, it’s a quick-connect fitting or a threaded connection.
- Attach Weight: Most pull-out sprayers have a weight that attaches to the hose under the sink. This weight helps the sprayer retract smoothly. Slide it onto the hose at the recommended position (check your manual).
Step 5: Testing for Leaks
This is the moment of truth!
- Turn Water Back On: Slowly turn the hot and cold shut-off valves back on by turning them counter-clockwise.
- Check Connections: Immediately inspect all the connections you made under the sink – at the shut-off valves and at the faucet shanks – for any drips or leaks.
- Run the Faucet: Turn on the new faucet (both hot and cold). Let the water run for a minute or two.
- Further Inspection: While the water is running and after you turn it off, check all connections again for leaks. Pay close attention to the base of the faucet on the sink surface.
- Tighten if Necessary: If you find a small drip, try gently tightening the connection by a quarter turn. If a leak persists, you may need to turn off the water again, disconnect, re-apply Teflon tape (if applicable to the fitting), and reconnect.
Step 6: Final Touches and Cleanup
Once you’re confident there are no leaks, you’re almost done!
- Wipe Down: Wipe away any excess plumber’s putty or sealant from around the faucet base on the sink.
- Organize Under Sink: Tidy up the area under the sink, ensuring the supply lines aren’t kinked.
- Dispose of Old Parts: Properly dispose of your old faucet.
Special Considerations: Undermount Sink Faucet Installation
If you have an undermount sink, the process is largely the same, but the accessibility for attaching the faucet mounting hardware is different.
- Reach is Key: The main difference with an undermount sink faucet installation is that you’ll be working almost exclusively from underneath the sink. This is where a basin wrench is absolutely essential.
- Clearance: Ensure you have enough clearance to maneuver your tools. Sometimes, cabinets or plumbing might need temporary removal for better access.
- Mounting Brackets: Undermount sinks often have specific mounting brackets or channels that the faucet shanks pass through before being secured. Make sure you’re using the correct hardware provided with your faucet.
- Gasket Placement: Pay extra attention to the gasket or putty seal at the faucet base, as you won’t see it from above until the installation is complete.
Kitchen Faucet Mounting: Best Practices
- Don’t Overtighten: This is the most common mistake. Overtightening can strip threads, crack plastic parts, or even damage your sink. Snug is sufficient.
- Use Plumber’s Putty or Gasket: Always use the provided gasket or a bead of plumber’s putty where the faucet meets the sink to create a watertight seal.
- Proper Alignment: Ensure the faucet is perfectly straight before tightening the mounting nuts. You can use a small level if you want to be extra precise.
- Correct Supply Lines: Use flexible, braided stainless steel supply lines for durability and ease of installation. Always check their condition before installing.
Troubleshooting Common Issues
| Problem | Cause | Solution |
|---|---|---|
| Faucet Leaks at Base | Insufficient or improper sealant/gasket. | Turn off water. Remove faucet, re-apply plumber’s putty or ensure gasket is seated correctly. Re-tighten. |
| Dripping from Spout | Worn-out cartridge or valve seat. | Replace the faucet cartridge or valve seat according to manufacturer instructions. |
| Low Water Pressure | Clogged aerator, kinked supply line, or partially closed valve. | Clean or replace aerator. Check supply lines for kinks. Ensure shut-off valves are fully open. |
| Leaks at Supply Line Nuts | Loose connection or damaged fitting/gasket. | Turn off water. Gently tighten the nut. If it still leaks, disconnect, check gasket, and re-connect. |
| Sprayer Hose Leaks | Loose connection or damaged hose/fitting. | Check and tighten the connection. If damaged, replace the hose. |
Frequently Asked Questions (FAQ)
Q1: How long should a kitchen faucet installation take?
A1: For an experienced DIYer, replacing a kitchen faucet can take 30 minutes to an hour. For a first-timer, especially if parts are difficult to remove, it might take 1-3 hours.
Q2: Do I need to turn off the main water supply?
A2: Only if you cannot locate or operate the shut-off valves under the sink. Always try to use the local shut-off valves first.
Q3: What kind of sealant should I use?
A3: Plumber’s putty is generally recommended for sealing the faucet base to the sink. Some faucets come with a rubber gasket, which can also be used alone or with putty for extra security. Teflon tape is used on threaded pipe connections (like at the shut-off valves if you’re not using flexible lines with rubber seals).
Q4: My old faucet is really stuck. What can I do?
A4: Use a penetrating oil (like WD-40) and let it sit for 10-15 minutes. You may need to tap the stuck parts gently with a wrench or hammer. A basin wrench is often necessary for tight spots. If it’s extremely corroded, you might need to carefully cut the mounting nuts with a small hacksaw or an oscillating multi-tool, being very careful not to damage the sink.
Q5: Can I connect my new faucet directly to the water pipes instead of the shut-off valves?
A5: No, this is not recommended. Always connect your faucet’s supply lines to properly functioning shut-off valves. Shut-off valves are essential for future maintenance or emergencies. If your current valves are old or leaky, it’s a good idea to replace them while you’re doing the faucet installation.
Q6: What is the purpose of the aerator?
A6: The aerator is the small screen at the tip of your faucet spout. It mixes air with water, creating a smooth, splash-free stream and can also reduce water consumption.
Q7: I have an undermount sink. Does that change anything?
A7: Yes, it makes access to the mounting hardware more difficult. You will be working almost exclusively from underneath the sink, making a basin wrench essential. The process of securing the faucet to the sink from below is the primary difference.
Conclusion
You’ve successfully navigated the steps for your kitchen sink faucet installation! Replacing your kitchen faucet is a manageable DIY project that can significantly enhance your kitchen’s functionality and appearance. By following these detailed steps and taking your time, you can confidently achieve a professional-looking result. Enjoy your new, leak-free kitchen faucet!