
A dripping kitchen faucet is more than just an annoyance; it’s a constant waste of water and can lead to higher utility bills. Can you fix a dripping kitchen faucet yourself? Yes, absolutely! Most dripping faucet issues can be resolved with basic tools and a little patience, making DIY faucet repair a rewarding and cost-effective solution. This guide will walk you through the steps of leaky faucet repair, helping you stop faucet leak and improve your plumbing fixture maintenance.
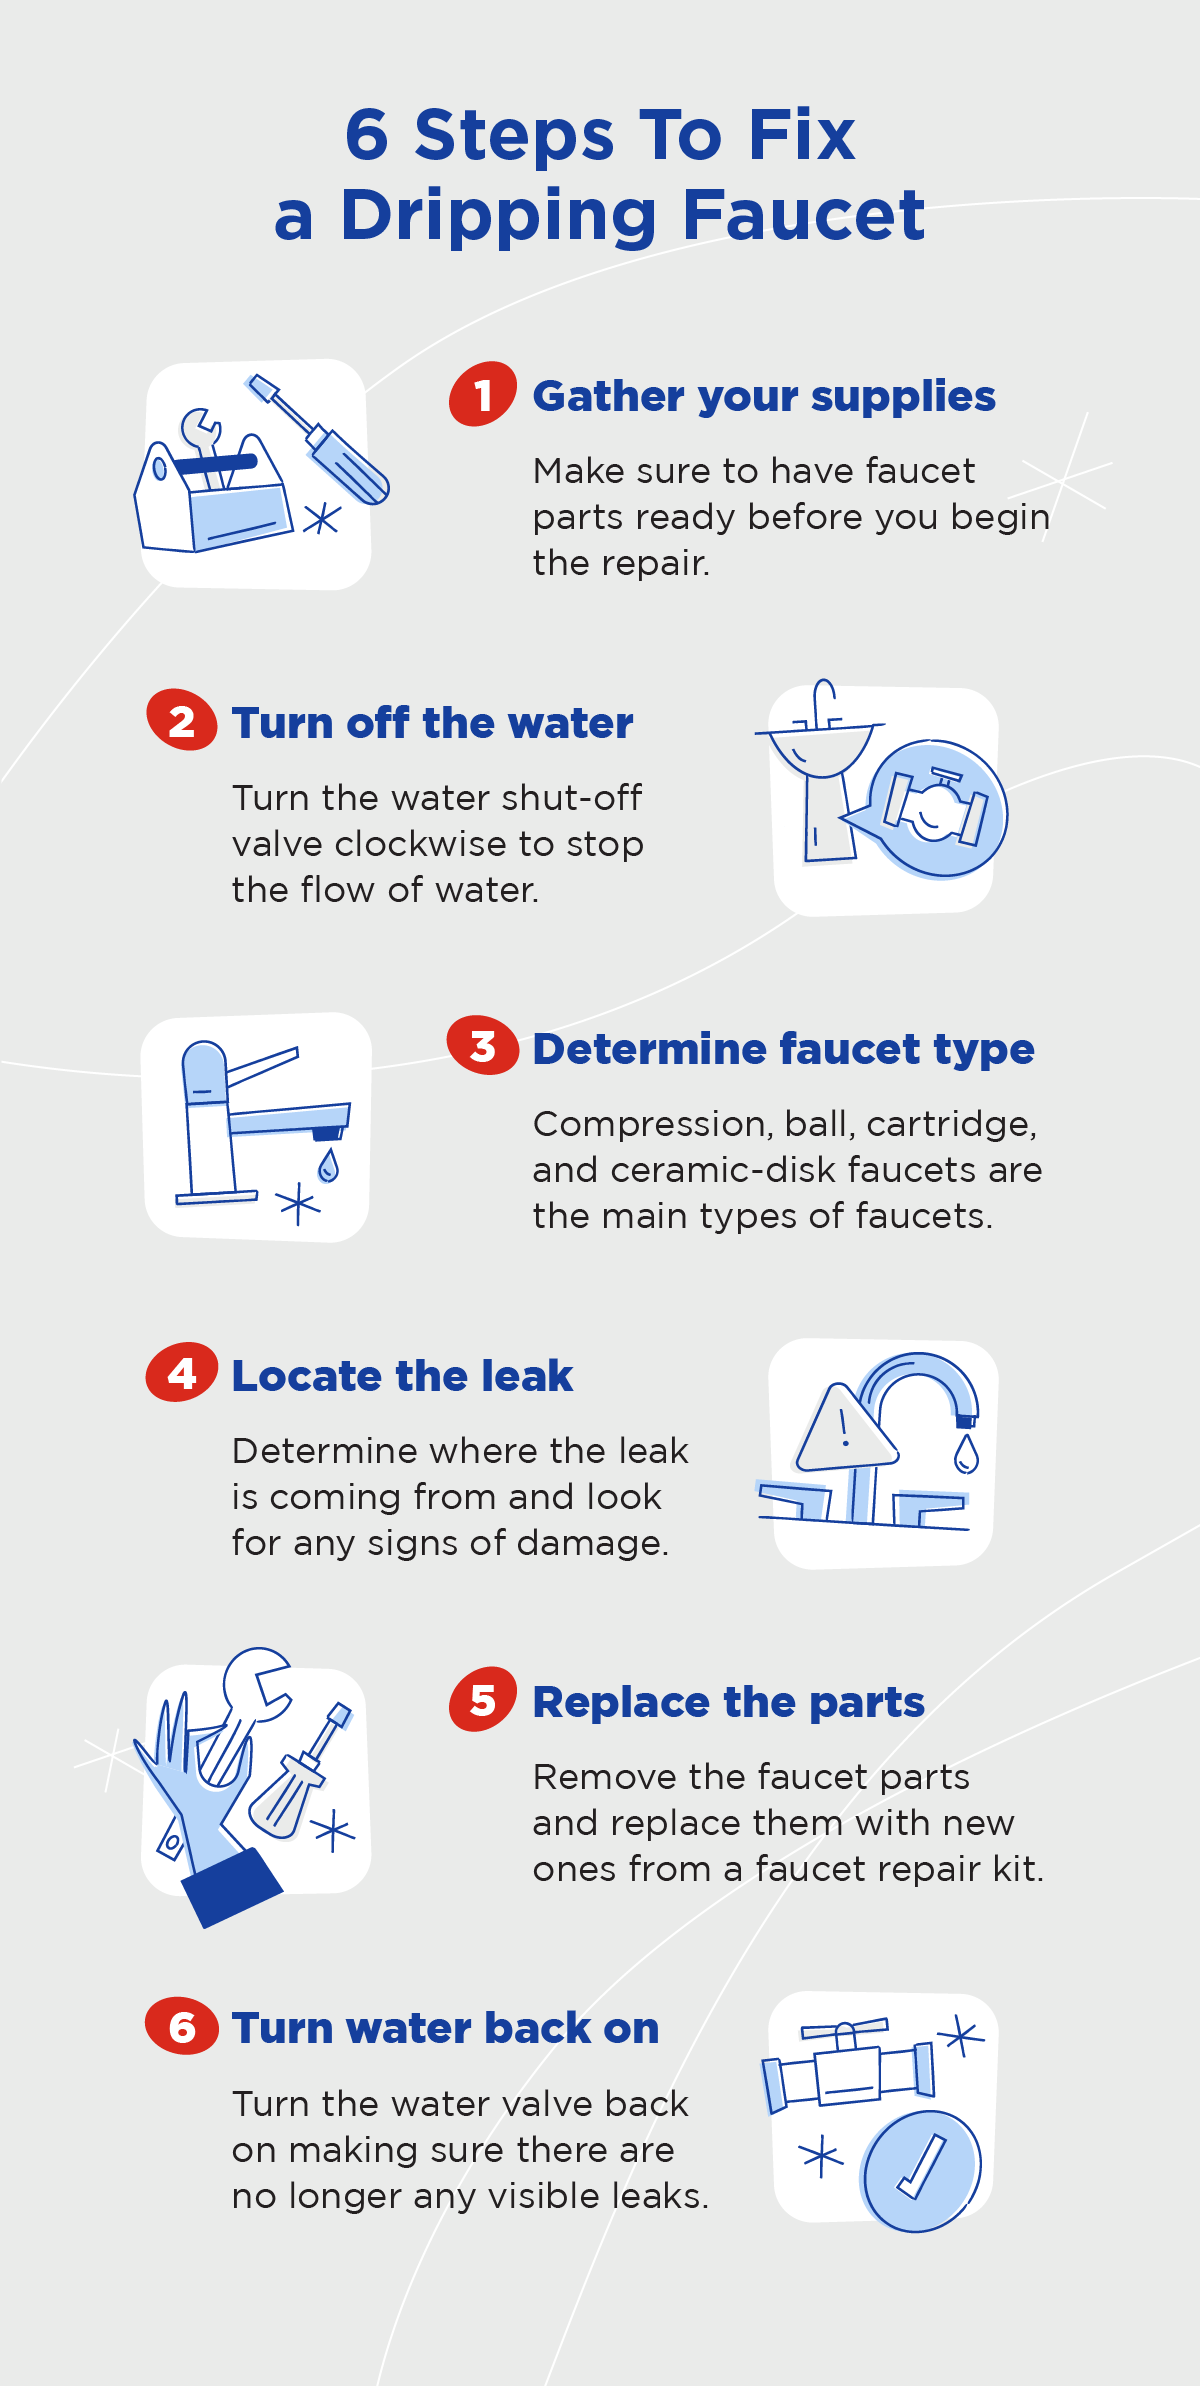
Image Source: www.mrrooter.com
What’s Causing Your Faucet to Drip?
Before you start, it’s helpful to know why your faucet is dripping. The most common culprits are worn-out parts inside the faucet mechanism. These parts are designed to create a seal, and over time, they can degrade, allowing water to seep through. Common issues include:
- Worn-out washers: These are rubber or plastic discs that create a seal when you turn off the faucet.
- Damaged O-rings: Small rubber rings that fit around the valve stem, preventing leaks around the handle.
- Faulty cartridges: In newer faucets, a cartridge controls the water flow. If it’s damaged, it will cause drips.
- Corroded valve seats: The part of the faucet where the washer presses against. If it’s rough or corroded, it won’t seal properly.
Let’s dive into how to tackle these common problems.
Tools You’ll Need for Dripping Faucet Repair
Gathering the right tools before you begin will make the process much smoother. Here’s a basic toolkit for kitchen sink repair:
- Adjustable wrench
- Phillips head screwdriver
- Flathead screwdriver
- Plumber’s tape (PTFE tape)
- Penetrating oil (like WD-40)
- Rag or old towel
- Bucket
- Replacement parts (washers, O-rings, or a new cartridge – it’s best to have these on hand or know your faucet model to get the correct ones)
- Pliers (needle-nose and regular)
- Utility knife or putty knife
Step-by-Step Guide to Fixing a Dripping Kitchen Faucet
This guide covers the most common types of faucets: compression faucets and cartridge faucets.
Preparation: Safety First!
- Turn off the water supply: This is the most crucial step. Look under your sink for the shut-off valves for both hot and cold water. Turn them clockwise until they are tight. If you can’t find individual shut-off valves or they don’t work, you’ll need to turn off the main water supply to your house.
- Drain residual water: Turn on the faucet to let any remaining water in the pipes drain out.
- Protect your sink: Place a rag or towel in the sink drain to prevent small parts from falling down it.
Fixing a Compression Faucet (Older Style with Two Handles)
Compression faucets are fairly simple. They use a stem with a rubber washer at the end that presses against a valve seat to stop water flow.
Step 1: Remove the Handle
- Find the decorative cap: Look for a small cap on top of the handle. It might have a “H” or “C” for hot and cold, or it might be plain.
- Pry off the cap: Use a flathead screwdriver or a utility knife to gently pry off the decorative cap.
- Unscrew the handle screw: You’ll find a screw underneath the cap. Use a screwdriver to remove it.
- Remove the handle: Gently pull the handle straight up. If it’s stuck, try wiggling it. A handle puller tool can be helpful if it’s really stubborn.
Step 2: Access the Stem
- Remove the packing nut: Beneath the handle, you’ll see a packing nut. This holds the stem in place. Use an adjustable wrench to loosen and remove it by turning it counter-clockwise.
- Remove the stem: Once the packing nut is off, you should be able to unscrew the entire stem assembly by turning it counter-clockwise with your wrench or by hand.
Step 3: Replace the Faucet Washer
- Locate the washer: At the bottom of the stem, you’ll find a small screw holding a rubber washer.
- Remove the old washer: Use a flathead screwdriver to remove the screw and then pry off the old, worn washer.
- Install the new washer: Place the new washer onto the stem and secure it with the screw. Make sure it’s the correct size and type for your faucet. This is a key part of replace faucet washer.
Step 4: Check and Repair the Valve Seat
- Inspect the valve seat: Look inside the faucet body where the stem was. You’ll see the valve seat. If it looks rough, pitted, or corroded, it needs attention. This is called faucet valve seat repair.
- Clean or reface the valve seat: You can try cleaning it with a cloth and some vinegar to remove mineral deposits. If it’s damaged, you might need a valve seat wrench to remove and replace it, or a valve seat dresser tool to grind it smooth. If you don’t have these specialized tools, sometimes a new valve seat is the easiest solution.
Step 5: Replace the O-ring (If Applicable)
Some compression faucets also have an O-ring around the stem.
- Find the O-ring: It’s usually located just above the washer, on the stem itself.
- Remove the old O-ring: Carefully pry it off with a small screwdriver or utility knife.
- Install the new O-ring: Slide the new worn O-ring replacement onto the stem. Ensure it fits snugly in the groove.
Step 6: Reassemble the Faucet
- Reinsert the stem: Screw the stem assembly back into the faucet body, turning clockwise.
- Tighten the packing nut: Screw the packing nut back on and tighten it with the wrench. Don’t overtighten, as this can make the handle stiff.
- Reattach the handle: Place the handle back onto the stem and secure it with the screw.
- Replace the decorative cap: Snap the cap back into place.
Step 7: Turn Water Back On and Test
- Slowly turn on the water: Open the shut-off valves under the sink slowly.
- Check for leaks: Turn the faucet on and off several times. Look for any drips or leaks around the handle or spout.
Fixing a Cartridge Faucet (Modern Single-Handle Faucets)
Cartridge faucets are common in modern kitchens. They use a self-contained cartridge to control water flow and temperature.
Step 1: Remove the Handle
- Locate the handle screw: Most single-handle faucets have a screw hidden under a decorative cap or plug, often on the front or side of the handle.
- Pry off the cap/plug: Use a utility knife or small flathead screwdriver to gently remove the cap or plug.
- Unscrew the handle screw: Use the appropriate screwdriver (usually Phillips) to remove the screw holding the handle.
- Remove the handle: Pull the handle straight off the faucet body. Again, a handle puller might be needed if it’s stuck.
Step 2: Remove the Cartridge
- Identify the retaining clip or nut: You’ll see either a retaining clip (a small metal pin) or a retaining nut that holds the cartridge in place.
- Remove the clip: If there’s a clip, use needle-nose pliers to pull it straight up and out.
- Remove the retaining nut: If there’s a nut, use an adjustable wrench to unscrew it counter-clockwise.
- Pull out the cartridge: Once the clip or nut is removed, you should be able to pull the cartridge straight up and out of the faucet body. This is the core of fix faucet cartridge. Sometimes, you might need to gently twist it as you pull.
Step 3: Inspect and Replace the Cartridge
- Examine the old cartridge: Look for any cracks, mineral buildup, or wear on the seals.
- Replace the cartridge: If the cartridge appears damaged or worn, it’s best to replace it. Take the old cartridge to a hardware store to find an exact match, or look up your faucet model online. This is a crucial step for DIY faucet repair.
- Check the O-rings inside the faucet: While the cartridge is out, look inside the faucet body. There are usually O-rings that seal the cartridge. If these are worn, you’ll need to replace them. This is similar to the worn O-ring replacement in compression faucets, though they are located differently.
Step 4: Install the New Cartridge
- Insert the new cartridge: Carefully slide the new cartridge into the faucet body, ensuring it’s oriented correctly. There are usually notches or tabs that need to align with slots in the faucet body.
- Reinstall the retaining clip or nut:
- If you removed a clip, slide it back into its slot.
- If you removed a nut, screw it back on and tighten it with your wrench.
Step 5: Reassemble the Faucet
- Reattach the handle: Place the handle back onto the cartridge stem and secure it with the screw.
- Replace the decorative cap/plug.
Step 6: Turn Water Back On and Test
- Slowly turn on the water supply valves.
- Test the faucet: Operate the handle to check for smooth movement and ensure there are no leaks.
Troubleshooting Other Dripping Faucet Issues
If you’ve followed these steps and your faucet is still dripping, or if you have a different type of faucet, here are some additional dripping tap troubleshooting tips:
Ball Faucets
Ball faucets have a rotating metal or plastic ball inside that controls water flow. They often have a set of springs and rubber seals that wear out.
- Repair Steps:
- Turn off water.
- Remove the handle (usually a set screw on the side).
- Remove the cap and collar.
- Lift out the ball.
- Inside the faucet body, you’ll see two rubber seats and springs. Use needle-nose pliers to remove them.
- Replace the seats, springs, and any worn O-rings. A repair kit for your specific faucet model is recommended.
- Reassemble in reverse order.
Ceramic Disc Faucets
These are very durable and less prone to dripping, but when they do drip, it’s usually the ceramic disc cartridge itself that’s failed.
- Repair Steps:
- Turn off water.
- Remove the handle (look for a set screw).
- Remove the escutcheon cap.
- You’ll see the ceramic disc cartridge. It’s usually held in by screws or a locking nut.
- Remove the screws or nut and lift out the cartridge.
- Replace the entire ceramic disc cartridge with an identical one.
- Reassemble.
Leaky Spout Base
If the drip is coming from the base of the spout where it swivels, this is often due to worn O-rings.
- Repair Steps:
- Turn off water.
- Identify how the spout is attached. Some lift off after removing the handle and bonnet nut, while others might have a retaining ring.
- Once the spout is removed, locate the O-rings on the faucet body or spout base.
- Carefully remove the old O-rings and replace them with new ones of the same size. Lubricate the new O-rings with plumber’s grease before installing.
- Reassemble the faucet.
What If the Faucet Still Drips After Repair?
- Wrong parts: Ensure you used the correct replacement parts for your faucet model.
- Damaged valve seat (compression faucets): If the valve seat is severely damaged and cannot be repaired, you may need to replace the entire faucet.
- Cracked faucet body: In rare cases, the faucet body itself might be cracked.
- Incorrect installation: Double-check that all parts are installed correctly and tightened appropriately.
When to Call a Professional Plumber
While most faucet drips are manageable with DIY faucet repair, there are times when you should call a professional:
- You’re uncomfortable with the repair: If you’re not confident or feel out of your depth, it’s better to get professional help to avoid causing more damage.
- The faucet is very old or corroded: Very old faucets can be brittle and difficult to disassemble without breaking.
- You can’t find the correct replacement parts: Some older or specialty faucets require specific parts that are hard to locate.
- You’ve tried multiple repairs and the drip persists: If you’ve replaced parts and the leak continues, there might be a more complex issue.
- The shut-off valves under the sink don’t work: If you can’t turn off the water supply, a plumber will have the tools and knowledge to handle it safely.
Maintaining Your Faucets to Prevent Future Leaks
Good plumbing fixture maintenance can save you a lot of trouble.
- Regular cleaning: Wipe down your faucet regularly to prevent mineral buildup.
- Gentle use: Avoid forcing handles or over-tightening.
- Address small drips immediately: Don’t let minor leaks turn into bigger problems.
- Know your faucet model: Keep a record of your faucet’s brand and model number so you can easily find replacement parts if needed.
Fixing a dripping kitchen faucet is a practical skill that can save you money and conserve water. By following these detailed steps, you can tackle this common household problem and enjoy a quiet, drip-free kitchen sink.
Frequently Asked Questions (FAQ)
Q1: How long does it take to fix a dripping kitchen faucet?
A1: For most common issues like replacing a washer or cartridge, it typically takes between 30 minutes to 1.5 hours, depending on your experience and the faucet type.
Q2: What is the most common cause of a dripping faucet?
A2: The most common cause is a worn-out rubber washer or a faulty cartridge, which are the parts that create the seal to stop water flow.
Q3: Can I use plumber’s tape on all faucet repairs?
A3: Plumber’s tape (PTFE tape) is primarily used on threaded pipe connections to create a watertight seal. It’s generally not used on the internal parts of a faucet like washers or cartridges, but you might use it when replacing a valve seat or other threaded components within the faucet body.
Q4: Do I need to replace the entire faucet if one part is worn?
A4: Not usually. Most modern faucets are designed with replaceable parts like washers, O-rings, and cartridges, which are much cheaper to replace than the whole faucet.
Q5: My faucet has two handles, and only one drips. What could be the problem?
A5: If only one handle drips, the issue is likely isolated to the internal components of that specific handle (e.g., the washer or cartridge associated with that handle). You’ll need to disassemble only that handle to access and replace the worn part.
Q6: How do I know if I have a compression or cartridge faucet?
A6: Compression faucets typically have two separate handles (one for hot, one for cold) that you turn multiple times to fully open or close. Cartridge faucets usually have a single lever that moves up/down for volume and left/right for temperature, and the movement feels smoother and more controlled.
Q7: What should I do if the screws are stuck or corroded?
A7: If screws are stuck, try applying a penetrating oil (like WD-40) and let it sit for 15-30 minutes. Gently tap the screw head with a screwdriver and wrench to help break the corrosion. If the screw head is stripped, you might need a screw extractor tool.
Q8: Is it okay to use vinegar to clean faucet parts?
A8: Yes, white vinegar can be effective at removing mineral deposits and light corrosion from metal parts. Soak them in vinegar for a few hours, then scrub gently with an old toothbrush or cloth. Rinse thoroughly afterward.