
Can I install a kitchen backsplash myself? Yes, you absolutely can! This detailed guide will walk you through everything you need to know about doing a DIY backsplash. We’ll cover choosing backsplash materials, preparing your space, and the actual install kitchen backsplash process, whether you’re going for a classic subway tile backsplash, something more modern, or even a simple peel and stick backsplash. We aim to demystify backsplash installation guide so you feel confident tackling this rewarding project.
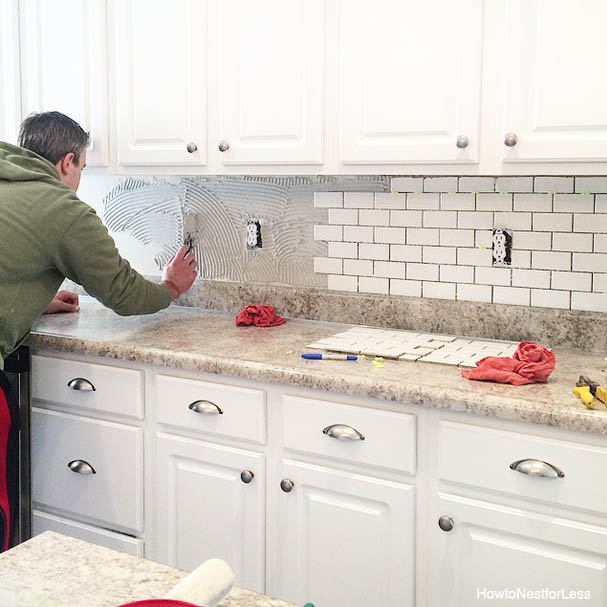
Image Source: howtonestforless.com
Why Add a Kitchen Backsplash?
A kitchen backsplash is more than just a decorative element. It serves a crucial purpose in protecting your walls from splatters, grease, and moisture that inevitably occur during cooking. Beyond its practical function, a backsplash can completely transform the look and feel of your kitchen. It’s a fantastic opportunity to inject personality, color, and style into your space. From classic kitchen backsplash ideas to contemporary designs, the options are vast.
Choosing Your Backsplash Materials
The first big decision is selecting your backsplash materials. This choice will influence the look, feel, durability, and kitchen backsplash cost of your project.
Popular Backsplash Material Options
Here’s a look at some common and popular choices:
| Material | Pros | Cons | Typical Cost per Sq Ft |
|---|---|---|---|
| Ceramic Tile | Affordable, wide variety of styles/colors, easy to clean, durable. | Can chip or crack, requires grout, can be slippery if not sealed. | $1 – $15 |
| Porcelain Tile | Very durable, water-resistant, stain-resistant, elegant look. | More expensive than ceramic, harder to cut, can be heavy. | $2 – $20 |
| Glass Tile | Reflective, brightens space, sleek look, easy to clean. | Can be fragile, shows water spots, can be slippery, installation can be tricky. | $5 – $30+ |
| Natural Stone | Unique beauty, adds warmth, durable (granite, marble, slate, travertine). | Porous (needs sealing), can stain, can be expensive, can chip/scratch. | $10 – $50+ |
| Peel and Stick | Very easy to install, affordable, great for renters, many styles. | Durability can vary, adhesive may weaken over time, can look less premium. | $2 – $15 |
| Metal Tile | Modern, sleek, durable, easy to clean, heat-resistant. | Can scratch, fingerprints show easily, can be more expensive. | $5 – $25 |
| Subway Tile | Classic, timeless, versatile, affordable, easy to install. | Requires grout, can chip. | $1 – $10 (for the tile) |
When making your choice, consider:
- Your Budget: Kitchen backsplash cost can vary significantly. Peel-and-stick options are often the most budget-friendly, while natural stone or intricate glass tiles can be pricier.
- Durability: How much wear and tear will the backsplash face? Areas near the stovetop might benefit from more durable, heat-resistant materials.
- Maintenance: Are you looking for something easy to wipe down, or are you willing to seal and maintain natural stone?
- Style: What look are you going for? This is where kitchen backsplash ideas truly come into play.
Planning Your Backsplash Project
Before you even think about buying materials, take time to plan. This is key to a smooth DIY backsplash project.
Measuring Your Space
Accurate measurements are crucial for ordering the right amount of backsplash materials.
- Measure the Height: Measure from the countertop to the bottom of your cabinets. Do this in several places along the wall and use the largest measurement.
- Measure the Width: Measure the length of the countertop area you want to cover.
- Account for Obstacles: Note the location and size of outlets, switches, windows, and doors. You’ll need to cut tiles around these.
- Add for Waste: Always add 10-15% extra to your total square footage for cuts, mistakes, and future repairs. It’s better to have too much than too little.
Tools and Supplies You’ll Need
Gathering all your tools and supplies before you start will save you time and frustration during the backsplash installation guide.
Essential Tools:
- Measuring tape
- Pencil
- Level
- Utility knife or box cutter (for peel and stick)
- Putty knife or scraper
- Screwdrivers (to remove outlet covers and switch plates)
- Safety glasses
- Gloves
- Sponges
- Buckets
- Tile cutter (for ceramic/porcelain/glass)
- Notched trowel (for adhesive)
- Grout float
- Grout sponge
- Tile nippers (for small cuts)
- Caulking gun and caulk
Essential Supplies:
- Your chosen backsplash material (tiles, sheets, etc.)
- Tile adhesive or mastic
- Grout (if using tile)
- Grout sealant (if needed)
- Painter’s tape
- Drop cloths or old newspapers
- Cleaning cloths
- Water
Preparing Your Kitchen Walls
Proper wall preparation is critical for a successful tile kitchen backsplash or any other type. A clean, smooth surface ensures the adhesive sticks properly and the tiles lay evenly.
Step 1: Clear the Area
- Remove everything from your countertops.
- Cover your countertops and stovetop with drop cloths or newspapers to protect them from dust and debris.
- Turn off the power to any outlets or switches in the backsplash area at the breaker box for safety.
- Remove outlet covers and switch plates.
Step 2: Clean the Walls
- Use a mild degreaser or all-purpose cleaner to thoroughly clean the walls where the backsplash will go. Kitchen walls can accumulate grease and grime.
- Rinse the walls with clean water and a damp cloth to remove any cleaner residue.
- Allow the walls to dry completely.
Step 3: Repair and Smooth
- Fill any holes or cracks in the wall with spackling paste. Let it dry according to the product instructions.
- Once dry, sand down any rough spots or dried spackle to create a smooth surface.
- Wipe away the dust with a damp cloth.
Step 4: Mark Your Lines
- Use a level and pencil to draw a horizontal reference line where the bottom of your backsplash will sit. This ensures your tiles start straight. For a subway tile backsplash, this line is especially important for a professional look.
- If you’re using a pattern, lightly sketch out where your tiles will go, especially around windows and outlets.
Installing Your Kitchen Backsplash: Step-by-Step
Now for the exciting part – the actual install kitchen backsplash! The process will vary slightly depending on your chosen backsplash materials.
Method 1: Installing Tile Backsplashes (Ceramic, Porcelain, Glass, Stone)
This is a common and popular choice for a tile kitchen backsplash.
Step 1: Laying Out Your Tiles (Dry Fit)
- Before applying any adhesive, lay out a section of your tiles on the countertop or a flat surface to visualize the pattern and spacing. This is a good time to make any adjustments to your kitchen backsplash ideas.
- Decide on your grout line width (typically 1/16″ to 1/8″). Use tile spacers to maintain consistent spacing.
Step 2: Applying Adhesive
- Using a notched trowel, spread a thin, even layer of tile adhesive or mastic onto a small section of the wall. Work in small areas (about 2×2 feet) so the adhesive doesn’t dry out before you place the tiles.
- Hold the trowel at a 45-degree angle to create consistent ridges in the adhesive. These ridges help the tiles adhere properly.
Step 3: Setting the Tiles
- Begin at your marked reference line, usually in the center of the wall or at a visible corner.
- Press each tile firmly into the adhesive with a slight twisting motion.
- Insert tile spacers between each tile to maintain even grout lines.
- Use your level frequently to ensure rows are straight and plumb.
Step 4: Cutting Tiles for Obstacles and Edges
- For outlets, switches, and edges, you’ll need to cut tiles.
- For Straight Cuts: Use a manual tile cutter. Measure the space, mark the tile, score it with the cutter, and then snap it along the line.
- For Curves or Complex Cuts: Use a wet saw or tile nippers. Always wear safety glasses!
- Test fit cut tiles before applying adhesive to them.
Step 5: Cleaning Excess Adhesive
- As you work, gently wipe away any adhesive that squeezes up between the tiles or gets onto the tile faces with a damp sponge or cloth. It’s much easier to clean when wet.
Step 6: Letting the Adhesive Cure
- Once all tiles are set, remove all tile spacers.
- Allow the adhesive to cure completely according to the manufacturer’s instructions, typically 24-48 hours. Do not disturb the tiles during this time.
Step 7: Grouting Your Backsplash
- Mix the Grout: Follow the manufacturer’s instructions for mixing the grout. It should have a peanut butter-like consistency.
- Apply the Grout: Using a grout float, spread the grout over the tiles, pushing it into all the gaps between the tiles. Work at a 45-degree angle.
- Wipe Excess Grout: Hold the float at a steeper angle and scrape off excess grout from the tile surfaces.
- Initial Cleaning: After about 15-20 minutes (or as directed by the grout manufacturer), use a damp (not wet) sponge to gently wipe away any remaining grout haze from the tile faces. Rinse your sponge frequently in clean water. Be careful not to pull grout out of the joints.
- Final Haze Removal: Once the grout has set for a few hours, a light haze may appear. Buff this off with a clean, dry cloth.
Step 8: Sealing the Grout
- Once the grout is fully cured (usually 48-72 hours, check product instructions), apply a grout sealant using a small brush or applicator. This protects the grout from stains and moisture.
- Wipe away any excess sealant from the tile faces immediately.
Step 9: Final Touches
- Reinstall outlet covers and switch plates. You might need longer screws if the tiles add thickness.
- Apply a bead of caulk along the seam where the backsplash meets the countertop and where it meets the cabinets. This seals gaps and prevents water from seeping behind the tiles. Choose a caulk that matches your grout color or is paintable.
Method 2: Installing Peel and Stick Backsplash
This is a fantastic and often budget-friendly DIY backsplash option, perfect for renters or those seeking a quick update.
Step 1: Prepare the Surface
- Ensure your walls are clean, dry, and smooth, just like for tile. Peel and stick materials adhere best to a non-porous surface. If you have textured walls, consider a primer or smoothing compound.
Step 2: Plan Your Layout
- For peel and stick, it’s often best to start in a prominent corner or center of a wall.
- If you have a pattern, ensure you align it correctly as you go.
Step 3: Apply the First Sheet/Tile
- Peel back a small portion of the backing paper from your chosen peel and stick backsplash product.
- Carefully align the first sheet with your starting point (e.g., the corner of the counter or a marked line).
- Press the exposed adhesive side firmly onto the wall.
Step 4: Smooth and Adhere
- Slowly peel away the backing paper while simultaneously pressing the sheet onto the wall.
- Use a credit card, squeegee, or your hands to firmly press down the entire sheet, smoothing out any air bubbles as you go. Work from the center outwards.
Step 5: Cut Around Obstacles
- For outlets, switches, or windows, you’ll need to cut.
- For simple cutouts, you can often peel back the backing paper for that section and carefully cut around the obstacle with a sharp utility knife.
- For more precise cuts, you might want to measure the area, transfer the dimensions to the back of the peel-and-stick sheet, and cut it out before applying.
Step 6: Continue Applying Sheets
- Overlap the edges of subsequent sheets according to the manufacturer’s instructions. Some have a seamless overlap, while others require a specific fit.
- Keep checking your alignment and smoothness as you continue.
Step 7: Final Touches
- Trim any excess material at the top or bottom with a sharp utility knife.
- Reinstall outlet covers and switch plates.
Frequently Asked Questions About Kitchen Backsplashes
Q1: How much extra tile do I need for a backsplash?
A1: It’s recommended to purchase 10-15% extra tile to account for cuts, breakage, and potential future repairs.
Q2: What is the best adhesive for a tile backsplash?
A2: For most standard ceramic or porcelain tiles in a kitchen backsplash, a pre-mixed tile mastic is a good and easy-to-use option. For heavier tiles like natural stone or glass, or in areas with extreme temperature fluctuations, a thin-set mortar is often recommended. Always check the tile manufacturer’s and adhesive manufacturer’s recommendations.
Q3: Can I install a backsplash over existing tile?
A3: In some cases, yes. If the existing tile is smooth, flat, and well-adhered to the wall, you might be able to install a new tile backsplash directly over it, especially with a thin-set mortar. However, for peel and stick backsplash, it’s usually best to apply it to a bare, smooth wall. Always check the product specifications.
Q4: How do I clean a tile backsplash?
A4: Most tile backsplashes can be cleaned with a soft cloth or sponge and mild dish soap. For grout, a specialized grout cleaner can be used if needed, but avoid harsh abrasives that could damage the grout or sealant.
Q5: What is the typical kitchen backsplash cost?
A5: The kitchen backsplash cost can range widely, from as little as $1-$5 per square foot for basic ceramic or vinyl peel-and-stick tiles to $30-$100+ per square foot for premium natural stone, glass, or intricate mosaic tiles. Installation costs, if you hire a professional, will add to this.
Q6: What’s the difference between tile mastic and thin-set mortar?
A6: Tile mastic is a pre-mixed adhesive, easier to use, and generally for standard ceramic or porcelain tiles in dry areas. Thin-set mortar is a powder mixed with water, offering a stronger bond and better water resistance, making it suitable for heavier tiles, glass, or areas prone to moisture.
Q7: How do I grouting kitchen backsplash neatly?
A7: The key to neat grout kitchen backsplash is proper application and timely cleanup. Use a grout float to force grout into the joints, remove excess grout with the float held at an angle, and then use a damp sponge for initial cleaning, ensuring you don’t dig out the grout. Final haze removal with a dry cloth is also crucial.
Q8: What are some popular kitchen backsplash ideas?
A8: Popular kitchen backsplash ideas include classic subway tile backsplash, geometric patterns, mosaic tiles, natural stone slabs, glass tiles for a reflective look, and modern metal tiles. Color choices range from classic white and neutral tones to bold blues, greens, or even graphic prints.
Conclusion
Embarking on a DIY backsplash project is a fantastic way to refresh your kitchen without a complete overhaul. Whether you choose the ease of a peel and stick backsplash, the timeless appeal of a subway tile backsplash, or the classic elegance of a ceramic tile kitchen backsplash, this backsplash installation guide provides the foundational knowledge. By carefully planning, preparing your surfaces, and following these steps, you can achieve a professional-looking result that enhances both the beauty and functionality of your kitchen. Remember to always prioritize safety, read product instructions carefully, and enjoy the process of transforming your space!