
Can you wash a kitchen hood filter in the dishwasher? Yes, most metal mesh kitchen hood filters can be safely washed in a dishwasher. This is often the easiest way to tackle built-up grease and grime.
Your kitchen hood filter is a silent hero, working tirelessly to capture grease, smoke, and odors from your cooking. Without it, your kitchen would quickly become a greasy, smoky mess. But over time, this essential component can become caked with grease, reducing its effectiveness and potentially becoming a fire hazard. Regular kitchen vent cleaning and proper range hood filter maintenance are crucial for keeping your kitchen air clean and your appliance running smoothly. This guide will walk you through the best methods for cleaning your kitchen hood filter, from a quick spruce-up to a deep-down degreasing kitchen hood filter session.
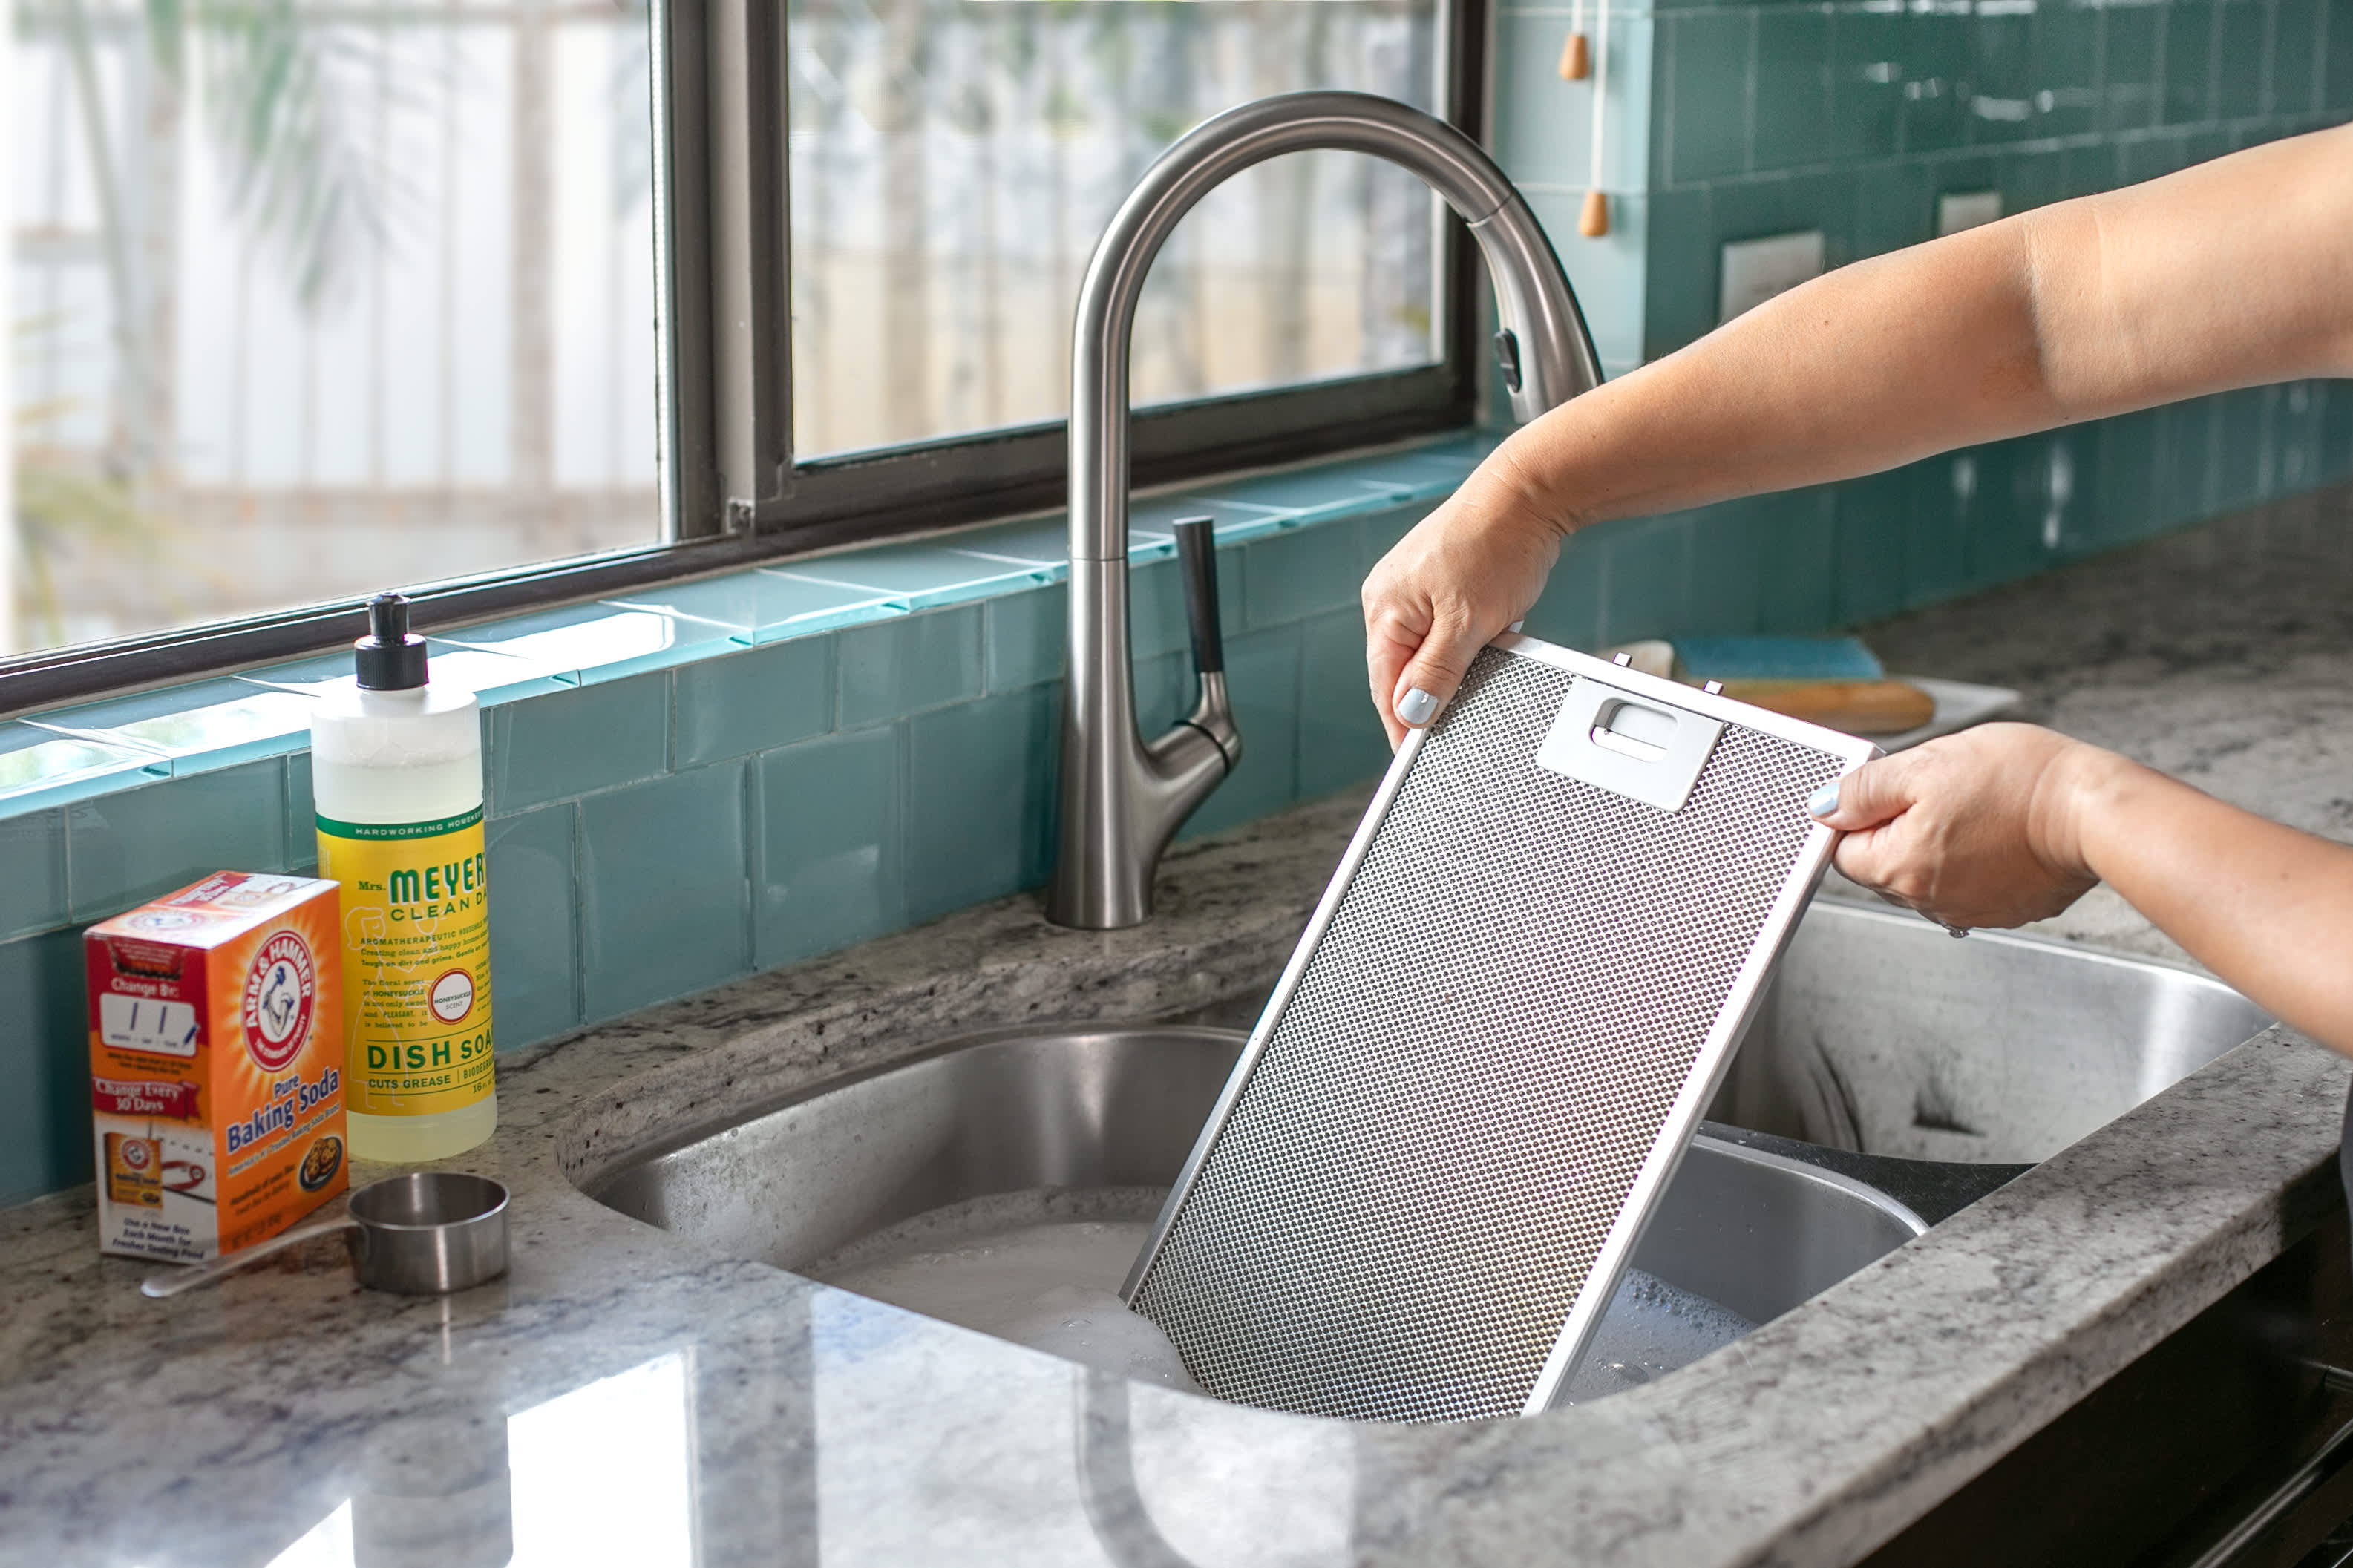
Image Source: cdn.apartmenttherapy.info
Why Cleaning Your Kitchen Hood Filter Matters
Before we dive into the ‘how-to,’ let’s briefly touch on ‘why.’ A clean filter means:
- Better Air Quality: It efficiently removes smoke, steam, and airborne grease particles, keeping your kitchen air fresher and healthier.
- Reduced Fire Risk: Accumulated grease is highly flammable. A clean filter significantly reduces the risk of a grease fire igniting in your vent system.
- Improved Appliance Performance: A clogged filter restricts airflow, forcing your range hood to work harder, consume more energy, and perform less effectively.
- Extended Appliance Lifespan: Proper maintenance, including filter cleaning, helps prevent strain on the motor and other components, leading to a longer-lasting appliance.
- A Cleaner Kitchen: It prevents grease from settling on your stovetop, countertops, and cabinets.
Types of Kitchen Hood Filters
Most kitchen hoods use one of two main types of filters:
Metal Mesh Filters
These are the most common type and are typically made of aluminum or stainless steel. They work by trapping grease particles in a fine mesh. These are generally washable and reusable.
Charcoal Filters
Often found in recirculating (ductless) range hoods, these filters use activated charcoal to absorb odors and smoke. These filters are usually not washable and need to be replaced periodically. If your hood has both mesh and charcoal filters, you’ll need to clean the mesh ones and replace the charcoal ones. This guide focuses on cleaning the metal mesh filters.
Getting Started: What You’ll Need
Before you embark on your DIY kitchen hood filter cleaning adventure, gather these supplies:
- Hot Water: The hotter, the better for cutting through grease.
- Dish Soap: A good degreasing dish soap is your best friend here.
- Baking Soda: A natural degreaser and deodorizer.
- White Vinegar: Another excellent degreaser and can help with stubborn buildup.
- Large Sink, Basin, or Bathtub: You’ll need a large enough space to soak the filters. A bathtub is ideal for larger filters.
- Non-abrasive Brush or Sponge: Something to gently scrub away loosened grease. An old toothbrush is great for nooks and crannies.
- Gloves: To protect your hands from grease and hot water.
- Old Towels or Paper Towels: For drying the filters.
- Optional: Oven Cleaner: For extremely stubborn, baked-on grease. Use with caution and ensure good ventilation.
The Deep Clean Kitchen Hood Filter Process: Step-by-Step
This section outlines the best way to clean your range hood filter to achieve sparkling results. We’ll cover both the dishwasher method and the manual soak-and-scrub method.
Method 1: The Dishwasher Delight
If your filters are dishwasher-safe (check your range hood’s manual), this is the easiest route.
h4: Preparing for the Dishwasher
- Remove the Filters: Carefully detach the filters from your range hood. Most have a simple latch or clip mechanism.
- Pre-Rinse (Optional but Recommended): Give them a quick rinse under hot running water to remove any loose debris or surface grease. This helps prevent your dishwasher from getting clogged.
- Load the Dishwasher:
- Place the filters securely in the dishwasher.
- Ensure they are not blocking the spray arms from rotating freely.
- Position them so water can easily reach all surfaces.
- Avoid washing them with delicate items.
h4: Running the Dishwasher Cycle
- Use a Hot Water Cycle: Select the hottest water cycle available on your dishwasher.
- Add Dishwasher Detergent: Use a standard dishwasher detergent, preferably one known for its degreasing power.
- Run the Cycle: Let the dishwasher complete its full cleaning cycle.
h4: Post-Dishwasher Care
- Inspect: Once the cycle is finished, carefully remove the filters. Inspect them to ensure all grease is gone. If some residue remains, you may need to do a quick manual scrub or run them through another cycle.
- Dry Thoroughly: Allow the filters to air dry completely or dry them with a clean towel before reinserting them into the range hood. Moisture can lead to mold or mildew.
Method 2: The Manual Soak-and-Scrub – The Best Way to Clean Range Hood Filter by Hand
For filters that aren’t dishwasher-safe or for a truly deep clean, the manual method is highly effective. This is a fantastic approach for degreasing kitchen hood filter build-up.
h4: Step 1: Removal and Initial Rinse
- Remove Filters: As with the dishwasher method, carefully remove the filters from your range hood.
- Pre-Rinse: Rinse them thoroughly under hot running water to remove loose grease and food particles. You can use a hose attachment or a faucet sprayer for this.
h4: Step 2: The Soaking Solution
This is where the real degreasing magic happens. You have a few powerful options for your soaking solution:
- Option A: Hot Water and Dish Soap: Fill your sink or tub with the hottest water possible. Add a generous amount of degreasing dish soap. Swish it around to create suds.
- Option B: Hot Water, Dish Soap, and Baking Soda: For tougher grease, add about ½ cup of baking soda to the hot water and dish soap mixture. Baking soda is a mild abrasive and a powerful degreaser.
- Option C: Hot Water, Dish Soap, and White Vinegar: Mix equal parts hot water and white vinegar in your sink or tub, and then add a good squirt of dish soap. Vinegar helps break down grease and deodorize.
h4: Step 3: The Soak
- Submerge the Filters: Place the kitchen hood filters into the prepared soaking solution, ensuring they are fully submerged.
- Soaking Time: Let them soak for at least 30 minutes to an hour. For heavily soiled filters, you might need to soak them for several hours or even overnight. This extended soaking is key for a deep clean kitchen hood filter.
h4: Step 4: Scrubbing Away the Grime
After soaking, the grease should be significantly softened and loosened.
- Gentle Scrubbing: Use your non-abrasive brush or sponge to gently scrub each surface of the filter. Pay attention to the mesh and any crevices where grease tends to accumulate. An old toothbrush is excellent for reaching tight spots.
- Rinse as You Go: Rinse the brush or sponge frequently under hot running water to wash away the loosened grease.
h4: Step 5: Stubborn Grease Treatment (If Necessary)
If, after soaking and scrubbing, there are still stubborn patches of grease, you have a couple of options:
- Re-soak with a Stronger Solution: Try the baking soda or vinegar mixture again, or consider a dedicated kitchen degreaser.
- Oven Cleaner (Use with Extreme Caution): For the absolute toughest, baked-on grease, a heavy-duty oven cleaner can be effective.
- Safety First: Work in a well-ventilated area, wear thick rubber gloves and eye protection.
- Application: Spray the oven cleaner onto the affected areas of the filter (preferably outdoors or in a well-ventilated garage).
- Soak Time: Let it sit for the time recommended on the product label, usually 15-30 minutes. Do NOT let it dry on the filter.
- Scrub and Rinse: Scrub the filter again with your brush and rinse thoroughly with hot water. Ensure all oven cleaner residue is completely washed away, as it can be harmful.
h4: Step 6: Final Rinse and Drying
- Thorough Rinse: Once you’re satisfied with the cleanliness, rinse the filters thoroughly under hot running water. Make sure no soap, baking soda, vinegar, or degreaser residue remains.
- Air Dry or Towel Dry: Allow the filters to air dry completely on a clean surface or dry them thoroughly with old towels or paper towels. Ensure all moisture is gone before reinstalling.
Cleaning the Rest of the Range Hood
While you’re cleaning the filters, it’s a good opportunity to tackle the rest of your range hood. This is an essential part of kitchen exhaust filter cleaning and overall maintenance.
h4: Cleaning the Hood Exterior
- Wipe Down: Use a damp cloth with a little dish soap or a specialized stainless steel cleaner (if applicable) to wipe down the exterior of the hood.
- Buff: For stainless steel, buff with a clean, dry microfiber cloth to prevent streaks.
h4: Cleaning the Interior (Where Accessible)
- Wipe: If you can safely access the interior of the hood (where the filters were), wipe it down with a degreasing spray and a cloth. Be careful not to get moisture into the motor or electrical components.
Cleaning the Grease Trap (If Applicable)
Some range hoods have a separate cleaning grease trap kitchen hood component, often a small container at the bottom of the hood.
- Remove and Empty: Carefully remove the grease trap. It will likely contain accumulated grease. Empty it into a disposable container or directly into the trash.
- Wash: Wash the grease trap with hot, soapy water, using a brush to remove any residue. Rinse and dry thoroughly before reattaching.
Regular Kitchen Hood Filter Upkeep: Extending the Life of Your Cleaning
To make your deep cleaning sessions less frequent and easier, aim for regular kitchen hood filter upkeep.
How Often Should You Clean Your Kitchen Hood Filters?
- Light Cooking: If you cook infrequently or stick to boiling and steaming, cleaning once every 2-3 months might suffice.
- Moderate Cooking: For regular home cooking, aim for cleaning every 1-2 months.
- Heavy Cooking/Frying/Grilling: If you frequently fry, grill, or stir-fry, you’ll need to clean your filters more often, perhaps every 2-4 weeks.
The best indicator is visual: if the filters look visibly greasy and clogged, it’s time for a clean.
Tips for Maintaining Clean Filters Between Deep Cleans
- Wipe Down After Cooking: After particularly greasy meals, wipe down the accessible parts of the filter with a damp cloth or paper towel while it’s still warm.
- Use the Right Hood Settings: Always use your range hood when cooking, especially when frying or searing. Ensure you’re using the appropriate fan speed.
- Consider Filter Covers: Some people use disposable filter covers, which can be replaced more frequently, reducing the need for intensive cleaning of the main filter.
Common Problems and Solutions
| Problem | Possible Cause | Solution |
|---|---|---|
| Filters still look greasy after cleaning | Insufficient soaking time or weak cleaning solution | Soak for longer (several hours or overnight). Use a stronger solution with baking soda or vinegar. For extreme cases, consider oven cleaner with caution. |
| Filters are discolored or warped | Dishwasher cycle was too hot; harsh cleaning chemicals were used. | Check your hood’s manual for dishwasher safety. Use milder cleaning solutions. If warped, you may need to replace the filters. |
| Grease buildup on the hood interior | Filters were not cleaned regularly; hood design allows grease splatter. | Clean the interior of the hood when cleaning filters. Consider using a splash guard behind the cooktop. Ensure filters are properly seated. |
| Reduced airflow from the hood | Clogged filters; blocked ductwork. | Clean the filters thoroughly. If airflow doesn’t improve, the ductwork may need professional kitchen vent cleaning. |
| Stubborn odors persist | Grease and smoke particles embedded deep in mesh or charcoal filter. | Ensure thorough cleaning of mesh filters. For charcoal filters (in ductless hoods), replacement is necessary. Thorough kitchen exhaust filter cleaning may require multiple soaks for very stubborn odors in mesh filters. |
When to Replace Your Filters
Even with regular cleaning, filters have a lifespan. You should consider replacing your filters if:
- They are visibly damaged (bent, torn mesh).
- They remain heavily discolored or warped after cleaning.
- They no longer seem to effectively capture grease or odors, even after thorough cleaning.
- They are charcoal filters that have reached their saturation point (typically 3-6 months depending on usage).
Frequently Asked Questions (FAQ)
Q1: How often should I clean my kitchen hood filter?
A1: It depends on your cooking habits. For most households, cleaning every 1-2 months is recommended. If you cook with a lot of grease or fry frequently, you may need to clean them as often as every 2-4 weeks.
Q2: Can I use a wire brush to clean my kitchen hood filter?
A2: No, it’s best to avoid wire brushes as they can damage the delicate mesh of the filter, especially if it’s made of aluminum. Stick to soft brushes or sponges.
Q3: My filters are aluminum. Will dishwasher detergent damage them?
A3: Some highly alkaline dishwasher detergents can cause aluminum filters to oxidize, leading to a dull, chalky appearance. It’s often safer to use a degreasing dish soap when washing aluminum filters by hand. If using a dishwasher, ensure it’s set to a cooler cycle if possible and check your hood’s manual for specific recommendations regarding aluminum filters.
Q4: What’s the difference between a recirculating hood and a vented hood, and how does it affect filter cleaning?
A4: A vented hood pushes air and grease outside through ductwork. A recirculating hood filters the air and blows it back into the kitchen. Recirculating hoods typically use both mesh filters (to catch grease) and charcoal filters (to absorb odors). Mesh filters are cleaned similarly, but charcoal filters cannot be cleaned and must be replaced when they are no longer effective.
Q5: I used oven cleaner, and my filters look a bit dull now. Is that normal?
A5: Yes, strong cleaners like oven cleaner can sometimes cause aluminum filters to lose some of their shine or develop a duller appearance. While they are still functional, they might not look as aesthetically pleasing. Always rinse thoroughly after using such strong cleaners.
Q6: My range hood is making a strange noise after cleaning the filters. What should I do?
A6: Ensure the filters are correctly reinstalled and secured. Sometimes, if a filter isn’t seated properly, it can vibrate and cause noise. If the noise persists, check if any cleaning solution or excess water got into the fan motor, and consult your appliance manual or a professional.
By following these detailed steps, you can ensure your kitchen hood filters are clean, efficient, and contribute to a healthier, safer cooking environment. Regular range hood filter maintenance is a small task that yields significant benefits for your kitchen.