
Can you clean greasy kitchen cupboards easily? Yes, you absolutely can! Greasy kitchen cupboards are a common problem, but with the right methods and a little elbow grease, you can restore them to their former glory. This guide will walk you through everything you need to know to degrease kitchen cabinets effectively and without harsh chemicals, focusing on natural and DIY solutions.
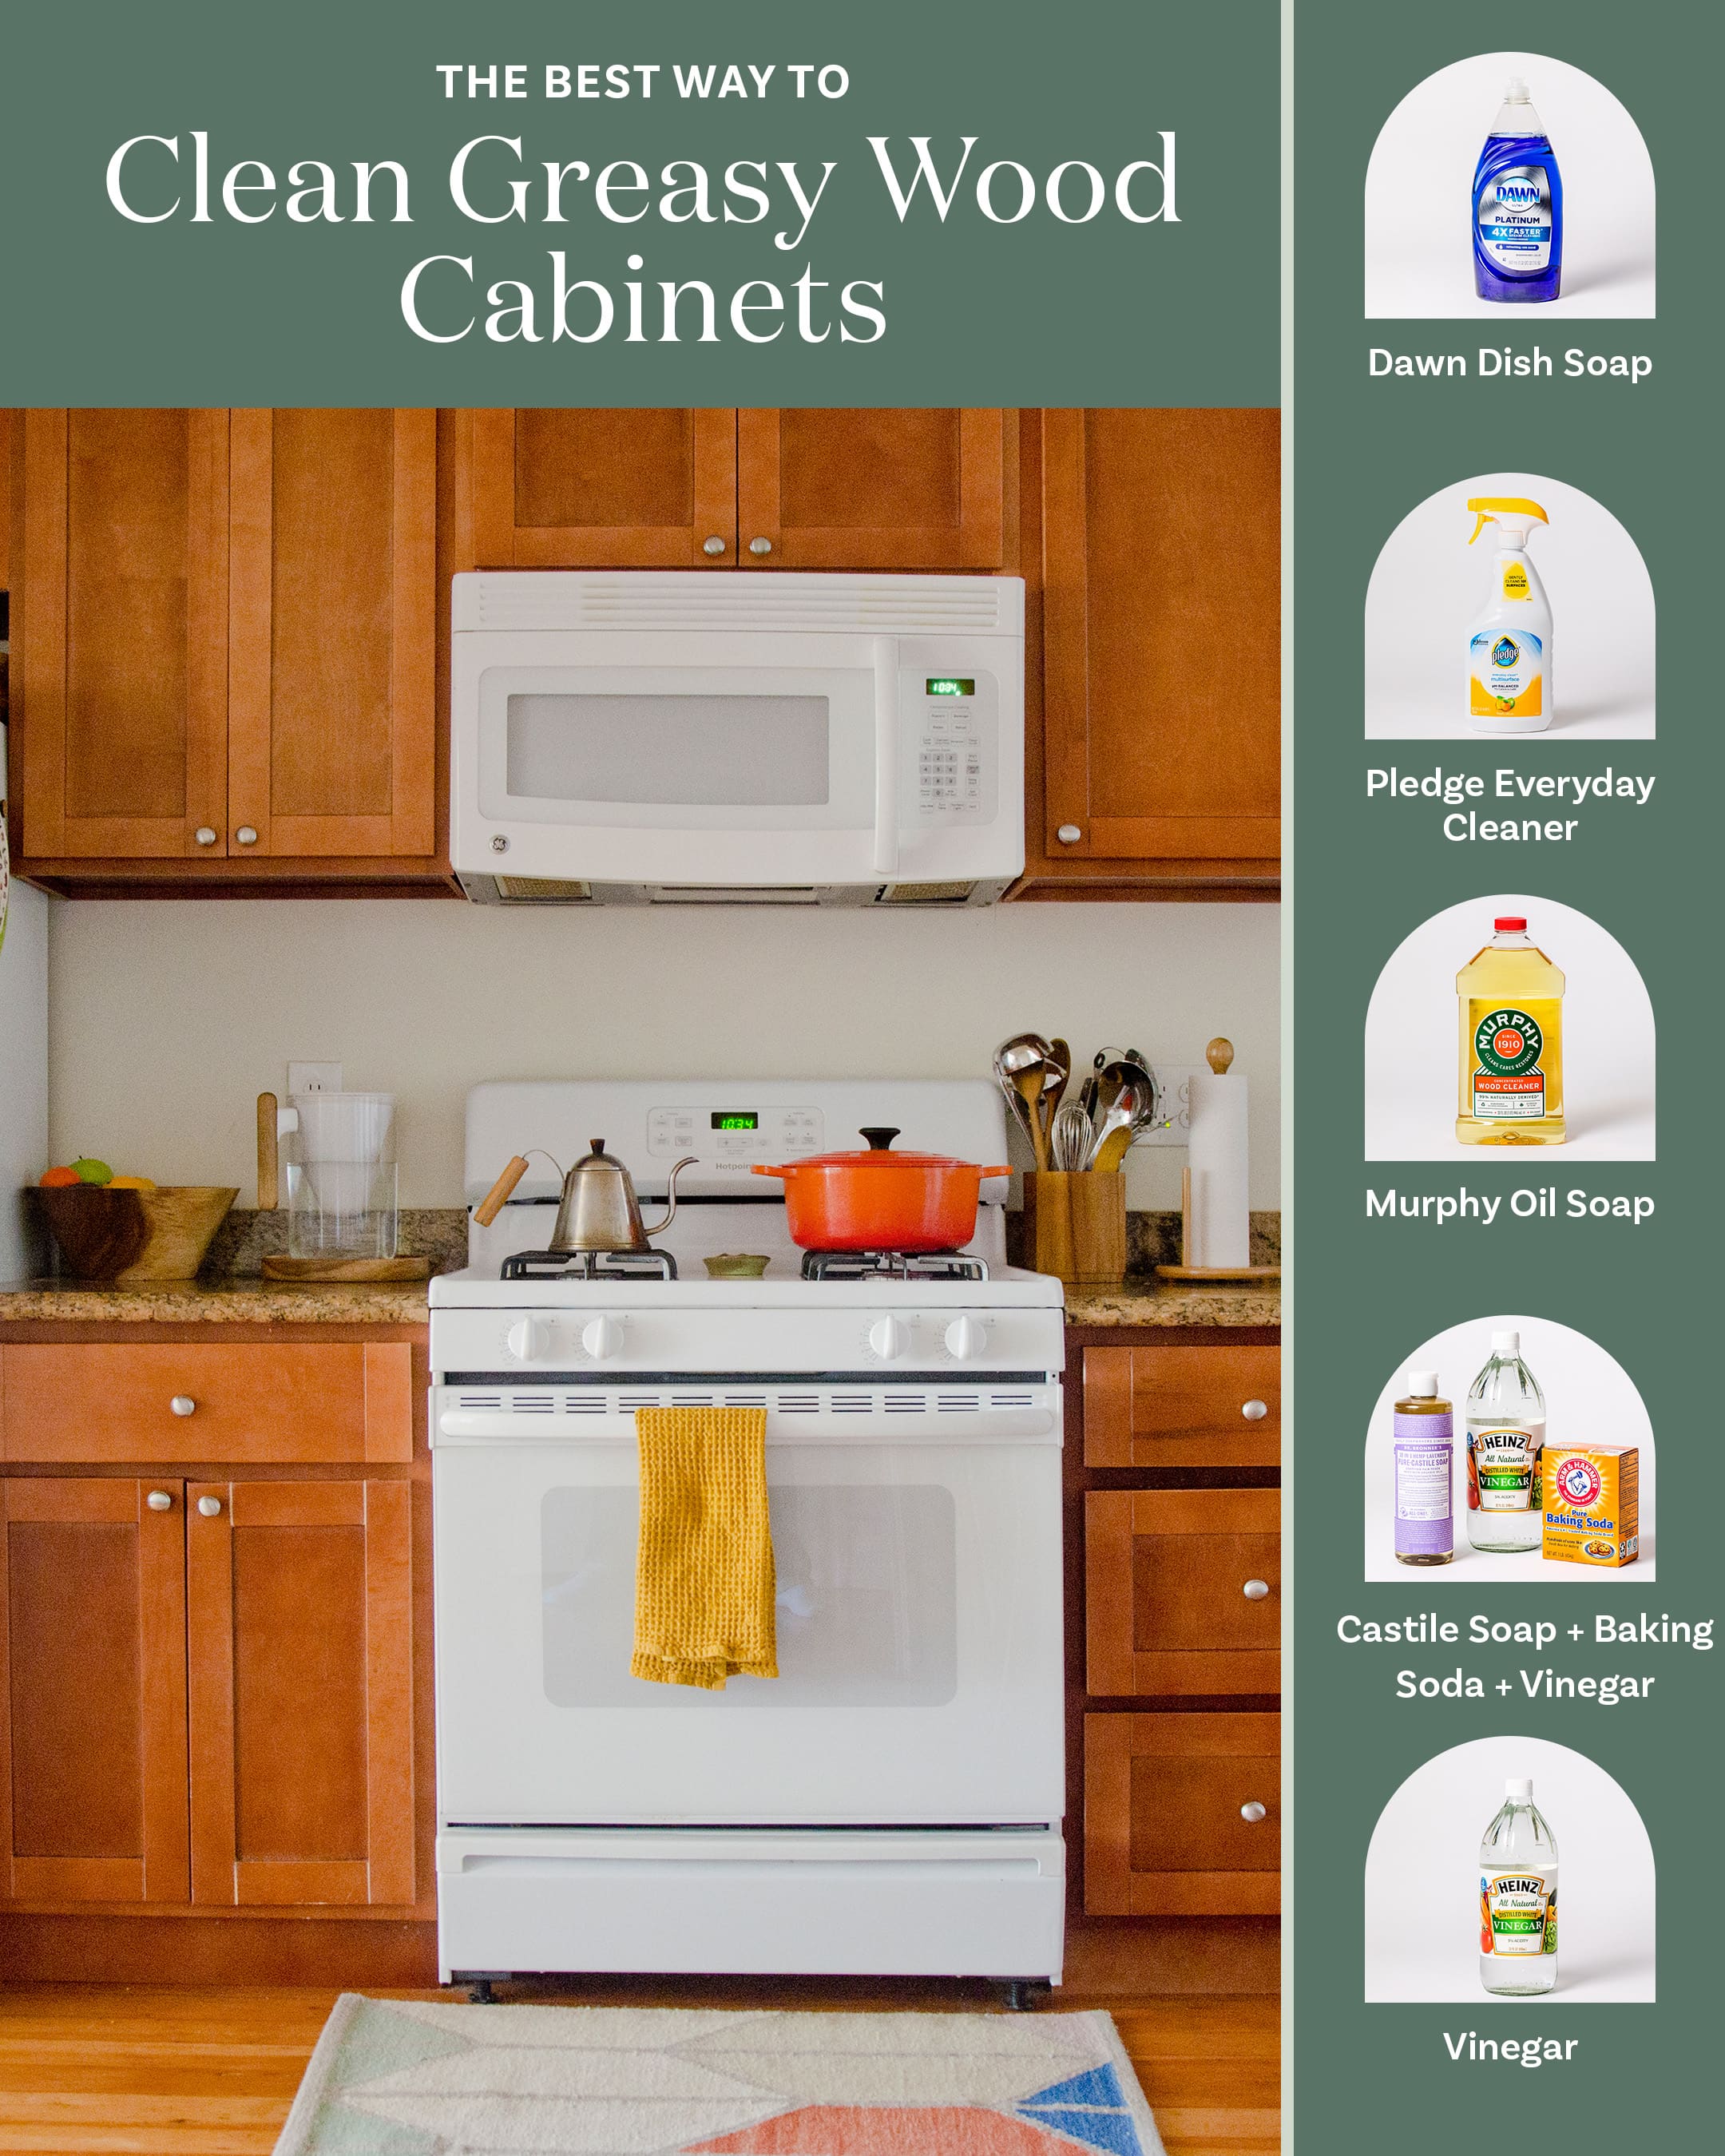
Image Source: cdn.apartmenttherapy.info
The Culprit: Why Do Kitchen Cupboards Get Greasy?
Kitchen cupboards, especially those near the stove, become victims of grease splatter from cooking. Tiny oil droplets fly through the air when you fry, sauté, or even boil. Over time, these droplets settle on cupboard surfaces, mixing with dust and dirt to form a stubborn, sticky film. This film is not only unsightly but can also attract more dirt and become harder to remove the longer it’s left.
Your Toolkit for a Sparkling Kitchen: What You’ll Need
Before you start, gather these essential cleaning supplies. Having everything on hand will make the process smoother and more efficient.
Essential Cleaning Supplies:
- Microfiber cloths: These are your best friends for cleaning. They are highly absorbent and gentle on surfaces, preventing scratches. Have several on hand.
- Soft sponges: Choose sponges that are non-abrasive. A soft side is ideal for most surfaces, while a slightly scrubbier side might be useful for tougher spots, but use with caution.
- Spray bottles: For your DIY cleaning solutions.
- Warm water: The base for most cleaning solutions.
- Dish soap: A good degreaser.
- White vinegar: Another excellent degreaser and disinfectant.
- Baking soda: A mild abrasive and deodorizer.
- Rubbing alcohol (optional): Can be effective for tough grease spots.
- Gloves: To protect your hands from cleaning solutions.
- Old towels or newspaper: To protect your countertops and floor from drips.
Natural Solutions: Your Go-To for a Greaseless Shine
The good news is you don’t need harsh chemical cleaners to tackle greasy cupboards. Many effective solutions can be made with common household ingredients. These are often safer for your family and better for the environment.
The Power of Dish Soap and Warm Water
This is the simplest and often most effective natural cabinet cleaner. Dish soap is formulated to cut through grease on dishes, and it works wonders on your cupboards too.
Method:
- Mix your solution: Fill a spray bottle or a bowl with warm water. Add a few drops of mild dish soap. You don’t need a lot; too much soap can leave a residue.
- Test a small area: Before applying to the entire cupboard, test the solution on an inconspicuous spot to ensure it doesn’t damage the finish.
- Apply and wipe: Dip a soft cloth or sponge into the soapy water, wring it out well, and wipe down the greasy surfaces. For stubborn spots, let the solution sit for a minute or two.
- Rinse: Dampen a clean microfiber cloth with plain warm water and wipe down the cabinets to remove any soap residue.
- Dry: Immediately dry the cabinets with a clean, dry microfiber cloth to prevent water spots.
The Vinegar and Baking Soda Combination: A Winning Duo
This classic DIY cupboard cleaner harnesses the power of two natural degreasers.
Vinegar and Baking Soda Cupboard Cleaner:
- For a paste: Mix baking soda with a small amount of water to create a paste.
- For a spray: Mix equal parts white vinegar and warm water in a spray bottle.
Method with Paste:
- Apply the paste: Apply the baking soda paste directly to the greasy areas.
- Let it sit: Allow the paste to sit for about 5-10 minutes. It will start to work on breaking down the grease.
- Wipe and scrub gently: Use a damp, soft cloth to wipe away the paste and loosened grease. For tougher spots, use a soft-bristled brush or the soft side of a sponge, scrubbing gently in a circular motion.
- Rinse: Wipe the cabinets with a cloth dampened with plain water to remove any residue.
- Dry: Thoroughly dry with a clean microfiber cloth.
Method with Vinegar Spray:
- Spray generously: Spray the vinegar and water solution directly onto the greasy cabinets.
- Let it dwell: Allow the solution to sit for a few minutes to penetrate the grease.
- Wipe clean: Use a microfiber cloth to wipe away the grease and solution.
- Rinse (optional but recommended): For those who dislike the vinegar smell, wipe down with a damp cloth.
- Dry: Dry thoroughly with a clean microfiber cloth.
Note: While this is generally safe for most cabinet finishes, always test in an inconspicuous area first, especially on painted or varnished surfaces.
Other Natural Degreasers to Consider
- Lemon Juice: The citric acid in lemon juice can help cut through grease. Mix with water and use as a spray.
- Rubbing Alcohol: For very tough, sticky spots, a solution of one part rubbing alcohol to two parts water can be effective. Use sparingly and ensure good ventilation.
Tackling Different Cabinet Materials: What Works Best?
The best way to clean greasy kitchen cupboards depends on the material they are made from. Different finishes require different levels of care.
Cleaning Wood Cupboards: Preserving the Grain
Removing grease from wood cupboards requires a gentle approach to avoid stripping the finish or damaging the wood.
H4: Finished Wood Cabinets:
Most finished wood cabinets have a protective sealant.
- Best approach: Mild dish soap and water or the vinegar/water spray are usually safe and effective.
- What to avoid: Abrasive cleaners, steel wool, and excessive amounts of water, as these can damage the finish or seep into the wood.
- For stubborn grease: A paste of baking soda and water applied gently might work, but always test first.
H4: Unfinished or Oiled Wood Cabinets:
These are more porous and susceptible to damage.
- Best approach: Use the mildest solution possible, perhaps just a damp cloth, and follow up with a specific wood cleaner or oil recommended for your cabinet type.
- What to avoid: Anything acidic or alkaline, as it can stain or lift the natural oils from the wood. Avoid harsh scrubbing.
How to Clean Laminate Cupboards: Durability and Care
Laminate cabinets are generally durable and easy to clean.
- Best approach: A soft cloth dampened with warm water and a mild dish soap is usually sufficient. The vinegar and water spray is also effective.
- What to avoid: Harsh abrasives or solvents that can scratch or dull the laminate surface. Avoid soaking the laminate, as water can seep into the edges and cause damage.
- For tough spots: A non-abrasive bathroom cleaner might be used sparingly, but always rinse thoroughly.
Cleaning Painted Kitchen Cabinets: Maintaining the Color
Painted cabinets can be more delicate, so gentle cleaning is key.
- Best approach: Use a soft cloth with a very mild soap and water solution. Blot rather than scrub.
- What to avoid: Aggressive scrubbing, abrasive cleaners, or strong solvents, which can remove the paint or leave streaks.
- For tough grease: Try the baking soda paste, applied very gently with a soft cloth. Rinse immediately and dry.
Stainless Steel Cabinet Fronts: Streak-Free Shine
If your kitchen has stainless steel cabinet fronts, they require specific care.
- Best approach: Use a microfiber cloth dampened with warm water and a small amount of mild dish soap. Wipe in the direction of the grain. Follow up with a dedicated stainless steel cleaner or a mixture of water and vinegar for a streak-free shine.
- What to avoid: Steel wool, abrasive powders, or cleaners containing chlorine bleach, which can scratch and corrode the stainless steel.
The Best Degreaser for Kitchen Cabinets: When Natural Isn’t Enough
While natural cleaners are excellent, some grease buildup can be exceptionally stubborn. In these cases, you might need a commercial degreaser.
Choosing a Commercial Degreaser:
- Look for mild formulas: Opt for products specifically labeled as safe for kitchen surfaces or cabinet finishes.
- Consider enzyme-based cleaners: These use natural enzymes to break down grease and are often less harsh than chemical-based cleaners.
- Read the label carefully: Always check the manufacturer’s instructions and warnings.
- Test first: Even commercial products should be tested in an inconspicuous area before widespread use.
How to Use Commercial Degreasers:
- Ventilate the area: Open windows and doors.
- Wear gloves: Protect your skin.
- Apply according to instructions: Usually, you spray it on, let it sit for a specified time, and then wipe clean.
- Rinse thoroughly: This is crucial to remove all chemical residue.
- Dry completely: Use a clean, dry cloth.
Step-by-Step Guide to Cleaning Greasy Kitchen Cupboards
Now that you know your options, let’s break down the process for a thorough clean.
Step 1: Preparation is Key
- Clear the decks: Remove everything from the cupboard shelves and doors. This includes any decorative items, spice racks, or food items stored on top.
- Protect your workspace: Lay down old towels or newspaper on your countertops and floor directly below the cabinets you’ll be cleaning. This will catch any drips and protect surfaces from cleaning solutions.
Step 2: Pre-Cleaning Wipe Down
- Dry dusting: Start by dusting all surfaces with a dry microfiber cloth. This removes loose dust and debris, preventing it from turning into mud when you add liquid cleaners.
Step 3: Applying Your Chosen Cleaner
- Choose your weapon: Select your preferred cleaning solution – dish soap and water, vinegar spray, or a commercial degreaser.
- Work in sections: It’s more manageable to clean one cupboard door or a small section at a time.
- Apply the cleaner: Spray the solution directly onto the cloth or sponge, not directly onto the cabinets, especially if they are made of wood or have sensitive finishes. This prevents oversaturation. Alternatively, spray lightly onto the cabinet surface.
Step 4: The Art of Degreasing
- Gentle scrubbing: Use your damp cloth or sponge to wipe the greasy surfaces. Work in a consistent direction, following the grain of the wood if applicable.
- Tackling stubborn spots: For areas with heavy grease buildup, you might need to apply a little more pressure or let the cleaner sit for a few minutes. You can also try the baking soda paste for tough spots.
- Don’t forget the edges and corners: Grease and grime love to accumulate in these areas. Use a toothbrush or cotton swabs for tight spots.
Step 5: The Rinse Cycle
- Clean rinse cloth: Dampen a separate, clean microfiber cloth with plain warm water.
- Wipe away residue: Wipe down all cleaned surfaces to remove any cleaning solution residue. This step is vital to prevent streaking or dulling of the finish. Rinse the cloth frequently.
Step 6: The Drying and Buffing
- Immediate drying: Use a clean, dry microfiber cloth to thoroughly dry the cabinets. Don’t let water air dry, as this can lead to water spots and potential damage to certain finishes.
- Buff for shine: For a polished look, especially on wood or laminate, buff the dry cabinets with a clean, dry microfiber cloth.
Kitchen Cabinet Cleaning Tips for Ongoing Maintenance
Regular cleaning is the best way to prevent heavy grease buildup. Incorporate these kitchen cabinet cleaning tips into your routine.
- Wipe spills immediately: Don’t let spills or splatters sit. A quick wipe with a damp cloth after cooking can save you a lot of scrubbing later.
- Clean near the stove daily: Make it a habit to wipe down the cabinets closest to your cooktop after each cooking session.
- Use range hood filters: Ensure your range hood filters are clean and functioning properly. They catch a significant amount of airborne grease.
- Ventilate while cooking: Open windows or turn on your range hood to help dissipate grease and steam.
- Monthly deep clean: Aim for a more thorough cleaning of all your kitchen cabinets at least once a month.
Restoring Your Cabinets: Beyond Cleaning
Sometimes, after cleaning away grease, you might notice dullness or minor damage to your cabinet finish. Kitchen cupboard restoration can bring back their luster.
Reviving Dull Finishes:
- For wood: After cleaning, you can apply a small amount of furniture polish or a specialized wood conditioner to restore shine and protect the wood.
- For laminate: A good quality laminate polish can add a protective layer and enhance the appearance.
- For painted cabinets: Consider a clear acrylic sealer or a furniture wax designed for painted surfaces.
Dealing with Minor Scratches:
- Wood: For light scratches on wood, a wood repair crayon or stain stick in a matching color can work wonders.
- Laminate: Scratches on laminate are harder to fix without professional help. For very minor surface scratches, a clear nail polish can sometimes fill them, but test first.
- Painted: Touch-up paint is the best solution for scratches on painted cabinets.
Frequently Asked Questions (FAQ)
Q1: What is the best natural degreaser for kitchen cabinets?
The best natural degreaser is often a mixture of dish soap and warm water or a solution of equal parts white vinegar and water. Both effectively cut through grease without harsh chemicals.
Q2: Can I use an all-purpose cleaner on my kitchen cabinets?
It depends on the all-purpose cleaner and your cabinet material. Many all-purpose cleaners contain chemicals that can damage certain finishes. Always test in an inconspicuous area first, and opt for milder formulas if unsure.
Q3: How often should I clean my kitchen cabinets?
It’s ideal to wipe down cabinets near the stove daily after cooking. A thorough cleaning of all cabinets should be done at least once a month to prevent heavy buildup.
Q4: My cabinets have a sticky residue after cleaning. What did I do wrong?
This is usually due to using too much soap or not rinsing thoroughly enough. Always use a mild soap solution and rinse well with a clean, damp cloth. Ensure you dry the cabinets completely afterwards.
Q5: How do I clean the inside of my kitchen cabinets?
Cleaning the inside is similar to the outside, but usually less intensive. Empty the cabinets, dust them, and wipe them down with a mild soap and water solution. Rinse and dry thoroughly before restocking. For stubborn spots, a baking soda paste can be effective.
Q6: What is the best way to remove grease from wood cupboards without damaging the finish?
For wood cupboards, always start with the gentlest method: a soft cloth dampened with warm water and a tiny amount of mild dish soap. Wipe gently, rinse with a clean damp cloth, and dry immediately. Avoid abrasive materials or harsh chemicals.
Q7: Can vinegar damage my kitchen cabinets?
Vinegar is acidic and can potentially dull or damage certain finishes, especially if used undiluted or left on for too long. It’s always best to dilute vinegar with water (e.g., 1:1 ratio) and test in an inconspicuous spot before cleaning your entire cabinet. Always rinse the surface with plain water after using vinegar.
By following these detailed steps and tips, you can effectively degrease kitchen cabinets and keep them looking pristine, transforming your kitchen into a cleaner, more inviting space.