
What is the best way to clean a kitchen sink? The best way to clean a kitchen sink involves a multi-step approach using appropriate cleaning agents for different materials and tackling common issues like stains and drain clogs. This guide will walk you through everything you need to know for a sparkling clean sink.
Your kitchen sink is the workhorse of your culinary space. It handles everything from washing dishes to rinsing produce and filling pots. Because of this constant use, it can quickly become a breeding ground for germs, develop stubborn stains, and even harbor unpleasant odors. Regular cleaning is essential for hygiene and maintaining the appearance of your kitchen. But what happens when the everyday wipe-down isn’t enough? It’s time for a deep clean. This comprehensive guide will explore the best methods for a deep clean, covering everything from common grime to hard-to-remove sink stains and keeping your kitchen sink clean.
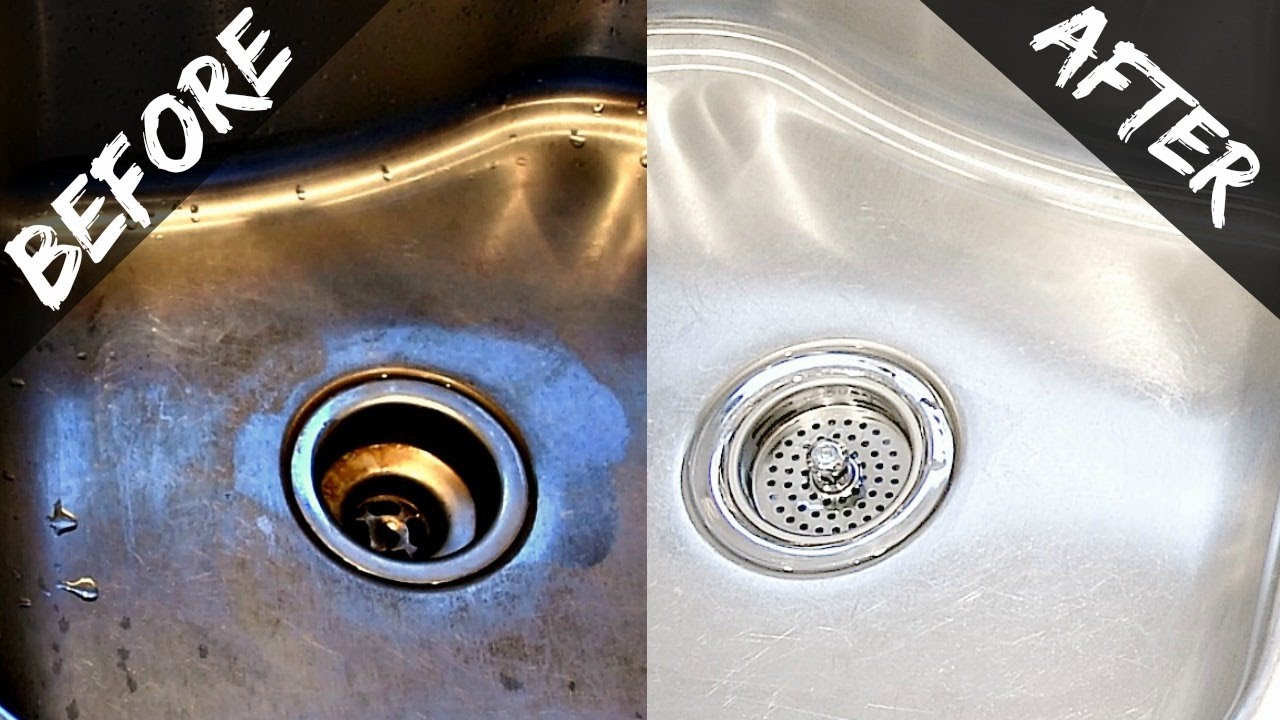
Image Source: i.ytimg.com
Preparing for Your Deep Clean
Before you start scrubbing, a little preparation goes a long way. Gathering your supplies and clearing the sink ensures a smoother, more effective cleaning session.
Essential Cleaning Supplies
Having the right tools makes the job much easier. Here’s a list of what you’ll need for most kitchen sink cleaning tasks:
- Gloves: To protect your hands from cleaning chemicals and grime.
- Soft cloths or sponges: For general washing and wiping. Avoid abrasive scrubbers on delicate sink materials.
- Old toothbrush: Perfect for getting into nooks and crannies, especially around the faucet and drain.
- Baking soda: A gentle abrasive and deodorizer.
- White vinegar: A natural disinfectant and excellent for removing hard water spots.
- Dish soap: For cutting through grease and general cleaning.
- Lemon or lemon juice: For natural cleaning, disinfecting, and shining.
- Optional: Commercial sink cleaner (choose one appropriate for your sink material), Borax, Hydrogen Peroxide, Microfiber cloths for shining.
Clearing the Sink Area
The first step in any deep clean is to remove everything from the sink and the surrounding countertop.
- Empty the sink: Wash any dishes, glasses, or utensils left in the sink. Remove any dish racks, sponges, or cleaning tools.
- Clear the drain: Remove any visible food particles or debris from the drain opening. You can use a paper towel or a gloved hand.
- Wipe down the countertop: Clear the immediate area around the sink so you have ample space to work.
General Deep Cleaning Methods for All Sink Types
Regardless of whether you have a stainless steel, porcelain, or composite sink, there are fundamental deep cleaning steps that apply to all. These steps focus on tackling everyday grime, soap scum, and general dullness.
Step 1: Rinse and Clear Debris
Start by rinsing the entire sink with hot water. This helps to loosen surface grime and wash away loose debris. Pay attention to corners and edges where dirt tends to accumulate.
Step 2: Apply a Gentle Abrasive
Baking soda is a fantastic natural sink cleaner. It’s mild enough for most surfaces but effective at scrubbing away stuck-on food and general grime.
- Create a paste: Mix baking soda with a little water to form a thick paste.
- Apply the paste: Spread the paste all over the interior surfaces of your sink.
- Let it sit: Allow the paste to sit for about 5-10 minutes. This gives the baking soda time to work on softening any tough spots.
- Scrub gently: Using a damp soft cloth or sponge, scrub the sink in a circular motion. For tougher areas, you can use an old toothbrush to get into tight spots.
Step 3: Tackle Stains and Discoloration
Many kitchen sinks develop stains from coffee, tea, food coloring, or mineral deposits. Knowing how to remove sink stains is crucial for a truly deep clean.
- For stubborn food stains: For persistent food stains, you can try a paste of baking soda and hydrogen peroxide. Apply it to the stain, let it sit for 10-15 minutes, then scrub gently.
- For hard water spots and mineral deposits: White vinegar is your best friend here. Soak paper towels in white vinegar and lay them over the stained areas. Let them sit for at least 30 minutes, or even longer for severe buildup. The acid in the vinegar will help to dissolve the mineral deposits. Afterward, scrub and rinse.
- For rust stains: A paste of lemon juice and salt can be effective. Apply it to the rust stain, let it sit for an hour, then scrub with a soft brush.
Step 4: Rinse Thoroughly
After scrubbing, it’s essential to rinse away all the cleaning paste and loosened grime. Use plenty of warm water.
Step 5: Sanitize and Deodorize
Now it’s time to kill any lingering bacteria and neutralize odors.
- Vinegar spray: Fill a spray bottle with undiluted white vinegar. Spray the entire sink, focusing on areas around the drain and faucet. Let it sit for 5-10 minutes.
- Rinse again: Rinse the sink thoroughly with water.
- Optional deodorizing: You can pour a cup of baking soda down the drain followed by a cup of hot water and vinegar. Let it fizz for a few minutes, then flush with more hot water. This is one of the most effective sink cleaning hacks for keeping drains fresh.
Step 6: Shine and Dry
The final step is to dry the sink completely and polish it to a beautiful shine.
- Dry thoroughly: Use a clean, soft cloth (microfiber cloths work exceptionally well) to dry all surfaces of the sink. This prevents water spots from forming.
- Polish: For stainless steel sinks, you can use a bit of olive oil or a dedicated stainless steel polish on a cloth to buff the surface and make it shine. For porcelain or composite sinks, a gentle polish can restore luster.
Specific Cleaning Methods for Different Sink Materials
While the general steps cover most bases, different sink materials have unique needs and sensitivities. Knowing how to clean your specific sink type ensures you get the best results without causing damage.
Cleaning Stainless Steel Sinks
Stainless steel is popular for its durability and sleek look, but it can be prone to water spots, scratches, and dullness.
How to Deep Clean a Stainless Steel Sink
- Initial Rinse: Rinse the sink with hot water to loosen debris.
- Baking Soda Scrub: Create a paste of baking soda and water. Apply it to the sink and scrub gently in the direction of the grain using a soft sponge or cloth. The grain is usually visible as faint lines in the metal.
- Tackle Stubborn Spots: For tougher grime or light scratches, you can use a paste of baking soda and dish soap. For tougher stains, try a paste of baking soda and vinegar, letting it sit for 10-15 minutes before scrubbing.
- Rinse Thoroughly: Rinse all baking soda residue away with warm water.
- Vinegar Treatment: Spray the sink with white vinegar to tackle water spots and disinfect. Let it sit for a few minutes, then rinse again.
- Dry and Polish: Buff the sink dry with a soft microfiber cloth. For an extra shine, apply a few drops of olive oil or stainless steel polish to the cloth and rub it into the sink, following the grain. This also helps create a barrier that repels water and fingerprints.
Kitchen Sink Cleaning Tips for Stainless Steel:
- Avoid harsh abrasives: Steel wool or abrasive scrubbing pads can scratch stainless steel.
- Clean with the grain: Always wipe and scrub in the direction of the metal grain to avoid visible scratches.
- Don’t let harsh chemicals sit: Avoid leaving bleach or oven cleaner in the sink for extended periods.
Cleaning Porcelain Sinks
Porcelain sinks are beautiful and classic but can be susceptible to chipping and staining if not cared for properly.
How to Deep Clean a Porcelain Sink
- Clear and Rinse: Remove all items and rinse the sink with hot water.
- Baking Soda and Soap: Make a paste with baking soda and a mild dish soap. Apply it generously to the sink surface.
- Gentle Scrubbing: Use a soft sponge or cloth to scrub the sink. For tougher stains, an old toothbrush can be used around the edges and drain.
- Vinegar for Shine: If water spots are an issue, spray with white vinegar and let sit for a few minutes before rinsing.
- Rinse Well: Rinse the sink thoroughly with warm water to remove all cleaning residue.
- Dry and Protect: Dry the sink completely with a soft cloth to prevent water spots. You can use a porcelain polish or a thin layer of car wax for added protection and shine, though this is optional.
Kitchen Sink Cleaning Tips for Porcelain:
- Never use abrasive cleaners or pads: These will scratch and dull the porcelain finish.
- Be cautious with harsh chemicals: Avoid bleach unless absolutely necessary and diluted, and never mix bleach with vinegar.
- Address stains promptly: The longer stains sit, the harder they are to remove.
Cleaning Composite Sinks
Composite sinks, often made from granite or quartz resins, are very durable but can be sensitive to certain cleaning agents.
How to Deep Clean a Composite Sink
- Rinse and Remove Debris: Rinse the sink with warm water and remove any loose particles.
- Mild Dish Soap: The best way to clean a composite sink is with warm water and mild dish soap. Use a soft cloth or sponge to wash the entire surface.
- Baking Soda for Grime: For tougher grime or light discoloration, a baking soda paste can be used. Apply it to the affected areas and scrub gently.
- Vinegar for Water Spots: If you notice hard water spots, soak a cloth in white vinegar and lay it over the affected area for about 15-20 minutes. Then scrub gently and rinse.
- Rinse and Dry: Rinse the sink thoroughly with water. Dry it completely with a soft cloth to prevent water spots and maintain its finish.
Kitchen Sink Cleaning Tips for Composite:
- Avoid abrasive cleaners: Similar to porcelain, abrasive cleaners can damage the surface.
- Check manufacturer’s recommendations: Always refer to the manufacturer’s guidelines for your specific composite sink material. Some may have specific cleaning products they recommend or advise against.
- Don’t use abrasive sponges: Stick to soft cloths or non-scratch sponges.
Tackling Sink Drains: Keeping Them Clear and Odor-Free
Cleaning the sink basin is only part of the equation. Proper cleaning sink drains is vital for preventing clogs and unpleasant smells.
Natural Methods for Cleaning Sink Drains
- Baking Soda and Vinegar: This is a classic and effective method.
- Pour ½ cup of baking soda down the drain.
- Follow with ½ cup of white vinegar.
- Immediately cover the drain with a stopper or cloth to contain the fizzing reaction.
- Let it sit for at least 30 minutes, or longer for tougher clogs.
- Flush the drain with boiling water. Repeat if necessary.
- Hot Water Flush: Regularly pouring boiling water down the drain can help to dissolve grease and prevent buildup. Do this weekly for maintenance.
- Citrus Peels: Running citrus peels (lemon, orange, grapefruit) through the garbage disposal (if you have one) not only helps to clean the blades but also leaves a fresh scent in the drain.
Dealing with Clogs
If your drain is slow or completely blocked, you may need more direct intervention.
- Plunger: For a standard sink drain, a plunger can be very effective. Ensure there’s enough water in the sink to cover the plunger cup. Create a seal and plunge vigorously several times.
- Drain Snake or Auger: For more stubborn clogs, a drain snake is a mechanical tool that can reach further down the pipe to break up or pull out obstructions.
- Enzyme Drain Cleaners: These use natural enzymes to break down organic matter causing the clog. They are generally safer than harsh chemical cleaners.
Shining Your Kitchen Sink: Achieving a Pristine Finish
After a good deep clean, you want your sink to truly shine. This is where polishing and detailing come in.
Polishing Stainless Steel
- Microfiber Cloth: After drying, use a clean, dry microfiber cloth to buff the entire surface of the sink in the direction of the grain.
- Olive Oil or Mineral Oil: For an extra gleam, apply a tiny amount of olive oil or mineral oil to a cloth and buff the sink. This not only shines but also helps to repel water spots.
- Specialized Stainless Steel Polish: Commercial stainless steel polishes are available and can provide a long-lasting shine.
Restoring Shine to Porcelain and Composite
- Gentle Polish: For porcelain and composite sinks, a mild, non-abrasive polish can restore luster. Always test in an inconspicuous area first.
- Rubbing Compound (for minor scuffs on composite): Very fine automotive rubbing compound might be used for scuffs on some composite sinks, but always check manufacturer recommendations.
Keeping Your Kitchen Sink Clean: Proactive Habits
Preventative measures are key to minimizing the need for frequent deep cleans and ensuring you’re always keeping your kitchen sink clean.
Daily Habits
- Rinse after each use: Rinse away food particles and soap residue immediately after using the sink.
- Wipe down daily: Use a soft cloth and a little dish soap or a vinegar solution to wipe down the sink and faucet at the end of each day.
- Don’t let dirty dishes pile up: Wash dishes promptly or rinse them thoroughly before leaving them in the sink.
Weekly Habits
- Baking Soda Scrub: Perform a quick baking soda scrub once a week to prevent grime buildup.
- Drain Flush: Pour boiling water down the drain weekly to help keep it clear.
- Check the faucet and handles: Wipe down the faucet, handles, and sprayer to remove water spots and fingerprints.
Common Sink Cleaning Mistakes to Avoid
Even with the best intentions, some common mistakes can hinder your cleaning efforts or even damage your sink.
- Using the wrong cleaner for your sink material: As discussed, abrasive cleaners can scratch or dull finishes on stainless steel, porcelain, and composite sinks.
- Mixing cleaning chemicals: Never mix bleach with ammonia or vinegar. This can create dangerous toxic fumes.
- Leaving cleaners to sit too long: While some stains require soaking, leaving harsh chemicals in the sink for too long can damage the finish.
- Not rinsing thoroughly: Leftover cleaning product residue can attract dirt or damage the sink.
- Ignoring the drain: A dirty drain can lead to significant problems.
Frequently Asked Questions (FAQ)
Q1: How often should I deep clean my kitchen sink?
A: For most households, a thorough deep clean once a month is sufficient. However, if you notice significant grime, stains, or odors, you may need to do it more frequently, perhaps bi-weekly. Daily wipe-downs and weekly quick cleans are crucial for maintenance.
Q2: Can I use bleach to clean my kitchen sink?
A: You can use diluted bleach for sanitizing purposes, especially on porcelain or stainless steel sinks, but it should be used with caution. Always dilute bleach with water (e.g., 1 part bleach to 10 parts water). Never mix bleach with other cleaners like vinegar or ammonia, as this creates toxic gases. Rinse thoroughly after use. Avoid using bleach on composite sinks unless specifically recommended by the manufacturer, as it can sometimes discolor them.
Q3: What are the best natural sink cleaner options?
A: Baking soda, white vinegar, and lemon juice are excellent natural sink cleaner options. Baking soda acts as a mild abrasive and deodorizer, vinegar is a disinfectant and effective against hard water stains, and lemon juice offers cleaning, disinfecting, and shining properties.
Q4: How do I remove tough stains like coffee or tea from my sink?
A: For coffee or tea stains, a paste made from baking soda and water or baking soda and hydrogen peroxide is usually effective. Apply the paste, let it sit for 10-15 minutes, then scrub gently with a soft cloth or sponge. For persistent stains on stainless steel, a specialized stainless steel cleaner might be needed.
Q5: My sink has a persistent odor. How can I get rid of it?
A: Odors from the sink often come from the drain. A great way to combat this is by pouring boiling water down the drain, followed by a mixture of baking soda and vinegar. Let it fizz for 30 minutes, then flush with more boiling water. Running citrus peels through a garbage disposal also helps neutralize odors.
By following these detailed methods and kitchen sink cleaning tips, you can ensure your sink remains hygienic, stain-free, and beautifully shining. Regular attention will keep your kitchen looking its best and prevent those more intensive deep cleaning sessions from becoming a chore.