
Can I apply a backsplash myself? Yes, you absolutely can apply a backsplash yourself! With a little patience and the right tools, a DIY kitchen backsplash is a very achievable project for most homeowners. This guide will walk you through the process, from choosing your materials to the final wipe-down, making your kitchen renovation backsplash a beautiful success.
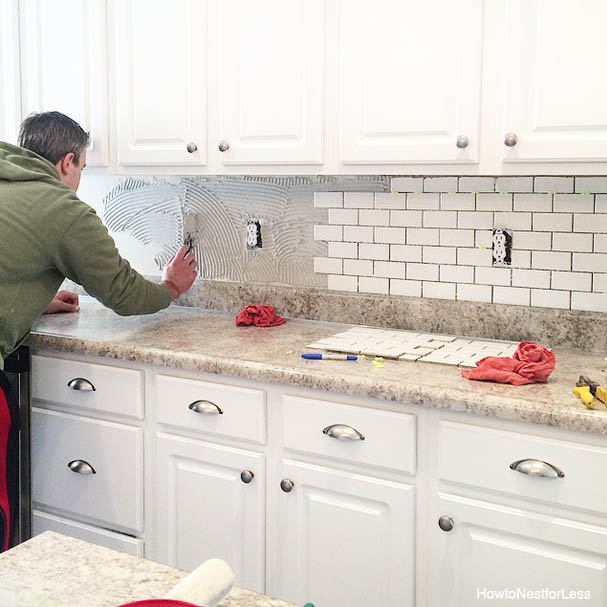
Image Source: howtonestforless.com
Planning Your Kitchen Backsplash Project
Embarking on a DIY kitchen backsplash project is an exciting way to refresh your kitchen’s look. Whether you dream of a classic subway tile backsplash, a modern peel and stick backsplash, or intricate kitchen wall tiles, careful planning is key.
Choosing Your Backsplash Material
The first step is selecting the material that suits your style, budget, and DIY skill level.
Popular Backsplash Materials
- Ceramic Tile: Versatile, affordable, and available in countless colors, patterns, and sizes. Great for a classic tile backsplash installation.
- Porcelain Tile: Similar to ceramic but denser and more durable, making it ideal for high-traffic areas.
- Glass Tile: Adds a touch of elegance and light reflection. Can be trickier to cut.
- Natural Stone (Marble, Granite, Travertine): Offers a luxurious feel but is more expensive and requires sealing.
- Metal Tile (Stainless Steel, Copper): Provides a sleek, modern look. Can be easy to install, especially peel-and-stick options.
- Peel and Stick Backsplash: A fantastic DIY option. These often mimic the look of tile but are much simpler to apply and remove. Perfect for renters or those wanting a quick update.
Factors to Consider When Choosing
- Budget: Some materials, like natural stone, are pricier than others, like ceramic.
- Durability: How will the backsplash hold up to grease, heat, and cleaning?
- Ease of Installation: Are you comfortable with tiling and grouting, or would a peel and stick backsplash be better?
- Maintenance: Some materials require sealing or special cleaning methods.
- Style: Does it complement your existing cabinets, countertops, and overall kitchen decor?
Estimating Material Needs
Once you’ve chosen your material, measure your backsplash area carefully.
How to Measure
- Height: Measure from the countertop to the bottom of your upper cabinets.
- Width: Measure the length of the wall space you want to cover.
- Obstructions: Account for outlets, windows, and cabinet edges.
- Add for Cuts and Breakage: It’s wise to add 10-15% extra material to account for cuts, mistakes, and potential breakage. This is especially important for intricate patterns or if you’re new to tile backsplash installation.
Gathering Your Tools and Supplies
Having all your tools ready before you start will make the process smoother.
Essential Tools and Supplies
| Tool/Supply | Purpose |
|---|---|
| Chosen Backsplash Material | Your tiles, sheets, or peel-and-stick panels. |
| Tile Cutter/Wet Saw | For making straight and angled cuts on ceramic or porcelain tiles. |
| Glass Cutter | For scoring and snapping glass tiles. |
| Measuring Tape | For accurate measurements. |
| Level | To ensure your tiles are straight. |
| Pencil | For marking cuts and layout lines. |
| Spacers | To maintain consistent grout lines between tiles. |
| Trowel (Notched) | For spreading backsplash adhesive evenly. Choose notch size based on tile. |
| Grout Float | For spreading and pressing backsplash grout into joints. |
| Sponge | For cleaning excess grout. |
| Buckets (2) | One for clean water, one for rinsing your sponge. |
| Safety Glasses | To protect your eyes from debris. |
| Gloves | To protect your hands from adhesive and grout. |
| Painter’s Tape | To protect surfaces and create straight lines. |
| Caulk/Grout Sealer | For sealing grout lines after curing. |
| Backsplash Adhesive | The “glue” that holds your tiles in place. |
| Backsplash Grout | Fills the spaces between tiles. |
| Tack Cloth/Damp Cloth | For cleaning surfaces. |
| Drop Cloths | To protect countertops and floors. |
| Utility Knife | For trimming or making small adjustments. |
| Backsplash Cutting Tools | Essential for shaping tiles around obstacles. |
Preparing Your Kitchen Walls
Proper wall preparation is crucial for a lasting and professional-looking backsplash. This step is vital for any kitchen renovation backsplash.
Cleaning the Wall Surface
Start by thoroughly cleaning the wall area where the backsplash will be applied.
- Remove Grease and Grime: Use a degreaser or a solution of warm water and dish soap to remove any cooking grease or dirt.
- Wipe Down: Wipe the walls with a clean, damp cloth to remove any residue.
- Dry Completely: Ensure the walls are completely dry before proceeding.
Patching Imperfections
Smooth, clean walls are essential for good adhesion.
- Fill Holes and Cracks: Use a spackling compound to fill any holes or cracks in the drywall.
- Sand Smooth: Once dry, lightly sand the patched areas until they are smooth and flush with the wall.
- Wipe Away Dust: Use a tack cloth or damp cloth to remove any sanding dust.
Priming the Wall
Applying a primer creates a uniform surface and improves adhesion. This is a key step for successful tile backsplash installation.
Why Prime?
- Better Adhesion: Primer helps the backsplash adhesive bond more effectively.
- Uniform Surface: It seals porous surfaces and prevents the wall from absorbing moisture from the adhesive or grout.
- Easier Cleanup: It can make removing the backsplash later (if ever needed) a bit easier.
How to Prime
- Choose the Right Primer: For most kitchen backsplashes, a good quality latex-based primer is suitable. If you’re tiling over existing tile, you might need a bonding primer.
- Apply Evenly: Use a roller or brush to apply a thin, even coat of primer.
- Dry Time: Allow the primer to dry completely according to the manufacturer’s instructions.
Protecting Surrounding Areas
Protect your countertops and floors from adhesive and grout.
- Cover Countertops: Lay down drop cloths or old towels over your countertops.
- Use Painter’s Tape: Apply painter’s tape along the edges of countertops, cabinets, and windows to create clean lines and prevent accidental application of adhesive or grout.
Applying Your Backsplash: Step-by-Step
Now for the fun part – bringing your vision to life!
Laying Out Your Design (Dry Fit)
Before you apply any adhesive, it’s a good idea to do a “dry fit” of your tiles.
- Visualize the Pattern: Lay out a section of your tiles on the countertop to see how the pattern looks and how cuts will be needed.
- Find the Center: For a balanced look, find the center point of the wall and start tiling outwards from there. This is especially helpful for subway tile backsplash patterns to ensure symmetrical cuts on the edges.
- Mark Reference Lines: Use your level and pencil to draw horizontal and vertical reference lines on the wall to guide your installation.
Applying the Backsplash Adhesive
The backsplash adhesive is what holds everything in place.
Types of Adhesive
- Thin-set Mortar: A cement-based adhesive, ideal for ceramic, porcelain, and natural stone tiles. It offers strong adhesion and water resistance. You’ll need to mix this with water.
- Mastic Adhesive: A pre-mixed adhesive, suitable for lighter tiles like ceramic and glass. It’s easier to use but less water-resistant than thin-set.
- Peel and Stick Adhesive: For peel and stick backsplash options, the adhesive is already on the back of the panel.
How to Apply
- Mix Thin-set (if using): Follow the manufacturer’s instructions precisely. Mix in small batches as it can dry out.
- Spread Adhesive: Using your notched trowel, spread a thin, even layer of adhesive onto a small section of the wall at a time (about 2-3 square feet). Hold the trowel at a 45-degree angle to create consistent ridges. Don’t cover more area than you can tile before the adhesive starts to skin over.
- For Peel and Stick: Simply peel the backing off the panel and carefully align it with your reference lines, pressing firmly onto the wall.
Setting the Tiles
This is where your design starts to take shape.
Placing the First Tile
- Align with Lines: Carefully place your first tile along your marked lines, pressing it firmly into the adhesive with a slight twisting motion.
- Use Spacers: Insert tile spacers between tiles to maintain consistent grout lines. This is crucial for a professional finish, especially for intricate kitchen wall tiles.
Continuing Installation
- Work in Sections: Continue applying adhesive and setting tiles section by section.
- Check for Level: Regularly use your level to ensure tiles are straight and plumb.
- Wipe Away Excess Adhesive: If any adhesive oozes through the grout lines or onto the tile face, wipe it away immediately with a damp sponge or cloth. It’s much harder to remove once dry.
Cutting Tiles for Edges and Obstacles
This is where your backsplash cutting tools come into play.
Common Cutting Scenarios
- Outlets: You’ll need to cut out openings for electrical outlets. Mark the outlet location on the tile and use a tile nipper or a wet saw with a ceramic blade to cut the shape.
- Edges: Cut tiles to fit along the edges of your backsplash area.
- Windows and Doors: These require precise cuts to fit around frames.
Cutting Techniques
- Tile Cutters: Good for straight cuts on ceramic and porcelain.
- Wet Saws: The most versatile, allowing for straight, angled (miter), and curved cuts. Essential for glass tiles and more complex shapes.
- Tile Nippers: Useful for small, irregular cuts and notching around outlets.
-
Glass Cutters: Score the glass, then use the breaking pliers or tap gently to snap the piece.
-
Safety First! Always wear safety glasses when cutting tiles.
Grouting the Backsplash
Once the adhesive has fully cured (check the adhesive manufacturer’s instructions – usually 24-48 hours), it’s time to grout. This is a key part of tile backsplash installation.
Choosing Your Grout
- Sanded Grout: Contains sand, providing strength and preventing shrinkage. Best for grout lines 1/8 inch wide or larger.
- Unsanded Grout: Contains no sand, making it smoother. Best for narrow grout lines (less than 1/8 inch) and delicate tiles like glass.
- Epoxy Grout: Very durable and stain-resistant, but more difficult to work with.
Applying the Grout
- Mix Grout: Prepare the backsplash grout according to the manufacturer’s instructions. It should have a peanut butter-like consistency.
- Spread Grout: Use a grout float to spread the grout over the tiles, working it into all the joints at a 45-degree angle. Apply firm pressure to ensure the joints are completely filled.
- Remove Excess Grout: Hold the grout float at a 90-degree angle and scrape off the excess grout from the tile surface.
Cleaning Off Grout Haze
This is a crucial step for a clean finish.
- Wait: Allow the grout to set slightly (about 15-30 minutes), until it firms up but isn’t fully dry.
- First Wipe: Use a damp (not wet!) sponge, wiping diagonally across the tiles to remove the bulk of the grout. Rinse your sponge frequently in one bucket of clean water, and use the second bucket for rinsing the dirty sponge.
- Second Wipe: After a few hours, a slight haze may appear on the tiles. Buff this off with a clean, dry microfiber cloth.
Sealing and Finishing Touches
The final steps ensure your backsplash looks great and lasts.
Sealing the Grout
Grout is porous and can stain easily. Sealing protects it.
- When to Seal: Wait at least 72 hours after grouting, or as recommended by the grout manufacturer.
- Apply Sealer: Use a small brush or applicator to apply a quality grout sealer to the grout lines.
- Wipe Excess: Wipe any excess sealer off the tiles immediately with a clean cloth.
Caulking the Edges
Caulking provides a flexible, waterproof seal along edges.
- Where to Caulk: Apply a bead of silicone caulk along the joint where the backsplash meets the countertop and where it meets the underside of the cabinets.
- Smooth the Bead: Wet your finger or a caulk-smoothing tool and run it along the bead of caulk to create a neat, concave line.
Cleaning Up
- Final Wipe: Give your new backsplash a final wipe-down to remove any remaining dust or smudges.
- Remove Painter’s Tape: Carefully remove all painter’s tape.
Frequently Asked Questions (FAQ)
Q: How long does it take to install a kitchen backsplash?
A: For a DIYer, a typical backsplash installation can take anywhere from a weekend to a few days, depending on the size of the area, the complexity of the tile pattern, and your experience level. Prep work and cutting tiles often take the most time.
Q: Can I tile over existing tile?
A: Yes, in many cases, you can tile over existing tile. The existing tile must be well-adhered, clean, and structurally sound. You’ll likely need to use a bonding primer and a suitable adhesive like thin-set mortar.
Q: What is the best backsplash adhesive for my project?
A: For most ceramic and porcelain tiles, thin-set mortar is recommended for its durability and water resistance. For lighter tiles or a quick DIY project, mastic or a peel and stick backsplash with pre-applied adhesive can be suitable. Always check the tile and adhesive manufacturer’s recommendations.
Q: How do I clean grout haze?
A: Grout haze is the film left on tiles after grouting. Wait for the grout to set for 15-30 minutes, then use a damp sponge to wipe the tiles diagonally. If a haze remains after drying, a specialized grout haze remover or a light buffing with a microfiber cloth can help.
Q: What are the essential backsplash cutting tools?
A: The most common backsplash cutting tools include a manual tile cutter for straight cuts, a wet saw for more complex cuts on harder tiles like porcelain or glass, and tile nippers for small adjustments and notching.
Q: How much backsplash grout do I need?
A: You can calculate the amount of grout needed based on the square footage of your backsplash, the size of your tiles, and the width of your grout lines. Most grout manufacturers provide a coverage calculator on their packaging or website. It’s always better to have a little extra.
Q: Is backsplash priming really necessary?
A: Yes, backsplash priming is highly recommended. It ensures better adhesion of the backsplash adhesive, creates a uniform surface, and can prevent issues like mildew or the wall absorbing moisture.
Q: What is the difference between sanded and unsanded backsplash grout?
A: Sanded grout contains fine sand particles that add strength and prevent shrinkage, making it ideal for grout lines 1/8 inch or wider. Unsanded grout is smoother and used for narrower grout lines (less than 1/8 inch) or delicate tiles like glass to prevent scratching.
Q: Can I use a peel and stick backsplash in my kitchen?
A: Absolutely! Peel and stick backsplash options are incredibly popular for DIYers due to their ease of installation. They come with pre-applied adhesive and are a great way to update your kitchen without the mess of traditional tile and grout.
Q: What are the best kitchen wall tiles for a beginner?
A: For beginners, ceramic subway tiles or larger format porcelain tiles are often the easiest to work with. Peel and stick backsplash tiles are also an excellent choice for those looking for a simple installation process.
This comprehensive guide should equip you with the knowledge to tackle your own kitchen backsplash project with confidence. Enjoy your beautiful new kitchen!