
Can you reface kitchen cabinets yourself? Yes, you can reface your kitchen cabinets yourself, making it a popular and cost-effective alternative to a full replacement. This guide will walk you through the process, from planning to the final touches, helping you achieve a fresh new look for your kitchen without the hefty price tag of professional cabinet refacing.
Refacing your kitchen cabinets is a smart way to update your kitchen’s appearance. It’s a process that involves covering the existing cabinet frames with new materials and replacing the doors and drawer fronts. This not only refreshes the look but can also improve functionality and durability. While DIY cabinet refacing requires patience and attention to detail, the results can be incredibly rewarding.
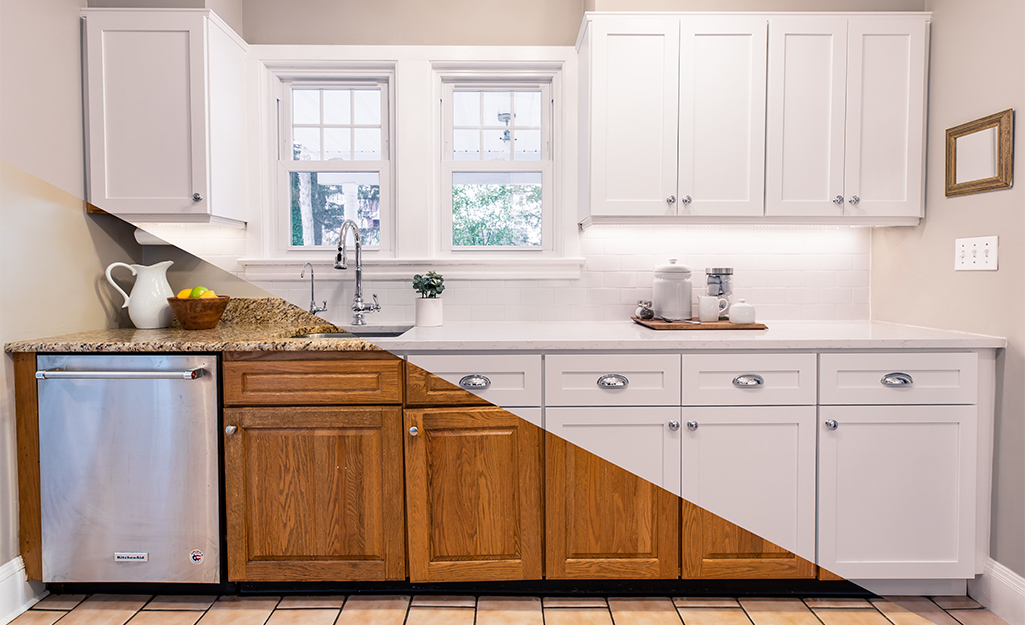
Image Source: contentgrid.homedepot-static.com
Why Reface Your Kitchen Cabinets?
Before diving into the “how,” let’s explore the “why.” Refacing offers several compelling advantages:
- Cost-Effective: Compared to a full kitchen remodel or even replacing all your cabinets, refacing is significantly cheaper. You’re essentially giving your existing cabinets a facelift, not rebuilding from scratch. This makes it a great option if your budget is a concern.
- Faster Turnaround: The process typically takes less time than a complete cabinet replacement. Since you’re working with your existing cabinet boxes, you can avoid the demolition and construction phases of a remodel.
- Less Disruptive: Refacing creates less mess and disruption in your home compared to a full gut renovation. You won’t have large amounts of debris or prolonged construction noise.
- Improved Aesthetics: You can transform the look of your kitchen by choosing new door styles, colors, and finishes. This is a fantastic way to modernize outdated cabinetry.
- Better Functionality: While the frames remain, you have the opportunity to upgrade hinges, drawer slides, and even hardware, improving how your cabinets operate.
Planning Your Cabinet Refacing Project
Thorough planning is crucial for a successful DIY project. Here’s what you need to consider:
1. Assess Your Current Cabinets
- Cabinet Box Condition: Are the cabinet boxes (the part attached to the wall) in good structural shape? They should be sturdy, with no rot or severe damage. If the boxes are in poor condition, refacing might not be the best option, and full replacement might be necessary.
- Cabinet Style: Consider the existing style of your kitchen. While refacing can drastically change the look, it’s good to have a general idea of the style you want to achieve – modern, traditional, farmhouse, etc.
- Cabinet Layout: Refacing doesn’t change the layout of your kitchen. You’ll be working with the existing cabinet placement.
2. Choose Your Refacing Method and Materials
There are several ways to reface cabinets, each with its own pros and cons regarding kitchen cabinet refacing cost and effort.
a) Cabinet Refacing Kits
These kits are designed for DIYers and often include pre-cut veneers or laminate sheets for the cabinet frames, along with new doors and drawer fronts.
- Pros: Simplifies the process, comes with specific instructions, can be a good starting point for beginners.
- Cons: Limited customization options, material quality can vary.
b) Laminate Cabinet Refacing
Laminate is a synthetic material that mimics the look of wood or other finishes. It’s applied to the cabinet frames.
- Pros: Durable, resistant to moisture and stains, wide variety of colors and patterns, generally more affordable than real wood.
- Cons: Can be less forgiving of surface imperfections on the existing cabinet, can chip or peel if not applied carefully, doesn’t offer the same depth or warmth as real wood.
c) Veneer Cabinet Refacing
Wood veneer is a thin slice of real wood applied to the cabinet frames.
- Pros: Offers the authentic look and feel of real wood, can be sanded and stained if needed, more premium appearance.
- Cons: More expensive than laminate, can be susceptible to moisture damage if not properly sealed, requires more careful handling and application.
d) Cabinet Door Replacement
This is a key component of refacing. You can buy new doors and drawer fronts to match your chosen refacing material for the frames.
- Pros: Allows for significant aesthetic change, many styles and materials available (wood, MDF, thermofoil).
- Cons: Can be a significant portion of the kitchen cabinet refacing cost, requires precise measurements.
e) Kitchen Cabinet Resurfacing
This term can sometimes be used interchangeably with refacing, but it more accurately describes kitchen cabinet refinishing or painting. However, in the context of refacing, it implies a complete update of the visible surfaces.
3. Budgeting for Your Project
Determine your budget early on. Factors influencing the overall kitchen cabinet refacing cost include:
- Size of your kitchen: More cabinets mean more materials.
- Material choice: Laminate is cheaper than veneer.
- Door style and material: Custom or solid wood doors will cost more.
- Hardware: New knobs and pulls add to the expense.
- Tools required: If you don’t have them, you’ll need to buy or rent them.
A rough estimate for DIY cabinet refacing can range from \$500 to \$3,000+ depending on these factors, while professional services can easily double or triple that amount.
4. Selecting Your New Look
This is the fun part!
- Color: Light colors can make a kitchen feel larger and brighter. Darker colors can add warmth and sophistication.
- Style: Consider modern slab doors, traditional raised-panel doors, or Shaker-style doors.
- Hardware: Hinges, knobs, and pulls are the jewelry of your cabinets. Choose finishes that complement your new doors and overall kitchen design.
Essential Tools and Materials for DIY Cabinet Refacing
Having the right tools makes the job much easier and ensures a professional finish.
Tools You’ll Need:
- Measuring Tape: For accurate measurements of your cabinet frames and doors.
- Utility Knife/Exacto Knife: For trimming veneers or laminate.
- Squeegee or Applicator Tool: For smoothing down veneers and laminates to prevent bubbles.
- Caulking Gun: For applying adhesive.
- Screwdriver Set: For removing and reattaching hinges and hardware.
- Orbital Sander: For smoothing any rough edges or preparing surfaces.
- Putty Knife: For applying wood filler or adhesive.
- Safety Glasses and Gloves: For protection.
- Cleaning Supplies: Degreaser, tack cloths, clean rags.
- Drill: For pilot holes and driving screws.
- Circular Saw or Miter Saw: If you need to cut veneer or laminate sheets to size.
- Patience and a good playlist!
Cabinet Refacing Materials:
- Veneer or Laminate Sheets: For covering the cabinet frames.
- New Cabinet Doors and Drawer Fronts: Pre-primed, painted, stained, or raw for you to finish.
- Adhesive/Contact Cement: Specifically designed for bonding veneers or laminates.
- Wood Filler: For filling any dings or imperfections on the cabinet frames.
- Primer and Paint/Stain: If you’re finishing your own doors or frames.
- New Hinges and Drawer Slides (Optional but Recommended): For improved functionality.
- New Cabinet Hardware: Knobs and pulls.
Step-by-Step Guide to DIY Cabinet Refacing
Let’s get started!
Step 1: Prepare Your Work Area and Cabinets
- Clear the Kitchen: Remove everything from your cabinets and drawers.
- Protect Surfaces: Cover countertops, floors, and appliances with drop cloths.
- Clean the Cabinets: Thoroughly clean all cabinet surfaces to remove grease and grime. A good degreaser is essential. Any residual grease will prevent the new material from adhering properly.
- Remove Doors and Drawer Fronts: Carefully remove all cabinet doors and drawer fronts. Label them to ensure you know which cabinet they belong to. Keep the hinges and any hardware you plan to reuse.
Step 2: Prepare the Cabinet Frames
- Fill Imperfections: Use wood filler to patch any holes, dents, or scratches on the cabinet frames. Let the filler dry completely, then sand it smooth.
- Sand Lightly (If Necessary): If the cabinet frames have a glossy finish, lightly sand them with fine-grit sandpaper (around 120-180 grit) to create a surface for the adhesive to grip. Wipe away all dust with a tack cloth.
Step 3: Apply Veneer or Laminate to Cabinet Frames
This is a critical step for a professional look.
- Measure and Cut: Measure each section of the cabinet frame you need to cover (sides, top, bottom, face frames). Cut your veneer or laminate to size, adding a small overlap for trimming.
- Apply Adhesive: Follow the manufacturer’s instructions for your chosen adhesive. For contact cement, apply it to both the cabinet frame and the back of the veneer/laminate. Allow it to become tacky before bonding.
- Bonding: Carefully align the veneer or laminate with one edge of the cabinet frame. Once it touches, it will bond. Work slowly, using a squeegee or applicator tool to press the material down firmly and remove any air bubbles as you go. Work from the center outwards.
- Trim Excess: Once bonded, use a sharp utility knife to carefully trim away any excess material along the edges and corners. You might need to make multiple passes. For a cleaner edge, score and snap or use a sharp blade.
Step 4: Install New Doors and Drawer Fronts
- Measure for New Doors: Accurately measure your existing cabinet openings for new doors and drawer fronts. If you ordered pre-made doors, double-check the measurements against your openings.
- Prepare New Doors (If Needed): If you ordered unfinished doors, now is the time to paint or stain them according to your design.
- Install Hinges: Attach new hinges to the new doors and drawer fronts, or reuse your old ones if they are in good condition and compatible.
- Attach Doors and Drawer Fronts:
- For Doors: Position the door against the cabinet frame. Hold it in place and temporarily screw in the hinges. Adjust the door until it hangs straight and has even gaps around the edges. Once satisfied, permanently attach the hinges.
- For Drawer Fronts: Align the new drawer front with the drawer box. You can often attach it from the inside of the drawer box with screws. Make sure it’s perfectly flush and square.
Step 5: Install New Hardware
- Mark and Drill: Decide on the placement of your knobs and pulls. Measure carefully and mark the spots. Drill pilot holes.
- Attach Hardware: Screw the knobs and pulls into place.
Step 6: Final Touches and Cleanup
- Inspect Your Work: Go over all the cabinets, checking for any loose edges, bubbles, or imperfections. Make any necessary adjustments.
- Reinstall Shelves and Drawer Slides: Put back any shelves and install new drawer slides if you decided to upgrade them.
- Clean Up: Remove all drop cloths and clean your workspace.
Cabinet Refinishing vs. Refacing vs. Resurfacing: Deciphering the Terms
It’s easy to get these terms confused, but they refer to different processes:
- Cabinet Refinishing: This usually involves sanding down the existing cabinet finish (paint or stain) and then applying a new coat of paint or stain. It addresses the surface but doesn’t change the door style or cover the cabinet boxes with new material. This is often a more labor-intensive process if done thoroughly.
- Cabinet Refacing: As detailed in this guide, this involves applying new material (veneer or laminate) to the cabinet frames and replacing the doors and drawer fronts. It’s a significant aesthetic update.
- Kitchen Cabinet Resurfacing: While sometimes used loosely, in the context of a full update, it can encompass refacing or even painting/refinishing. However, the most impactful “resurfacing” that changes the material and style is truly refacing.
Common Challenges in DIY Cabinet Refacing
Even with a great guide, DIY projects can present challenges:
- Achieving a Seamless Finish: Getting the veneer or laminate perfectly smooth without bubbles or wrinkles can be tricky, especially on the first attempt.
- Mismatched Colors/Grains: If you’re not careful, the new doors might not perfectly match the refaced frames if you’re not ordering them as a set.
- Measuring Errors: Incorrect measurements for new doors or veneer can lead to costly mistakes.
- Adhesive Application: Using too much or too little adhesive, or applying it at the wrong time, can result in poor bonding.
- Time Commitment: What seems like a weekend project can easily stretch into several days or weeks, especially for beginners.
When to Consider Professional Cabinet Refacing
While DIY cabinet refacing is achievable, there are times when professional help is advisable:
- Lack of Time: If you have a busy schedule, hiring professionals can save you valuable time.
- Desire for a Flawless Finish: Professionals have the experience and tools to ensure a perfect, factory-like finish.
- Complex Cabinet Designs: Intricate cabinet doors or unusual frame shapes might be challenging for a DIYer.
- Limited DIY Experience: If you’re not comfortable with precise cutting, adhesion, or detail work, professional services are a safer bet.
- Budget for Higher Quality: If your budget allows and you want the highest quality materials and craftsmanship, professional services are worth the investment.
The kitchen cabinet refacing cost for professionals will be higher, but it often includes expertise, specialized tools, and a warranty, which can provide peace of mind.
Frequently Asked Questions (FAQ)
Q1: How long does cabinet refacing typically take?
A1: For a DIYer, it can take anywhere from a few days to a week or two, depending on the size of the kitchen and your experience. Professionals can often complete the job in 3-5 days.
Q2: Can I reface my laminate cabinets?
A2: Yes, you can reface laminate cabinets. However, you need to ensure the laminate is clean, degreased, and lightly scuffed to provide a good surface for the new veneer or laminate adhesive.
Q3: What is the difference between refacing and replacing cabinets?
A3: Refacing updates the visible surfaces (doors, drawer fronts, and frame coverings), while replacing involves removing the old cabinet boxes entirely and installing new ones. Replacement is more costly and disruptive.
Q4: How much does it cost to reface kitchen cabinets?
A4: The kitchen cabinet refacing cost for DIY projects can range from \$500 to \$3,000+. Professional services typically start at \$2,000 and can go up to \$10,000 or more, depending on the kitchen size and materials.
Q5: What are the best cabinet refacing materials?
A5: For durability and ease of maintenance, laminate is a popular choice. For a premium, natural look, wood veneer is excellent. MDF doors are also common and can be painted or finished in various ways.
Q6: Do I need to remove my countertops to reface cabinets?
A6: Generally, no. You only need to remove the doors and drawer fronts. However, if your cabinet frames are installed under the countertop overhang, you might need to be extra careful during the refacing process.
Q7: Can I paint cabinets instead of refacing them?
A7: Yes, painting is a form of kitchen cabinet refinishing and is a much cheaper alternative to refacing. However, it doesn’t change the door style and the durability depends heavily on the prep work and paint quality.
Refacing your kitchen cabinets is a rewarding project that can dramatically transform your kitchen’s appearance and feel. By carefully planning, gathering the right cabinet refacing materials and tools, and following these steps, you can achieve beautiful, updated cabinetry on a budget. Remember to take your time, measure twice, and enjoy the process of giving your kitchen a fresh new life!