
Image Source: createandbabble.com
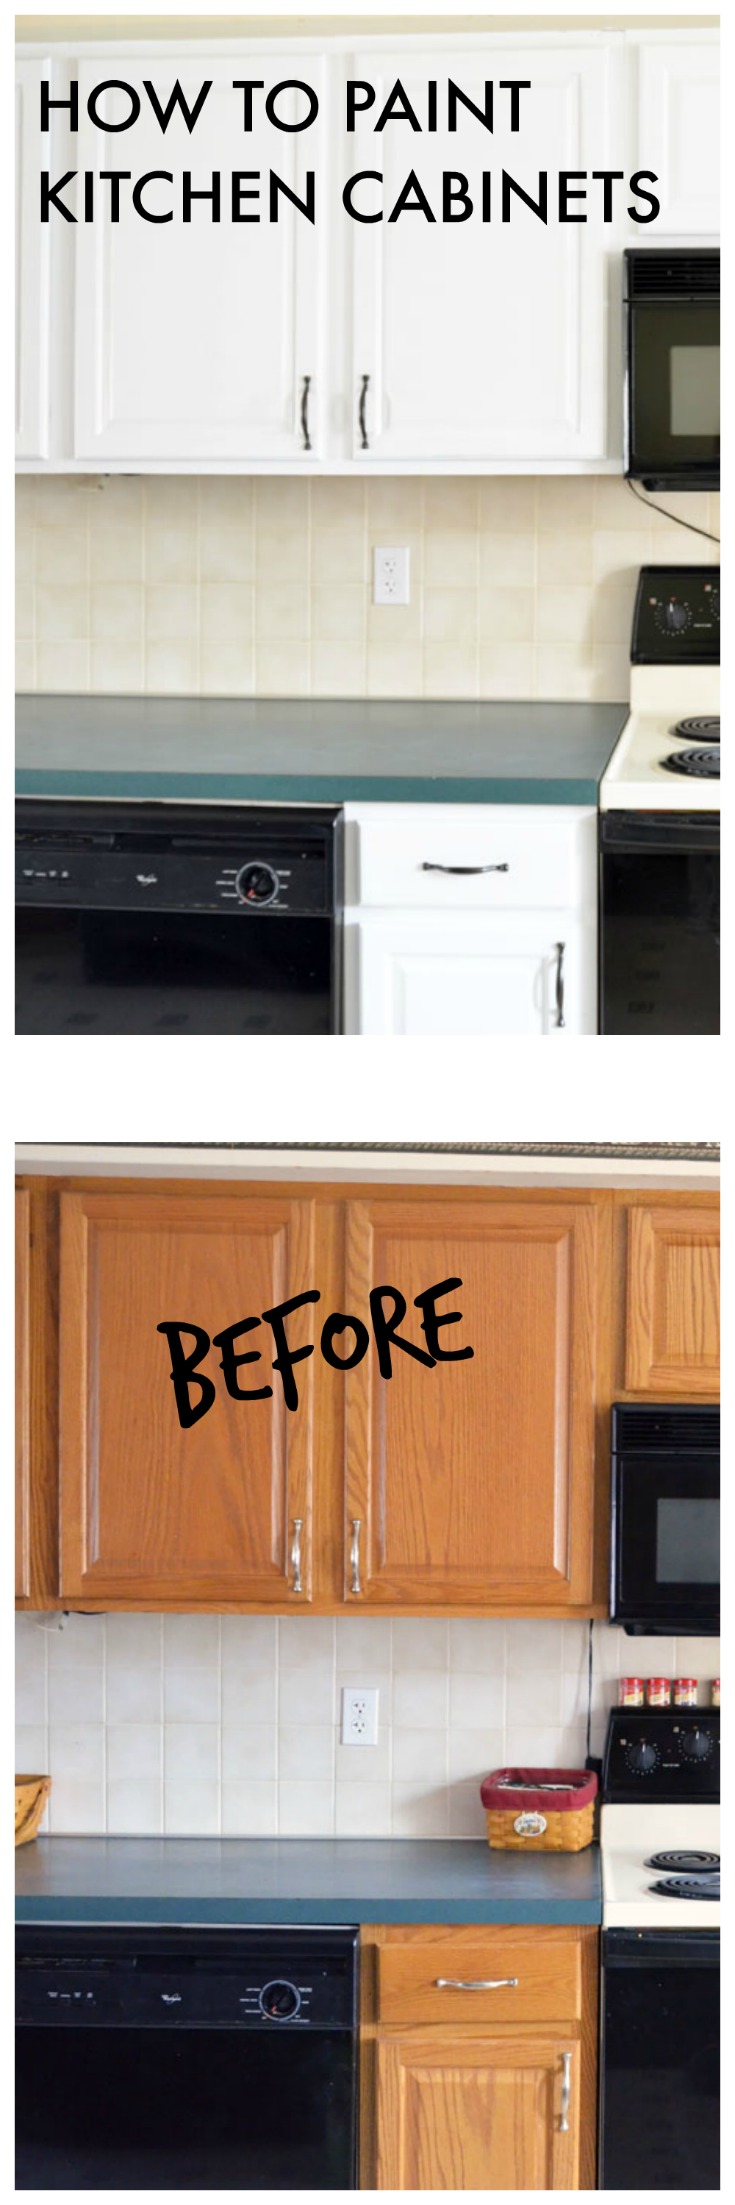
How Do I Paint My Kitchen Cabinets for Beginners: DIY Guide & Pro Tips
Can beginners paint their kitchen cabinets? Absolutely! With the right preparation and guidance, anyone can achieve a professional-looking kitchen cabinet makeover. This comprehensive guide will walk you through every step of DIY cabinet refinishing, from choosing the best paint for cabinets to applying the final coat. We’ll cover how to prep cabinets for painting, essential cabinet painting techniques, and tips for a durable, beautiful finish.
Getting Started: What You Need to Know
What is the best paint for cabinets? The best paint for cabinets is typically a high-quality acrylic enamel or a hybrid enamel. These paints offer excellent durability, adhesion, and a smooth finish that can withstand the wear and tear of a kitchen environment. Look for paints specifically labeled for cabinets or trim.
What is the most important step in painting cabinets? Proper preparation is the absolute key to a successful cabinet painting project. Skipping or rushing the prep work will lead to peeling paint, uneven finishes, and a less durable result.
Can I paint laminate cabinets? Yes, you can paint laminate cabinets, but it requires specific preparation and primers to ensure the paint adheres properly. We’ll cover this in detail later.
Planning Your Kitchen Cabinet Update
Before you pick up a brush, take some time to plan your kitchen cabinet update. This will save you time and frustration down the line.
Choosing Your Color and Finish
- Color: Consider your existing kitchen decor, the amount of natural light, and the overall style you want to achieve. Lighter colors can make a kitchen feel brighter and more spacious, while darker colors can add drama and sophistication.
- Finish:
- Satin/Eggshell: A popular choice for cabinets. It offers a slight sheen, is easy to clean, and hides minor imperfections well.
- Semi-Gloss: More reflective than satin, making it very durable and easy to wipe down. However, it can highlight imperfections.
- Matte: Offers a sophisticated, low-sheen look. It can be harder to clean and may show scuffs more easily.
Estimating Paint Quantities
A good rule of thumb is to plan for one quart of paint per 100 square feet of cabinet surface area. It’s always better to have a little extra than to run out mid-project.
Gathering Your Cabinet Painting Supplies
Having all your cabinet painting supplies ready is crucial for a smooth process.
Essential Supplies List:
- Screwdriver: To remove cabinet doors and hardware.
- Degreaser or TSP (Trisodium Phosphate): For thorough cleaning.
- Sandpaper: Various grits (120-grit for initial sanding, 220-grit for smoothing).
- Sanding Block or Electric Sander: For even sanding.
- Tack Cloths: To remove dust after sanding.
- Primer: High-quality bonding primer is essential, especially for laminate or previously varnished surfaces.
- Paint: Your chosen cabinet paint (acrylic enamel or hybrid enamel).
- Paint Rollers: Foam rollers (3/8 inch nap) for smooth surfaces.
- Paint Brushes: High-quality angled sash brushes for cutting in and detail work.
- Paint Tray: For rolling paint.
- Painter’s Tape: For masking off areas you don’t want to paint.
- Drop Cloths or Plastic Sheeting: To protect your floors and countertops.
- Safety Glasses and Gloves: For protection.
- Dust Mask or Respirator: Especially when sanding.
- Clean Rags: For wiping and cleaning.
- Optional: Paint Sprayer: For a professional, flawless finish (requires more practice and setup).
Step-by-Step: How to Prep Cabinets for Painting
This is arguably the most critical phase. Dedicate ample time to how to prep cabinets for painting to ensure a lasting, beautiful finish.
Step 1: Remove Doors, Drawers, and Hardware
- Use a screwdriver to carefully detach each cabinet door.
- Remove drawer fronts.
- Take off all hinges, knobs, and pulls. Keep them organized, perhaps in labeled plastic bags, so you know which hardware belongs to which door or drawer.
Step 2: Clean the Cabinets Thoroughly
- Kitchen cabinets accumulate grease and grime over time. You need to remove every trace of this.
- Mix a solution of degreaser or TSP with warm water.
- Using a sponge or cloth, meticulously clean all surfaces of the doors, drawer fronts, and cabinet frames.
- Rinse thoroughly with clean water and a clean sponge, and allow everything to dry completely. Any residual grease will prevent the primer and paint from adhering.
Step 3: Sanding for Adhesion
Sanding creates a surface for the primer and paint to grip.
- For Wood Cabinets:
- Start with 120-grit sandpaper to lightly scuff the surface. You’re not trying to remove the existing finish, just to create a dull, uniform surface.
- If there are any nicks or rough spots, you can use a slightly coarser grit (like 100-grit) with a sanding block to smooth them out, then follow with 120-grit.
- Follow up with 220-grit sandpaper to create a smoother finish.
- For Laminate Cabinets:
- Laminate can be tricky. Use a fine-grit sandpaper (around 150-220 grit).
- The goal is to lightly scuff the surface without going through the laminate layer.
- Pay close attention to any glossy areas.
- Sanding Technique:
- Use a sanding block for flat surfaces to ensure even pressure.
- For curved or detailed areas, you might need to wrap sandpaper around a soft cloth or use a flexible sanding sponge.
- Sand in the direction of the wood grain if applicable.
Step 4: Dust Removal
This is where tack cloths shine.
- After sanding, a fine layer of dust will cover your cabinets.
- Use a vacuum with a brush attachment to remove as much dust as possible.
- Then, wipe down all surfaces with a tack cloth. These sticky cloths trap fine dust particles that a regular cloth might miss. Repeat this process until no dust is visible.
Step 5: Fill Imperfections
- Inspect your cabinets for any holes (from previous hardware, for example) or small cracks.
- Use a good quality wood filler or a stainable/paintable caulk to fill these imperfections.
- Allow the filler to dry completely according to the manufacturer’s instructions.
- Once dry, lightly sand the filled areas smooth with 220-grit sandpaper and wipe away dust with a tack cloth.
Step 6: Masking
Protect areas you don’t want to paint.
- Use high-quality painter’s tape to carefully mask off any areas that won’t be painted, such as the inside of the cabinet frames, countertops, or backsplash.
- Ensure the tape is pressed down firmly to prevent paint bleed.
Applying Primer: The Foundation for Success
Primer is not an optional step; it’s essential for good adhesion and a smooth, opaque finish.
Why Prime?
- Adhesion: Primer helps paint stick to surfaces, especially tricky ones like laminate or glossy finishes.
- Uniformity: It creates an even base color, so your topcoat color looks consistent.
- Blocking Stains: Some primers can block wood tannins from bleeding through your paint.
Choosing the Right Primer
- For Wood Cabinets: A good quality water-based or oil-based bonding primer is recommended. If your wood is prone to tannins (like oak or cherry), consider an oil-based or shellac-based primer specifically designed for stain blocking.
- For Laminate Cabinets: You must use a high-adhesion bonding primer formulated for slick surfaces. Many brands offer excellent primers specifically for laminate or melamine.
Primer Application Techniques
- Brush: Use a good quality angled brush for edges and details.
- Roller: Use a foam roller for larger, flat surfaces. Apply a thin, even coat.
- Sprayer: If you have a paint sprayer, this is an excellent option for primer for a perfectly smooth finish. Ensure proper ventilation and mask off surrounding areas meticulously.
- Coats: Apply one or two thin, even coats of primer, allowing each coat to dry completely according to the manufacturer’s instructions before applying the next.
- Light Sanding (Optional but Recommended): After the primer is dry, very lightly sand the entire surface with 220-grit sandpaper or a fine-grit sanding sponge. This will create an even smoother surface for your paint. Wipe away dust with a tack cloth.
Painting Your Kitchen Cabinets: The Transformation
Now for the exciting part – applying the color!
Cabinet Painting Techniques for a Smooth Finish
- Brush Strokes: For cutting in edges and details, use smooth, even strokes with your angled brush. Avoid over-brushing, which can create texture.
- Rolling: Load your foam roller with a moderate amount of paint. Roll back and forth in a “W” or “M” pattern, then lightly backroll over the area to create an even coat without roller marks. Work in manageable sections.
- Drying Time: Allow adequate drying time between coats. Rushing this can lead to lifting or smudging. Follow the paint manufacturer’s recommendations.
Applying the Paint: Step-by-Step
-
First Coat:
- Start with your cabinet doors and drawer fronts laid flat.
- Use your brush to paint the edges and any detailed areas first.
- Then, use your roller to apply a thin, even coat to the larger surfaces.
- Paint the cabinet frames last, using your brush for edges and your roller for flat areas.
- Let the first coat dry completely.
-
Second Coat:
- Once the first coat is dry to the touch, inspect for any missed spots or thin areas.
- Apply a second thin, even coat, following the same technique as the first.
- Again, allow adequate drying time.
-
Third Coat (If Necessary):
- For deep colors or if you notice any inconsistencies, a third thin coat might be beneficial. Always aim for thin, even coats rather than one thick, gloppy one.
Drying and Curing
- Drying: This is the time it takes for the paint to be dry to the touch and not tacky.
- Curing: This is when the paint reaches its maximum hardness and durability. This can take several weeks. During the curing process, be gentle with your cabinets. Avoid abrasive cleaners or heavy scrubbing.
Reassembling Your Kitchen Cabinets
Once the paint is fully dry (usually 24 hours after the final coat), it’s time to put everything back together.
- Reattach Hardware: Carefully screw the knobs, pulls, and hinges back onto your cabinet doors and drawers.
- Rehang Doors and Drawers: Attach the doors and drawers back onto the cabinet frames. Adjust hinges if needed to ensure doors hang straight and close properly.
Painting Laminate Cabinets: Special Considerations
Painting laminate cabinets presents unique challenges due to the slick, non-porous surface. Here’s how to tackle it:
- Crucial Prep: Thorough cleaning and light sanding are even more vital.
- The Right Primer: You absolutely must use a high-adhesion bonding primer specifically designed for laminate or melamine. Standard primers may not stick, leading to peeling.
- Paint Choice: Use a high-quality acrylic enamel or a cabinet-specific paint.
- Avoid Heavy Sanding: Do not over-sand laminate, as you can easily damage the surface. The goal is to create a slight “tooth” for the primer.
- Thin Coats: Apply very thin, even coats of both primer and paint. Thick coats are more prone to peeling on laminate.
- Patience: Laminate can be more unforgiving. Take your time and follow each step meticulously.
Painting Wood Cabinets: Tips for a Beautiful Finish
Wood cabinets offer a great canvas for painting, but different types of wood may require slightly different approaches.
- Wood Type: If you have wood with strong grain patterns (like oak), you might want to consider a wood grain filler if you prefer a smoother look. Otherwise, embracing the natural texture can be beautiful.
- Tannin Blocking: Woods like oak, cherry, and mahogany contain tannins that can bleed through lighter paint colors. If you’re painting with a light color, use a stain-blocking primer (oil-based or shellac-based) to prevent this.
- Sanding: Light sanding with 120-grit followed by 220-grit is usually sufficient to prep wood.
- Grain Direction: Always sand and paint in the direction of the wood grain for the most natural appearance.
Pro Tips for a Flawless Finish
These cabinet painting tips from professionals will elevate your DIY project:
- Work in a Well-Ventilated Area: Open windows and use fans to ensure good airflow.
- Use High-Quality Brushes and Rollers: Cheap tools will leave brush marks and roller texture. Invest in good ones.
- Thin Coats are Key: It’s better to apply three thin coats than two thick ones. Thin coats dry faster and adhere better, reducing the risk of drips and runs.
- Don’t Skip the Tack Cloth: Seriously, dust is your enemy. Use tack cloths religiously after sanding.
- Test Your Paint: If possible, paint a scrap piece of wood or an inconspicuous area to test your color and finish.
- Allow Ample Drying Time: This cannot be stressed enough. Patience during the drying and curing phases is vital.
- Clean as You Go: Wipe up any drips or splatters immediately before they dry.
- Consider a Paint Sprayer: For the most professional finish, especially on intricate cabinet doors, a paint sprayer is the way to go. However, it requires practice and significant setup.
- Cabinet Painting Kits: Some brands offer specific cabinet painting kits that include all the necessary tools and sometimes even specialized primers and paints.
- Number Your Doors: If you have many doors, number them on the inside edge so you know exactly where each one goes.
Maintenance of Painted Cabinets
To keep your newly painted cabinets looking their best:
- Gentle Cleaning: Use a soft cloth and mild dish soap diluted in water. Avoid abrasive cleaners or scrub brushes.
- Wipe Up Spills: Clean up any spills or splatters promptly.
- Avoid Harsh Chemicals: Bleach or ammonia-based cleaners can damage the paint finish.
- Be Mindful of Heat: Avoid placing hot pans directly on painted surfaces without protection.
Frequently Asked Questions (FAQ)
-
Q: How long does it take to paint kitchen cabinets?
A: The entire process, including prep, priming, and multiple coats of paint with drying time, can take anywhere from a few days to a week or more, depending on your pace and the number of cabinets. -
Q: Can I paint my existing cabinet finish without sanding?
A: While some “no-sand” primers exist, for a truly durable and professional finish, light sanding is highly recommended to create a surface for the primer and paint to adhere to. Skipping sanding is a common cause of peeling paint. -
Q: How many coats of paint do I need?
A: Typically, two to three thin coats of paint are sufficient for a good coverage and finish. -
Q: What’s the difference between drying and curing?
A: Drying means the paint is no longer wet to the touch. Curing is when the paint hardens fully and reaches its maximum durability, which can take several weeks. Handle cabinets gently during the curing period. -
Q: Should I paint the inside of the cabinets?
A: Most people choose not to paint the inside of the cabinet boxes unless they are looking for a specific aesthetic. Painting the doors and drawer fronts is the most common approach for a significant kitchen cabinet update.
By following these detailed steps and incorporating these pro tips, you’ll be well on your way to a beautiful and updated kitchen. Enjoy your refreshed cabinets!