
A kitchen backsplash is a protective layer that covers the wall behind your kitchen counter and stove. Can you install a backsplash yourself? Yes, many homeowners can successfully tackle a DIY backsplash project! Who installs backsplashes? Typically, a homeowner, a contractor, or a tile installer.
Adding a kitchen backsplash is one of the most impactful ways to update your kitchen’s look. It’s a chance to inject personality, protect your walls from splashes and stains, and increase your home’s value. Whether you’re dreaming of a classic subway tile or a bold, modern mosaic, this comprehensive guide will walk you through everything you need to know to achieve a beautiful and functional backsplash.
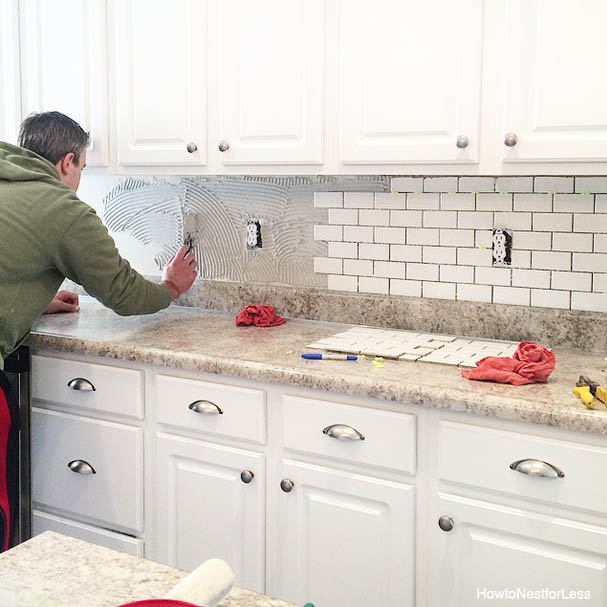
Image Source: howtonestforless.com
Why Add a Kitchen Backsplash?
Beyond aesthetics, a backsplash serves crucial practical purposes:
- Protection: It shields your walls from grease, water, food splatters, and heat, making them easier to clean and preventing damage to the drywall.
- Hygiene: A smooth, non-porous surface is simpler to wipe down, contributing to a cleaner kitchen environment.
- Style Statement: It’s a focal point that can tie together your kitchen’s design, adding color, texture, and pattern.
- Increased Home Value: A well-chosen and expertly installed backsplash is a desirable feature for potential buyers.
Choosing Your Backsplash Materials: A World of Options
The best kitchen backsplash for you depends on your style, budget, and how much maintenance you’re willing to do. Here’s a look at popular backsplash materials:
Tile Backsplashes
Tile remains the king of backsplash materials, offering incredible versatility.
- Ceramic Tile:
- Pros: Affordable, wide variety of styles, colors, and patterns, easy to cut and install, relatively durable.
- Cons: Can chip or crack if hit hard, some glazes can be slippery, requires sealing for some types.
- Popular Styles: Subway tile, mosaic tiles, patterned tiles, large format tiles.
- Porcelain Tile:
- Pros: Extremely durable, water-resistant, stain-resistant, less prone to chipping than ceramic, can mimic natural stone or wood.
- Cons: Denser and harder to cut than ceramic, can be more expensive.
- Popular Styles: Similar to ceramic, but often with more realistic natural stone looks.
- Natural Stone Tile (Marble, Granite, Travertine, Slate):
- Pros: Luxurious, unique, adds significant value, very durable (especially granite and slate).
- Cons: Can be expensive, porous and requires regular sealing to prevent stains, can be heavy and difficult to cut, some stones are prone to chipping or etching (like marble).
- Popular Styles: Classic marble subway, honed granite slabs, tumbled travertine.
- Glass Tile:
- Pros: Reflective and bright, easy to clean, water-resistant, available in a vast array of colors and finishes (clear, frosted, iridescent).
- Cons: Can be more expensive, prone to chipping or cracking, requires specialized adhesive and cutting tools, grout lines can show more.
- Popular Styles: Small mosaics, subway tiles, custom patterns.
- Metal Tile (Stainless Steel, Copper, Aluminum):
- Pros: Modern and sleek, durable, easy to clean, heat-resistant.
- Cons: Can show fingerprints and scratches, can be more expensive, requires specialized cutting tools, installation can be tricky due to adhesive challenges.
- Popular Styles: Stainless steel subway, copper mosaics, brushed aluminum panels.
Other Backsplash Materials
- Peel-and-Stick Backsplashes:
- Pros: Extremely easy to install, affordable, no special tools or adhesives needed, great for renters or quick updates.
- Cons: Durability can vary, may not look as high-end as traditional materials, can be difficult to remove cleanly.
- Popular Styles: Often mimic subway tile, brick, or marble.
- Solid Surface (e.g., Corian):
- Pros: Seamless appearance, non-porous, easy to clean, very durable.
- Cons: Can be expensive, limited style options compared to tile, susceptible to scratching.
- Slab Backsplashes (Quartz, Granite, Marble):
- Pros: Creates a seamless, luxurious look with minimal grout lines, highly durable and easy to clean.
- Cons: Very expensive, requires professional installation, heavy.
Planning Your DIY Backsplash Project
A successful DIY backsplash starts with careful planning.
Step 1: Design and Style Selection
Consider your existing kitchen:
- Cabinetry: Light cabinets might pair well with darker tiles, while dark cabinets can be brightened by lighter tiles.
- Countertops: Coordinate colors and patterns. If your countertops are busy, opt for a simpler backsplash, and vice-versa.
- Overall Kitchen Style: Modern, traditional, farmhouse, industrial? Choose a backsplash that complements your theme.
Popular Backsplash Patterns
- Subway Tile: A timeless classic, laid in a brick-like pattern.
- Herringbone: A V-shaped pattern that adds visual interest.
- Stacked: Tiles laid in straight, clean horizontal or vertical lines.
- Basketweave: Tiles arranged to resemble woven material.
- Checkerboard: Alternating colors for a graphic look.
- Penny Tile: Small, circular tiles that create a mosaic effect.
- Moroccan Fish Scale: Distinctive, scale-like tiles that offer a unique flair.
Step 2: Calculate Your Needs
Accurate measurement is key. You don’t want to run out of tiles mid-project or buy far too many.
How to Use a Backsplash Calculator
A backsplash calculator is a handy tool.
1. Measure: Measure the height of the area you want to cover (from countertop to cabinet bottom). Measure the width of each section.
2. Calculate Square Footage: For each section, multiply height by width. Add these areas together. For irregular shapes, break them down into rectangles and squares.
3. Add Waste: Always add 10-15% extra for cuts, mistakes, and future repairs. If you’re using a complex backsplash pattern, err on the side of 15% or more.
4. Check Tile Coverage: Most tiles are sold by the square foot or by the box. Ensure your calculation matches the product’s packaging. For example, if your backsplash is 30 sq ft and tiles are sold in boxes covering 10 sq ft, you’ll need 3 boxes (plus waste).
Step 3: Gather Your Tools and Materials
Here’s a typical list for a tile backsplash installation:
- Backsplash Tiles: Your chosen material.
- Tile Adhesive/Thin-set Mortar: The backsplash adhesive suitable for your tile type. Mastic is good for ceramic and porcelain in dry areas; thin-set is recommended for glass, natural stone, and high-moisture areas.
- Grout: Choose a color that complements or contrasts with your tiles. Sanded grout is for wider grout lines (1/8″ or more); unsanded grout is for narrower lines.
- Grout Sealer: Protects the grout from stains and moisture.
- Tile Spacers: To ensure consistent grout lines.
- Notched Trowel: For spreading the adhesive. The notch size depends on the tile size (smaller tiles need smaller notches).
- Tile Cutter (Wet Saw or Scoring Cutter): For making straight and intricate cuts. A wet saw is essential for glass and natural stone.
- Utility Knife: For trimming and small cuts.
- Level: To ensure tiles are straight.
- Tape Measure: For accurate measurements.
- Pencil: For marking.
- Sponge and Bucket: For cleaning excess adhesive and grout.
- Rubber Grout Float: For spreading grout.
- Safety Glasses: Crucial for eye protection.
- Gloves: To protect your hands.
- Drop Cloths: To protect your countertops and floors.
- Caulk: For sealing edges where the backsplash meets the countertop and cabinets.
The DIY Tile Backsplash Installation Process
Let’s break down the tile backsplash installation.
Preparation is Key
- Clear the Area: Remove everything from your countertops. Cover them with drop cloths.
- Turn Off Power: If working near outlets or switches, turn off the power at the breaker box. Remove outlet covers.
- Clean the Wall: Ensure the wall surface is clean, dry, and free from grease, dust, or old adhesive. Sand down any rough spots.
- Mark Your Lines:
- Find the center of the wall space you’re tiling.
- Use a level to draw a horizontal guideline from the countertop up to where the bottom of your backsplash will be. This ensures your first row of tiles is perfectly straight.
- For a level first row, especially with subway tile, you might want to create a ledger board: a straight piece of wood screwed temporarily to the wall along your guideline. This provides support for the first row as the adhesive dries.
Applying Adhesive
- Mix Adhesive (if using thin-set): Follow the manufacturer’s instructions precisely. Aim for a peanut-butter-like consistency.
- Spread Adhesive: Using the flat side of your notched trowel, spread a thin, even layer of adhesive onto a small section of the wall (about 2-3 sq ft at a time). Then, use the notched side to create consistent ridges. This helps ensure good adhesion and prevents the adhesive from drying out before you set tiles.
Setting the Tiles
- Start Laying Tiles: Begin at your starting point (often the center or a corner), pressing the first tile firmly into the adhesive with a slight twisting motion.
- Use Spacers: Place tile spacers between each tile to maintain consistent grout lines.
- Work in Sections: Continue laying tiles, working outwards from your starting point. Keep checking your level to ensure rows are straight.
- Make Cuts: As you reach edges, outlets, or corners, you’ll need to cut tiles.
- Scoring Cutter: Score the tile surface with the cutter, then snap it along the score line. Best for straight cuts on ceramic and porcelain.
- Wet Saw: More versatile for complex shapes, curves, and harder materials like glass or stone.
- Outlet Cutouts: Trace the outlet box onto the tile and cut out the shape. Remember to account for the tile thickness and grout line.
- Check for Adhesion: Press tiles firmly into the adhesive. If a tile feels loose, add a bit more adhesive to the wall or the back of the tile (back-buttering).
- Clean Up Excess Adhesive: Wipe away any adhesive that squeezes out between tiles or onto the tile faces with a damp sponge before it dries.
Grouting the Backsplash
- Remove Spacers: Once the adhesive has cured (usually 24 hours, check manufacturer instructions), carefully remove all tile spacers.
- Mix Grout: Prepare your grout for backsplash according to the manufacturer’s instructions. It should be a thick, paste-like consistency.
- Apply Grout: Using a rubber grout float, spread the grout over the tiles, working it into the gaps at a 45-degree angle. Ensure all the spaces between the tiles are completely filled.
- Remove Excess Grout: Hold the float at a steeper angle and scrape off as much excess grout as possible from the tile faces.
- Initial Wipe Down: After about 15-30 minutes (check grout instructions for timing), when the grout starts to firm up slightly, use a damp sponge to gently wipe the tiles. Rinse the sponge frequently in clean water. Be careful not to pull grout out of the joints. Aim for a diagonal motion across the tiles.
- Second Wipe Down: After another 30-60 minutes, repeat the wiping process with a clean, damp sponge to remove any remaining grout haze.
Sealing and Finishing
- Let Grout Cure: Allow the grout to cure completely, typically 48-72 hours.
- Apply Grout Sealer: Once cured, apply a grout sealer to the grout lines using a small brush or applicator. This protects the grout from stains and moisture. Wipe off any excess sealer from the tile faces immediately.
- Caulk Edges: Apply a bead of caulk around the edges where the backsplash meets the countertop and cabinets. This provides a waterproof seal and a clean finish.
- Reinstall Outlet Covers: Once everything is dry and cured, reinstall your outlet covers.
Stylish Kitchen Backsplash Ideas to Inspire You
Beyond the classic subway tile, explore these kitchen backsplash ideas for a unique look:
Modern & Minimalist
- Large Format Porcelain or Ceramic Tiles: Minimal grout lines create a sleek, uninterrupted surface.
- Glass Mosaics: Offer a subtle shimmer and can reflect light beautifully.
- Solid Slab (Quartz or Dekton): For a truly seamless and high-end appearance.
- Stacked Stone Veneer: Offers natural texture without the grout hassle of traditional stone tiles.
Farmhouse & Rustic Charm
- Beadboard: A classic, affordable option for a cottage or farmhouse feel.
- Whitewashed Brick Veneer: Provides the look of exposed brick with a softer, country touch.
- Tumbled Travertine or Limestone: Natural stone with an aged, textured finish.
- Patterned Ceramic Tiles: Consider vintage-inspired or geometric patterns in muted tones.
Bold & Bohemian
- Moroccan Zellige Tiles: Handmade, irregular tiles with a unique, artisanal glaze.
- Colorful Ceramic Mosaics: Mix and match vibrant colors and finishes for a lively look.
- Statement Patterned Tiles: Opt for a single bold pattern behind the stove as a focal point.
- Hand-Painted Tiles: Unique pieces that add an artistic touch.
Industrial Edge
- Stainless Steel Sheets or Mosaics: Reflective and durable, perfect for a modern kitchen.
- Metal Tiles (Copper, Pewter): Add warmth and industrial texture.
- Exposed Brick (Real or Veneer): A timeless industrial element.
- Concrete Look Porcelain Tiles: Mimic the raw, urban aesthetic of concrete.
Frequently Asked Questions About Kitchen Backsplashes
Q1: How much does a kitchen backsplash cost?
The cost varies greatly depending on the backsplash materials chosen and whether you DIY or hire a professional. Basic ceramic subway tiles can be as low as $1-$5 per square foot, while natural stone or high-end glass mosaics can range from $10-$30+ per square foot. Professional installation can add $500-$2000+ depending on the complexity and square footage. A backsplash calculator can help estimate material costs.
Q2: What is the easiest backsplash to install for a DIYer?
Peel-and-stick backsplash tiles are generally the easiest to install. For tile, ceramic subway tiles with a simple layout are also quite manageable for beginners.
Q3: How do I clean a kitchen backsplash?
Cleaning depends on the material.
* Tile (Ceramic, Porcelain): Mild dish soap and water with a soft cloth or sponge. For tough grime, a diluted all-purpose cleaner can be used.
* Natural Stone: Use specialized stone cleaners to avoid etching or damaging the surface. Always seal natural stone regularly.
* Glass: Glass cleaner works well.
* Metal: Stainless steel cleaners or mild soap and water.
Q4: Can I install a backsplash over existing tile?
Yes, in some cases. If the existing tile is in good condition, flat, and well-adhered, you can often tile over it. You’ll need to clean it thoroughly, possibly lightly sand it for better adhesion, and use a suitable adhesive (often thin-set is recommended). Ensure the new tile and adhesive can handle the added thickness.
Q5: How high should a backsplash go?
The standard height for a kitchen backsplash is typically from the countertop up to the bottom of the upper cabinets. However, you can extend it higher, especially above the stove, for better protection and a more dramatic look. Some people tile all the way to the ceiling for a cohesive statement.
Q6: What kind of grout is best for a backsplash?
For most tile backsplashes with grout lines 1/8″ or wider, sanded grout is recommended. For very narrow grout lines (less than 1/8″), unsanded grout is preferred to prevent scratching the tiles. Epoxy grout is another option; it’s very durable, stain-resistant, and waterproof but more challenging to install. Always consider sealing your grout for protection.
Q7: Do I need to seal my backsplash?
It depends on the material.
* Ceramic and Porcelain Tiles: Most are glazed and don’t require sealing, but check the manufacturer’s specifications.
* Natural Stone: Absolutely. Marble, travertine, limestone, and even some granites are porous and need regular sealing (often annually) to prevent stains.
* Glass Tiles: Do not require sealing.
* Grout: Yes, it’s highly recommended to seal grout lines to prevent staining and moisture absorption.
By following these steps and considering the various backsplash materials and backsplash design options, you can confidently tackle your own DIY backsplash project and transform your kitchen into a stylish and functional space. Remember to measure twice, cut once, and enjoy the process of creating your dream kitchen!