
Can you redo kitchen cabinets yourself? Yes, you absolutely can redo kitchen cabinets yourself! With the right plan and a little effort, you can transform your tired, outdated kitchen cabinets into something fresh and fabulous. This guide will walk you through the most popular DIY cabinet updates, from simple cosmetic changes to more involved transformations like cabinet refacing. Get ready to give your kitchen a stunning makeover without breaking the bank.
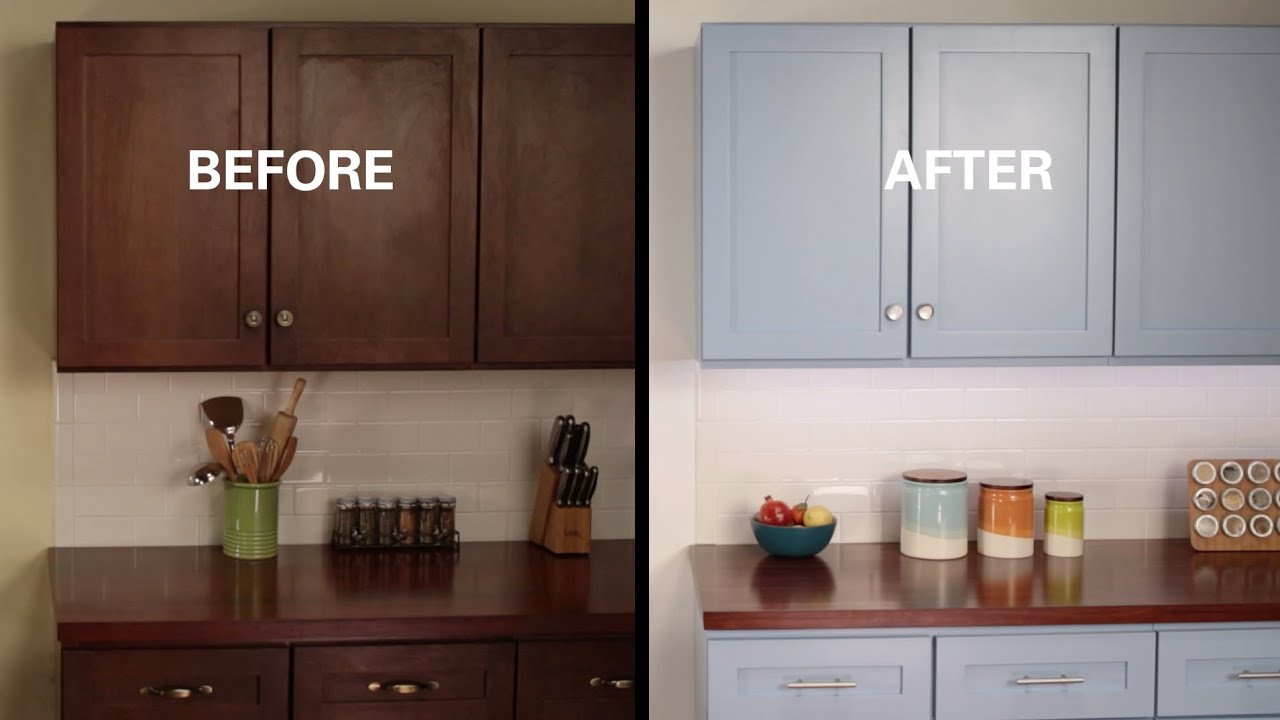
Image Source: i.ytimg.com
Why Redo Your Kitchen Cabinets?
Your kitchen cabinets are the workhorses of your cooking space. They hold your dishes, cookware, and pantry staples. Over time, they can start to look worn, dated, or just plain uninspiring. Redoing your cabinets can:
- Boost Curb Appeal: A fresh set of cabinets can dramatically improve the overall look of your kitchen.
- Increase Home Value: A kitchen renovation, even a partial one, can add significant value to your home.
- Improve Functionality: Sometimes, a makeover can involve upgrading hardware or drawer slides, making your cabinets work better.
- Save Money: Compared to a full cabinet replacement, DIY updates are far more budget-friendly.
- Personalize Your Space: You get to choose the colors, finishes, and styles that perfectly match your taste.
Popular DIY Kitchen Cabinet Makeover Options
There are several fantastic ways to refresh your kitchen cabinets. Each offers a different level of commitment, cost, and visual impact. Let’s dive into the most common and effective DIY cabinet updates.
1. Cabinet Painting: The Go-To DIY Transformation
Cabinet painting is often the most accessible and impactful DIY project for a kitchen cabinet makeover. It allows you to completely change the color and feel of your kitchen without the expense of replacing doors or refacing.
What You Need for Cabinet Painting:
- Screwdriver: To remove doors and hardware.
- Cleaning Supplies: Degreaser, mild soap, water, rags.
- Sanding Supplies: Sandpaper (120-220 grit), sanding block or orbital sander.
- Primer: High-quality cabinet primer.
- Paint: Cabinet-specific paint (alkyd or acrylic enamel recommended).
- Brushes and Rollers: High-density foam rollers for doors and drawers, angled brushes for details.
- Paint Trays: For easy pouring and application.
- Painter’s Tape: To protect adjacent surfaces.
- Drop Cloths: To protect your floors and countertops.
- Optional: Tack cloth for dust removal, putty knife for minor repairs.
The Cabinet Painting Process: Step-by-Step
Step 1: Preparation is Key
This is the most crucial step for a professional-looking finish.
- Empty Cabinets: Remove everything from your cabinets and drawers.
- Remove Doors and Drawers: Use your screwdriver to detach all cabinet doors and drawer fronts. Label them with masking tape so you know where they go back.
- Remove Hardware: Take off hinges, knobs, and pulls.
- Clean Thoroughly: Use a degreaser to remove any grease, grime, or sticky residue. This is essential for paint adhesion. A solution of TSP (trisodium phosphate) or a TSP substitute can also be effective.
- Repair Imperfections: Fill any holes or gouges with wood filler. Let it dry completely, then sand smooth.
- Sand Surfaces: Lightly sand all cabinet surfaces, doors, and drawer fronts. This creates a “tooth” for the primer to adhere to. Use 120-150 grit sandpaper for rougher areas and 220 grit for a smoother finish.
- Clean Again: After sanding, wipe down all surfaces with a tack cloth or a damp (not wet) cloth to remove dust.
Step 2: Priming for Durability
Primer creates a smooth, even base and helps your paint adhere better, preventing chipping and wear.
- Apply Primer: Apply one or two thin, even coats of a high-quality cabinet primer. Use a brush for edges and corners and a foam roller for flat surfaces.
- Allow Drying Time: Let the primer dry completely according to the manufacturer’s instructions.
- Light Sanding (Optional): After the primer dries, you can lightly sand with 220-grit sandpaper for an ultra-smooth finish. Wipe away dust with a tack cloth.
Step 3: Painting for a Fresh Look
Now for the exciting part!
- Apply Paint: Apply thin, even coats of your chosen cabinet paint. Avoid overloading your brush or roller, as this can lead to drips and unevenness.
- Work in Sections: Paint doors and drawer fronts horizontally on a flat surface. For cabinet boxes, paint one section at a time.
- Multiple Coats: Most projects will require at least two coats of paint. Allow each coat to dry thoroughly before applying the next. Follow the paint manufacturer’s recommended drying times.
- Smooth Finish: Use your foam roller for the main surfaces and your angled brush for any detailed areas or edges.
- Drying and Curing: Allow the paint to dry for at least 24 hours before reassembling. Full curing can take several days to a week, so be gentle with the cabinets during this time.
Step 4: Reassembly and Finishing Touches
- Reattach Hardware: Once the paint is fully dry, reattach your hinges, knobs, and pulls.
- Install Doors and Drawers: Carefully rehang your cabinet doors and reinsert your drawers.
- Cabinet Hardware Replacement: This is a great time to update your cabinet hardware. New knobs or pulls can drastically change the look of your cabinets.
2. Cabinet Refacing: A More Dramatic Kitchen Cabinet Makeover
Cabinet refacing is a more involved process than painting but offers a significant transformation. Instead of replacing the entire cabinet boxes, you cover the existing frames with a new veneer or laminate, and replace the doors and drawer fronts with new ones. This gives your kitchen a brand-new look without the cost of full replacement.
What is Cabinet Refacing?
Cabinet refacing involves:
- Overlaying Cabinet Boxes: The visible parts of your existing cabinet frames (the face frames) are covered with a thin layer of wood veneer, laminate, or a durable polymer material. This hides any old finishes or damage.
- Replacing Doors and Drawer Fronts: You get brand-new doors and drawer fronts in a style and material of your choice. This is where you can truly update the look of your kitchen.
- New Hardware: You can also update your cabinet hardware during this process.
Pros of Cabinet Refacing:
- Significant Aesthetic Upgrade: Completely changes the look of your cabinets.
- Durable Finish: New doors and veneers are often more durable than older finishes.
- Faster than Full Replacement: Generally quicker than gutting and rebuilding the entire kitchen.
- Cost-Effective: Cheaper than buying entirely new custom cabinets.
Cons of Cabinet Refacing:
- More Complex than Painting: Requires more precise work and potentially specialized tools.
- Higher Cost than Painting: Even DIY refacing is more expensive than painting.
- Cabinet Interior Remains the Same: The inside of your cabinet boxes won’t change.
The DIY Cabinet Refacing Process:
While often done by professionals, DIY cabinet refacing is possible with careful planning.
- Measure Precisely: Accurately measure your existing cabinet frames, doors, and drawer fronts.
- Order New Components: Purchase veneer or laminate for the frames and new doors and drawer fronts. Many companies offer custom-sized options.
- Prepare Cabinet Boxes: Clean the existing cabinet frames thoroughly.
- Apply Veneer/Laminate: Carefully apply the veneer or laminate to the face frames, ensuring a smooth, bubble-free finish. This often involves a strong adhesive and precise cutting.
- Install New Doors and Drawer Fronts: Attach new hinges to the doors and install them onto the refaced cabinet boxes. Attach drawer fronts to existing drawer boxes.
- Install Hardware: Add your new knobs or pulls.
3. Cabinet Resurfacing: A Smooth Operator
Cabinet resurfacing is a broader term that can encompass painting, staining, or applying new finishes. If you’re looking to refresh the look of your cabinets without a drastic change, or if your cabinets are in good condition but just need a facelift, resurfacing is a great option. This can also include minor repairs and updating.
Key Aspects of Cabinet Resurfacing:
- Sanding and Refinishing: This involves sanding down the existing finish to bare wood or a smooth surface, then applying a new stain or sealant. This is a labor-intensive process but can bring back the beauty of natural wood.
- Staining: If you have wooden cabinets, you can change their color by applying a new stain. This requires thorough sanding to remove the old finish.
- Sealing: After staining or painting, a protective sealant (like polyurethane) is applied to protect the finish from moisture and wear.
Cabinet Refinishing: Bringing Wood Back to Life
If you have beautiful wood cabinets that have faded or been damaged, cabinet refinishing is an excellent DIY cabinet update.
The Cabinet Refinishing Process:
- Disassembly: Remove doors, drawers, and hardware.
- Sanding: This is the most critical step. Sand down the entire cabinet surface, doors, and drawer fronts until all old finish is removed. Start with a coarser grit (e.g., 80-100 grit) if there’s a lot of old finish or damage, then move to finer grits (150, 220) for smoothness.
- Cleaning: Wipe down all surfaces to remove dust.
- Staining: Apply your chosen wood stain with a brush or cloth, following the grain of the wood. Wipe off excess stain according to product instructions.
- Sealing: Once the stain is dry, apply several coats of a durable sealant like polyurethane or varnish. Lightly sand between coats with very fine-grit sandpaper (320-400 grit) for a smooth finish.
4. Cabinet Door Replacement: A Quick Style Update
If your cabinet boxes are in good shape but you dislike the style of your doors and drawer fronts, cabinet door replacement is a fantastic solution. This is a simpler approach than full refacing, as you only swap out the visible panels.
When to Consider Cabinet Door Replacement:
- Outdated Styles: You want a more modern or different look.
- Damaged Doors: Some of your doors are beyond repair.
- Desire for a New Material: You want to switch from laminate to wood, or vice versa.
The Cabinet Door Replacement Process:
- Measure Existing Doors: Accurately measure the height and width of your current doors. Also, measure the style and thickness.
- Order New Doors: Purchase pre-made or custom-made cabinet doors and drawer fronts. Ensure they match your existing cabinet box dimensions and hinge types.
- Prepare Cabinet Boxes: Clean the cabinet boxes. If your new doors require different hinge placements, you may need to fill old holes and drill new ones.
- Install New Doors: Attach the new hinges to the new doors, then attach the doors to the cabinet boxes.
- Install Drawer Fronts: Attach the new drawer fronts to your existing drawer boxes.
- Add Hardware: Install your chosen knobs or pulls.
5. Cabinet Hardware Replacement: The Finishing Touch
This is perhaps the easiest and most affordable DIY cabinet update, yet it can have a surprisingly big impact. Swapping out old, dated hardware for something new can instantly modernize your kitchen.
What to Consider for Cabinet Hardware Replacement:
- Style: From sleek modern pulls to ornate traditional knobs, choose hardware that complements your kitchen’s overall design.
- Finish: Brushed nickel, matte black, brass, chrome – the finish can dramatically alter the look.
- Functionality: Ensure pulls are comfortable to grip and drawers slide smoothly.
- Hole Spacing: Measure the distance between screw holes on your existing hardware to ensure the new hardware will fit without drilling new holes.
The Hardware Replacement Process:
- Remove Old Hardware: Use a screwdriver to detach the old knobs and pulls.
- Clean the Area: Wipe down the cabinet door or drawer front where the old hardware was.
- Install New Hardware: Screw in the new knobs or pulls.
6. Upgrading Cabinet Drawer Slides: Enhancing Functionality
If your drawers are sticking, sagging, or difficult to open and close, upgrading your cabinet drawer slides is a highly worthwhile DIY project. Smooth-gliding drawers make a huge difference in the daily usability of your kitchen.
Types of Drawer Slides:
- Ball-Bearing Slides: These are typically the smoothest and most durable, offering full extension.
- Roller Slides: A more basic option, often found on older cabinets, which can be less smooth and don’t always offer full extension.
The Drawer Slide Upgrade Process:
- Remove Drawers: Carefully remove all drawers from their cabinets.
- Remove Old Slides: Unscrew the old drawer slides from both the drawer boxes and the cabinet interiors.
- Install New Slides: Follow the manufacturer’s instructions for installing the new slides. This usually involves screwing them into place on the sides of the drawers and the inner walls of the cabinets. Ensure they are level and parallel for smooth operation.
- Test Functionality: Reinsert the drawers and test their movement.
Choosing the Right DIY Cabinet Update
The best DIY cabinet update for you depends on your budget, the condition of your current cabinets, and the desired outcome.
| Project Type | Cost (DIY) | Time Commitment | Skill Level Required | Visual Impact | Durability |
|---|---|---|---|---|---|
| Cabinet Hardware Replacement | $ | Low | Very Low | Low to Medium | High |
| Cabinet Painting | $$ | Medium | Medium | High | Medium to High |
| Cabinet Door Replacement | $$$ | Medium | Medium | High | High |
| Cabinet Refacing | $$$$ | High | High | Very High | Very High |
| Cabinet Refinishing (Staining) | $$ | High | High | High | High |
| Upgrading Cabinet Drawer Slides | $$ | Medium | Medium | Functional | Very High |
Cost Key: $ = Low, $$ = Moderate, $$$ = High, $$$$ = Very High
Factors to Consider:
- Budget: How much are you willing to spend? Hardware is cheapest, while refacing and door replacement cost more.
- Time: How much time can you dedicate to the project? Painting requires patience for drying times, while refacing is more labor-intensive upfront.
- Skill Level: Be honest about your DIY abilities. Painting is more forgiving than precise veneer application.
- Current Cabinet Condition: Are your cabinets solid wood, laminate, or particleboard? This affects the best approach. Solid wood is ideal for refinishing and painting.
- Desired Look: Do you want a subtle refresh or a complete transformation?
Tips for Success in Your Kitchen Cabinet Makeover
- Patience is Key: Rushing any step, especially preparation or drying times, can lead to a less-than-perfect finish.
- Invest in Quality Materials: Using good quality primer, paint, and tools will make a significant difference in the final result and the longevity of your makeover.
- Test Your Paint: Before committing to painting all your cabinets, test your chosen color on a spare piece of wood or an inconspicuous area.
- Ventilation is Important: Ensure your workspace is well-ventilated, especially when using paints, primers, and solvents.
- Cleanliness: Keep your workspace clean to avoid dust and debris getting into your paint or finish.
- Read Manufacturer Instructions: Always follow the specific instructions for primers, paints, stains, and adhesives.
- Don’t Skimp on Prep: We can’t stress this enough! Proper cleaning, sanding, and priming are the foundation of a durable and beautiful finish.
Frequently Asked Questions (FAQ)
How long does it take to redo kitchen cabinets?
The time commitment varies greatly depending on the method. Replacing hardware can take a few hours. Painting can take anywhere from a weekend to a week or more, depending on drying times and the number of coats. Cabinet refacing or door replacement typically takes several days to a couple of weeks for a DIYer.
What is the most durable way to redo kitchen cabinets?
While paint can be very durable when applied correctly with a good quality enamel and a protective topcoat, cabinet refacing with high-quality laminate or wood veneer, or replacing doors with solid wood or high-quality MDF, generally offers the most durable long-term finish.
Can I paint over laminate cabinets?
Yes, you can paint over laminate cabinets, but proper preparation is crucial. You’ll need to clean them thoroughly with a degreaser, lightly sand to create a surface for the primer to adhere to, and use a high-quality bonding primer specifically designed for laminate or slick surfaces. Then, use a durable cabinet-grade paint.
Should I hire a professional or DIY cabinet refacing?
DIY cabinet refacing is possible but requires meticulous attention to detail and precision. If you’re not confident in your ability to achieve a flawless finish, hiring a professional might be a better investment to ensure stunning results.
What’s the difference between cabinet refacing and cabinet resurfacing?
Cabinet refacing specifically involves covering the existing cabinet frames with new material and replacing doors/drawer fronts. Cabinet resurfacing is a broader term that can include painting, staining, or applying new finishes to existing surfaces, often with some minor repairs.
By following these detailed steps and tips, you can embark on a rewarding DIY journey to transform your kitchen cabinets. Whether you choose a simple cabinet hardware replacement or a full cabinet painting project, stunning results are within your reach!