
Can you restain kitchen cabinets yourself? Absolutely! With the right preparation and a little patience, anyone can tackle a DIY cabinet restaining project and achieve beautiful results. This guide will walk you through the entire process, from choosing your stain color to applying the final protective coat, helping you transform your kitchen with a fresh new look.
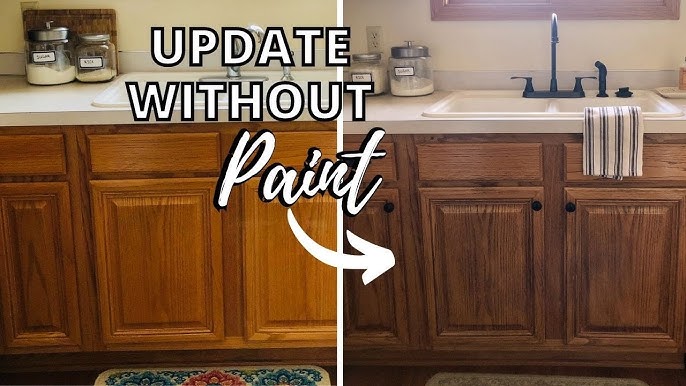
Image Source: i.ytimg.com
Giving Your Kitchen Cabinets a Makeover: The Power of Restaining
Your kitchen cabinets are a focal point of your home. Over time, they can start to look dated, worn, or simply not match your evolving style. Instead of a full cabinet replacement, restaining kitchen cabinets offers a cost-effective and rewarding way to update your kitchen’s appearance. It’s a form of cabinet refinishing that revitalizes the wood, bringing out its natural beauty and offering a completely new aesthetic. While kitchen cabinet painting is another popular option, wood cabinet staining allows the grain of the wood to show through, offering a warm, classic, and often more sophisticated look. This guide focuses on the art of DIY cabinet restaining, empowering you to achieve professional-looking results in your own home.
Why Restain Instead of Replace or Paint?
Deciding between restaining, replacing, or painting your kitchen cabinets is a big choice. Each has its pros and cons, but restaining offers a unique set of advantages for a kitchen cabinet makeover.
- Cost-Effective: Replacing cabinets is a major renovation and can be incredibly expensive. Painting can be more affordable, but often doesn’t provide the depth and richness that stain does. Restaining is typically the most budget-friendly option for a significant visual upgrade.
- Reveals Wood’s Natural Beauty: Unlike paint, which covers the wood entirely, stain penetrates the wood, enhancing its natural grain and texture. This creates a rich, layered look that adds warmth and character to your kitchen.
- Durable Finish: When done correctly with a quality topcoat, stained cabinets can be very durable and resistant to everyday wear and tear.
- Versatility: You can drastically change the look of your cabinets by choosing a different stain color. Go from a light oak to a deep espresso, or even try a colored stain for a unique effect.
- Eco-Friendly: Restaining gives existing cabinets a new life, reducing waste compared to discarding old cabinets and manufacturing new ones.
Getting Started: Planning Your Restaining Project
Before you dive in, careful planning is crucial. This will ensure your cabinet renewal project goes smoothly and you achieve the best possible outcome.
1. Choosing Your Stain Color
This is perhaps the most exciting part! Consider the overall color scheme of your kitchen, including countertops, flooring, and wall paint.
- Light Stains: Create an airy, modern feel. Think natural pine, light oak, or a subtle whitewash.
- Medium Stains: Offer warmth and versatility. Maple, cherry, or a classic walnut are good choices.
- Dark Stains: Provide a sophisticated, dramatic look. Espresso, ebony, or dark cherry can make a bold statement.
- Consider the Wood Type: Different wood species absorb stain differently. Red oak can take on a pinkish hue with some stains, while maple might appear more uniform. It’s always a good idea to test stains on scrap wood from your cabinets or on an inconspicuous area.
2. Selecting the Right Stain and Topcoat
There are several types of wood stain to choose from, each with its own characteristics:
- Oil-Based Stains: These are traditional, offer excellent color penetration, and are generally more forgiving for beginners. They dry slower, giving you more time to work.
- Water-Based Stains: Dry faster and are easier to clean up with water. They can sometimes raise the grain of the wood, requiring extra sanding.
- Gel Stains: These are thicker and sit on top of the wood rather than penetrating deeply. They are excellent for DIY cabinet restaining as they offer more control, are less likely to drip, and can often be applied directly over existing finishes without heavy cabinet stripping. They are also great for creating an “antiqued” look.
Your topcoat is just as important as the stain. It protects the stained wood from moisture, scratches, and daily use.
- Polyurethane: A popular choice, available in oil-based and water-based formulas, as well as oil-modified. It offers excellent durability.
- Varnish: Similar to polyurethane, offering strong protection.
- Lacquer: Dries very quickly and provides a hard, durable finish, but is best applied with a spray gun for an even finish.
- Water-based Polyacrylic: A good choice for a clear, durable finish that doesn’t yellow over time.
3. Gathering Your Supplies
Having all your tools and materials ready will make the process much smoother.
Essential Tools and Materials:
- Screwdriver or drill with appropriate bits (to remove doors and hardware)
- Orbital sander or sanding blocks
- Assorted grit sandpaper (80-grit, 120-grit, 220-grit)
- Tack cloths
- Mineral spirits or degreaser
- Painter’s tape
- Drop cloths or plastic sheeting
- Gloves (chemical-resistant)
- Safety glasses or goggles
- Respirator mask (especially for sanding and some finishes)
- Clean, lint-free rags
- Applicators for stain (foam brushes, good quality natural bristle brushes, or rags for wiping on stain)
- Applicators for topcoat (high-quality synthetic brushes or foam rollers)
- Wood filler (if needed for repairs)
- Your chosen wood stain
- Your chosen topcoat
The Step-by-Step Process: From Old to New
Now, let’s get to the hands-on work. This detailed breakdown will guide you through each stage of cabinet refinishing.
Step 1: Preparation is Key – Demolition and Cleaning
Thorough preparation is the most critical step for a successful wood cabinet staining project. Rushing this phase will likely lead to a less-than-ideal finish.
- Empty Cabinets: Remove all items from your kitchen cabinets.
- Remove Doors and Drawers: Use a screwdriver or drill to carefully remove all cabinet doors and drawer fronts. It’s helpful to label each door and its corresponding cabinet frame with masking tape so you know where everything goes back.
- Remove Hardware: Unscrew hinges, handles, and knobs from the doors and drawers. Store them safely in a bag or container.
- Clean Thoroughly: This is vital. Use a good degreaser or a solution of warm water and mild dish soap to clean the cabinet surfaces, doors, and drawer fronts. Remove all grease, grime, and food residue. If you have a lot of built-up grime, you might need a stronger cleaner. Rinse well with clean water and let everything dry completely. This step is crucial, especially if you plan to use gel stain, as it can sometimes adhere to existing finishes if they are clean.
Step 2: Sanding for Success – Preparing the Surface
Sanding cabinets is essential for the stain to adhere properly and for the finish to be smooth. The goal is to remove any old finish (if necessary), create a uniform surface, and open up the wood grain to accept the stain.
- Initial Sanding (If Needed for Stripping): If your cabinets have a thick, glossy finish that you need to remove entirely, start with a coarser grit sandpaper, such as 80-grit. You might consider using a chemical cabinet stripper before sanding if the finish is particularly stubborn. Follow the stripper’s instructions carefully, always working in a well-ventilated area with protective gear.
- Removing the Old Finish (If Necessary): For most DIY cabinet restaining projects using oil-based or gel stains, you don’t necessarily need to remove all the old finish. However, you do need to “de-gloss” it. If you are applying stain over an existing finish, sanding with 120-grit sandpaper will scuff up the surface, allowing the new stain to adhere.
- Smoothing the Surface: Once any old finish is addressed or the surface is de-glossed, move to a finer grit. Sand with 120-grit sandpaper to smooth out any imperfections or rough spots. Then, follow up with 220-grit sandpaper for a final, smooth finish. Always sand in the direction of the wood grain.
- Sanding Drawer Interiors and Cabinet Frames: Don’t forget to sand the inside edges of drawers and the cabinet frames themselves.
- Clean Up Dust: After sanding, it’s imperative to remove all dust. Use a vacuum cleaner with a brush attachment, followed by a tack cloth. Tack cloths are slightly sticky and are excellent at picking up fine dust particles. Repeat this dust removal process until no dust remains. Any lingering dust will show up in your final finish.
Step 3: Addressing Imperfections – Repairs and Grain Raising
- Wood Filler: If you have any nicks, dents, or gouges, now is the time to fill them with wood filler. Choose a filler that matches the un-stained color of your wood or a stainable filler. Apply it according to the product instructions, let it dry, and then sand it smooth with 220-grit sandpaper.
- Raising the Grain (Optional but Recommended for Water-Based Stains): If you are using a water-based stain, you might want to “raise the grain” before applying the stain. Dampen the wood lightly with a clean cloth or spray bottle filled with water. Let it dry completely. This will cause the wood fibers to swell and stand up. Then, lightly sand again with 220-grit sandpaper. This step prevents the stain from looking blotchy by pre-raising the grain. For oil-based and gel stains, this step is generally not necessary.
Step 4: Applying the Wood Stain – Bringing Color to Life
This is where the transformation really begins. Take your time and apply the stain evenly.
- Test the Stain: Always test your stain on a scrap piece of wood from your cabinet or an inconspicuous area (like the back of a door) to ensure you like the color and how it looks on your specific wood.
- Application Method:
- Wipe-On Method: This is a popular method for achieving an even color and is great for beginners. Apply the stain liberally with a clean, lint-free rag or foam brush, working in the direction of the wood grain.
- Brush-On Method: Use a high-quality natural bristle brush for oil-based stains and a synthetic brush for water-based stains. Apply a generous, even coat, again following the grain.
- Wiping Off Excess: After letting the stain penetrate for the time recommended on the product can (usually 5-15 minutes), use a clean, lint-free rag to wipe off the excess stain. Wipe with the grain. The longer you leave the stain on before wiping, the darker the color will be. Aim for an even wipe-off to avoid blotchiness.
- Multiple Coats: If you desire a darker color, you can apply additional coats after the previous one has dried to the touch. Follow the manufacturer’s instructions regarding drying times between coats. For very dark colors, you might need 2-3 coats.
Step 5: Applying the Topcoat – Protecting Your Work
Once the stain has dried thoroughly (allow at least 24-72 hours, or as per the stain manufacturer’s instructions), it’s time to apply the protective topcoat.
- Light Sanding Between Coats: After the first coat of topcoat has dried, lightly sand the surface with very fine-grit sandpaper (220-grit or higher) or a fine sanding sponge. This removes any dust nibs and creates a smoother surface for the next coat. Wipe away dust with a tack cloth.
- Applying Subsequent Coats: Apply thin, even coats of your chosen topcoat. Use a high-quality synthetic bristle brush or a foam roller for a smooth, brush-stroke-free finish. Work in the direction of the grain. Avoid overworking the finish.
- Number of Coats: Typically, 2-3 coats of topcoat are recommended for kitchen cabinets to provide adequate protection. Allow each coat to dry completely before applying the next.
- Full Curing: Be aware that most finishes take several days, or even weeks, to fully cure and reach their maximum hardness. While you can reassemble your cabinets after the finish is dry to the touch, avoid heavy use or cleaning with harsh chemicals for the full curing period.
Step 6: Reassembly and Enjoyment
Once all your cabinet doors, drawer fronts, and frames are dry and the topcoat has cured sufficiently, it’s time to put everything back together.
- Reattach Hardware: Screw the hinges, handles, and knobs back onto the doors and drawers.
- Hang Doors and Install Drawers: Carefully reattach the cabinet doors to the frames and slide the drawers back into place.
- Admire Your Work: Step back and enjoy your beautifully restained kitchen cabinets!
Alternative Methods and Tips for Specific Situations
While the above covers the general process, here are some tips for specific scenarios and alternative approaches to consider for your cabinet renewal.
Gel Stain: A Popular DIY Choice
Gel stain is a favorite for many DIYers, especially for DIY cabinet restaining, because it’s easier to control and can often be applied over existing finishes.
- Preparation: Clean thoroughly. If you’re going over an existing finish, a light scuff-sanding with 120-grit is usually sufficient.
- Application: Apply gel stain with a good quality synthetic brush or foam brush, working in sections and in the direction of the grain. Apply a thin, even coat.
- Wiping: Unlike traditional stain, you generally don’t wipe off gel stain. Instead, you “work it in” to the wood. The longer you brush and work it, the darker it will get. You can achieve a more opaque look by applying slightly thicker coats.
- Topcoat: Once dry, apply your chosen protective topcoat, following the same steps as above.
Whitewashing for a Lighter Look
Whitewashing is a technique that leaves a subtle hint of wood grain showing through a white or colored wash.
- Mixture: Mix white paint with water (or a specialized whitewash product) to create a milky consistency.
- Application: Apply the wash with a brush, then immediately wipe off the excess with a clean rag, following the grain. The more you wipe, the lighter the effect.
- Sealing: Once dry, you’ll still need to apply a protective topcoat.
Spraying for a Professional Finish
If you have access to a paint sprayer (or are willing to rent one), spraying offers the smoothest, most professional-looking finish, particularly for the topcoat.
- Protection: Mask off everything in your kitchen thoroughly. Overspray can travel surprisingly far.
- Application: Thin your chosen topcoat (usually polyurethane or lacquer) according to the sprayer’s instructions. Apply thin, even coats, maintaining a consistent distance and speed.
- Ventilation: Ensure excellent ventilation when spraying.
Troubleshooting Common Issues
Even with careful preparation, you might encounter a few hiccups.
- Blotchiness: This is the most common issue, especially with certain wood types like pine and maple when using water-based stains. It happens when the stain penetrates unevenly. Using a pre-stain wood conditioner before staining can help prevent this. If it’s already blotchy, you may need to sand it back and reapply the stain, this time using a pre-stain conditioner or a gel stain.
- Brush Strokes: Use high-quality brushes and apply the topcoat in thin, even coats. Lightly sanding between coats with very fine sandpaper and wiping with a tack cloth before applying the next coat will help eliminate brush marks.
- Uneven Color: This can be due to inconsistent sanding or uneven stain application. Ensure you sand uniformly and wipe off excess stain evenly.
Frequently Asked Questions (FAQ)
Q1: Can I restain kitchen cabinets without stripping them?
Yes, you often can, especially if you are using gel stains or if the existing finish is in good condition. The key is to properly clean and de-gloss the surface by sanding it with medium-grit sandpaper (around 120-grit) and then wiping it down with a tack cloth. This creates a surface the new stain can adhere to.
Q2: What is the best type of stain for kitchen cabinets?
For DIYers, gel stains are highly recommended because they are thicker, easier to control, less prone to drips, and can often be applied over existing finishes. Oil-based stains offer good penetration and a traditional look, while water-based stains dry faster but may require more prep work to avoid blotchiness.
Q3: How many coats of stain should I apply?
This depends on the desired color depth. Most projects require 1-3 coats. Apply one coat, let it penetrate for the recommended time, wipe off the excess, and then assess the color. If you want it darker, apply another coat following the same process. Always follow the manufacturer’s drying time recommendations between coats.
Q4: How long does it take to restain kitchen cabinets?
The entire process, from preparation to reassembly, can take anywhere from a few days to a week or more, depending on your pace, the number of cabinets, and drying times. Proper drying and curing times are crucial and should not be rushed.
Q5: Do I need to sand between coats of stain?
No, you do not sand between coats of stain. You only sand between coats of your topcoat to ensure a smooth finish.
Q6: What is the difference between cabinet refinishing and cabinet repainting?
Cabinet refinishing typically refers to sanding, staining, and sealing cabinets to enhance the wood’s natural beauty. Cabinet repainting involves covering the wood with an opaque layer of paint. Both are ways to update your kitchen cabinets, but they achieve very different looks.
Q7: How do I prevent blotchiness when staining?
Blotchiness is often caused by uneven stain absorption by the wood. Using a pre-stain wood conditioner before applying the stain can significantly help. Alternatively, using a gel stain or a stain that contains conditioner can also prevent this issue. Testing on scrap wood is always a good idea.
Conclusion: Your Beautifully Restained Kitchen Awaits
Restaining your kitchen cabinets is a rewarding DIY cabinet restaining project that can dramatically update your kitchen’s appearance and add value to your home. By following these detailed steps, focusing on meticulous preparation, and choosing the right materials, you can achieve a professional-looking finish that you’ll be proud of for years to come. Embrace the process of cabinet renewal, and get ready to enjoy your revitalized kitchen space!