
Can I paint my kitchen cabinets myself? Yes, absolutely! Painting your kitchen cabinets is a fantastic DIY project that can dramatically update your kitchen’s look without the hefty cost of a full renovation. This guide will walk you through the entire process of kitchen cabinet painting, turning worn-out cabinets into a stunning focal point. From choosing the best paint for kitchen cabinets to the final coat, we’ve got you covered. Get ready for a rewarding cabinet refinishing experience that will make your kitchen shine.
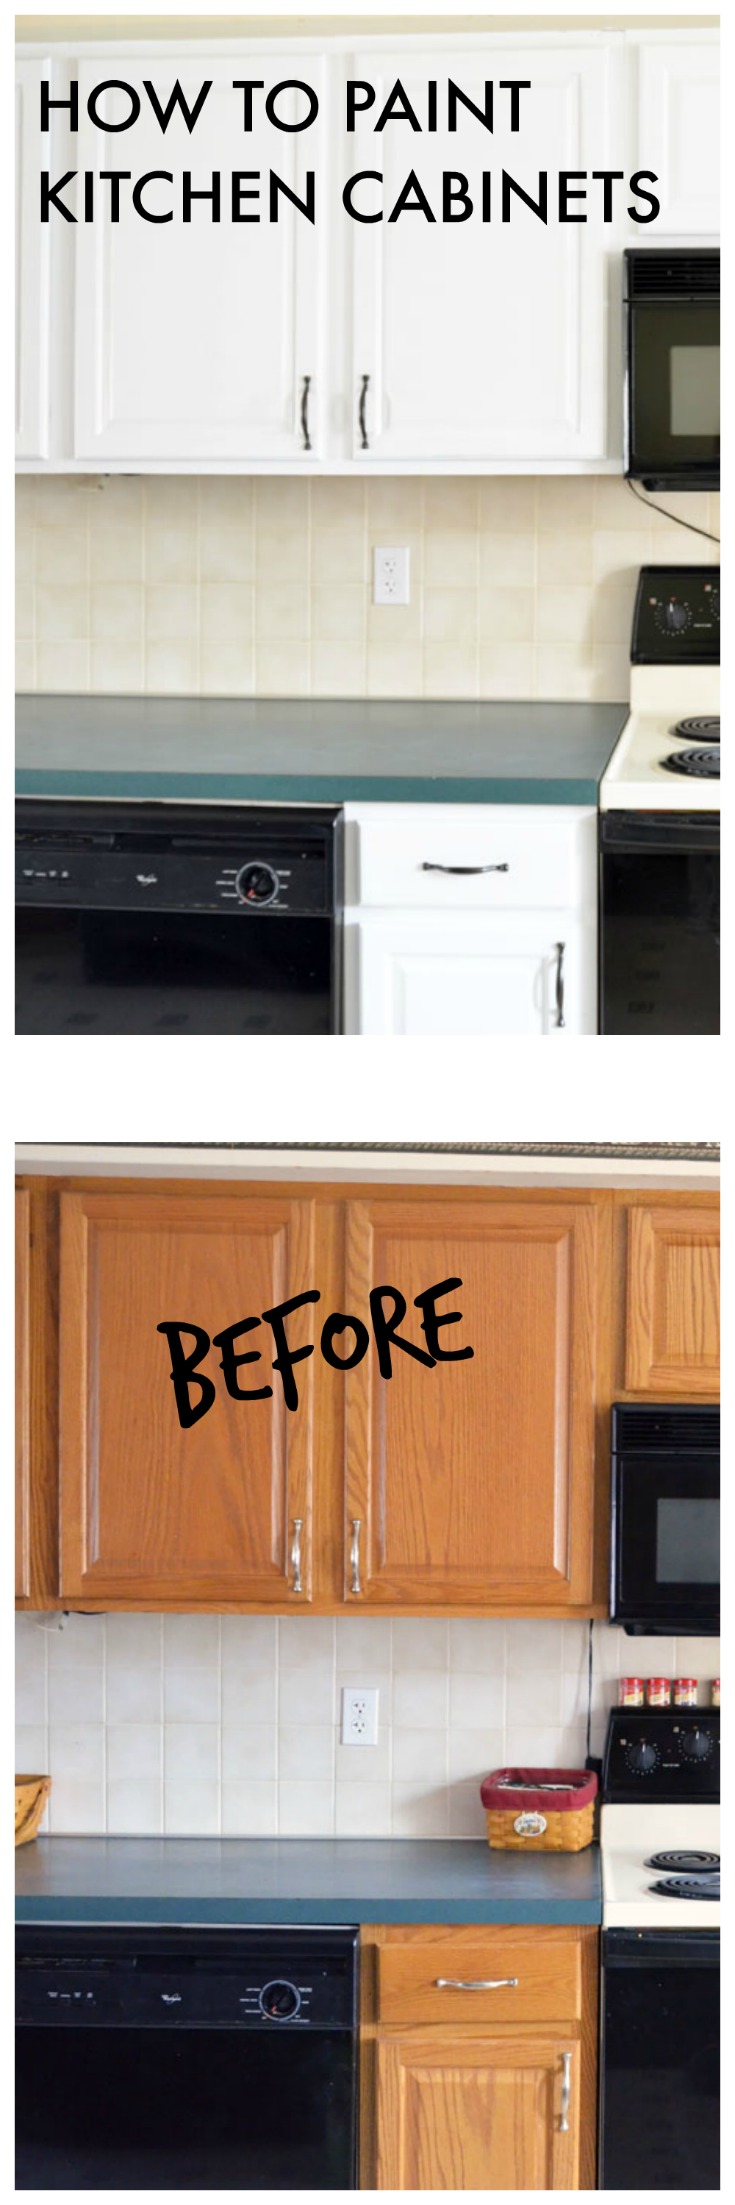
Image Source: createandbabble.com
Why Paint Your Kitchen Cabinets?
Updating your kitchen cabinets can be a game-changer. It’s often the most impactful visual element in your kitchen. Tired, outdated cabinets can make the whole space feel drab. Painting kitchen cabinets DIY offers a budget-friendly way to achieve a completely new look. You can choose any color you desire, from classic whites and grays to bold blues or greens, perfectly matching your style. It’s also a great way to hide minor imperfections in the cabinet material.
Is Painting Cabinets the Right Choice for You?
Before diving in, consider if painting kitchen cabinets DIY is the best route.
- Budget: Painting is significantly cheaper than refacing or replacing cabinets.
- Time: While it takes time and patience, it’s usually quicker than ordering custom cabinets.
- Skill Level: This project requires attention to detail and a willingness to learn, but it’s achievable for most DIYers.
- Desired Look: If you’re after a specific color or finish not available with new cabinets, painting is the way to go.
What You’ll Need: Essential Cabinet Painting Supplies
Gathering the right tools and materials is crucial for a smooth and professional finish. Here’s a comprehensive list of cabinet painting supplies:
- Screwdriver: To remove cabinet doors and hardware.
- Drop cloths or plastic sheeting: To protect your floors and surrounding areas.
- Painter’s tape: For clean lines and masking.
- Degreaser/Cleaner: TSP (Trisodium Phosphate) or a good kitchen degreaser is ideal.
- Sanding sponges or sandpaper: (150-grit and 220-grit) for smoothing surfaces.
- Orbital sander (optional): For faster sanding of large areas.
- Vacuum cleaner with a brush attachment: To remove dust after sanding.
- Tack cloths: To pick up fine dust particles.
- Primer: A high-quality cabinet primer is essential for adhesion and a smooth finish.
- Paint: Choose a durable paint specifically designed for cabinets (e.g., alkyd enamel, hybrid enamel, or a high-quality latex with a paint conditioner).
- Paint brushes: High-quality synthetic brushes for cutting in and detail work.
- Paint rollers: Foam rollers or small microfiber rollers for smooth surfaces.
- Paint tray: For rolling.
- Small containers or trays: For holding hardware.
- Gloves and safety glasses: For protection.
- Ventilation: Open windows or use fans to ensure good airflow.
- Optional for professional finish: Paint sprayer (HVLP sprayer is recommended).
Step 1: The Crucial Prep Work – How to Prep Kitchen Cabinets for Paint
This is arguably the most important step. Skipping or rushing how to prep kitchen cabinets for paint will lead to chipping, peeling, and a less-than-perfect finish.
1. Empty and Clean Out Cabinets
Start by removing everything from your cabinets. This gives you better access and prevents damage to your kitchen items.
2. Remove Cabinet Doors and Drawers
Use your screwdriver to carefully remove all cabinet doors, drawer fronts, and hardware. Keep all screws and hardware organized, perhaps by door, to make reassembly easier. Labeling doors (e.g., “Upper Left,” “Drawer 2”) is a smart move.
3. Clean Thoroughly
Kitchen cabinets accumulate grease and grime. Use a strong degreaser like TSP or a dedicated kitchen degreaser to thoroughly clean all surfaces of the doors, drawer fronts, and cabinet frames. Rinse well with clean water and allow them to dry completely. This step is critical for paint adhesion.
4. Sanding for Adhesion
Lightly sand all surfaces that will be painted. This roughens the surface just enough for the primer and paint to grip.
- Sanding Sponges or Sandpaper: Use 150-grit sandpaper or a sanding sponge to scuff up the existing finish. Focus on creating a uniform dull surface, not removing the original finish.
- Drawer Fronts and Doors: Sand both the front and back of doors and drawer fronts.
- Cabinet Frames: Sand the exposed cabinet frames.
- Smooth Edges: Use a finer grit (220-grit) to smooth out any rough spots after the initial sanding.
5. Dust Removal
After sanding, use a vacuum cleaner with a brush attachment to remove as much dust as possible. Then, wipe everything down with tack cloths. Tack cloths are slightly sticky and are excellent for picking up the finest dust particles that remain. Repeat this process to ensure a clean surface for priming.
6. Repair Imperfections
Inspect doors and drawers for any dents, chips, or holes. Fill these with wood filler or spackle. Once dry, sand the filled areas smooth and wipe away dust.
Step 2: Priming for Perfection
Primer acts as a bridge between your cabinets and the new paint. It ensures better adhesion, helps hide stains, and provides a uniform base color for your topcoat.
Choosing the Right Cabinet Primer
- Oil-Based Primer: Excellent for blocking stains and providing a durable base, especially on wood with knots or dark finishes. However, it has strong fumes and requires mineral spirits for cleanup.
- Water-Based (Latex/Acrylic) Primer: Easier to use and clean up, with lower VOCs. Look for a high-quality bonding primer or one specifically formulated for cabinets.
- Shellac-Based Primer: A good option for blocking tough stains and odors, but also has strong fumes.
For most DIY projects, a high-quality water-based cabinet primer designed for cabinetry is a great choice.
Application
- Apply a Thin, Even Coat: Apply the primer using a high-quality brush or roller. If you’re spray painting kitchen cabinets, ensure your sprayer is set up correctly for primer.
- Work in Sections: Prime the cabinet frames first, then move to the doors and drawer fronts.
- Avoid Drips and Runs: Work methodically and keep a wet edge to avoid visible brush marks or drips.
- Allow Drying Time: Let the primer dry completely according to the manufacturer’s instructions. This is usually a few hours.
- Light Sanding (Optional but Recommended): After the primer is dry, lightly sand any rough spots or imperfections with 220-grit sandpaper or a fine-grit sanding sponge. Wipe away dust with a tack cloth. This step significantly improves the smoothness of your final finish.
Step 3: Painting Your Cabinets – The Color Transformation
Now for the exciting part! Choosing the right paint and applying it correctly will give your cabinets that showroom look.
What’s the Best Paint for Kitchen Cabinets?
When selecting best paint for kitchen cabinets, durability and a smooth finish are key.
- Alkyd Enamel (Oil-Based): Offers a very hard, durable finish that resists chipping and wear. However, it has strong fumes, requires mineral spirits for cleanup, and can yellow over time, especially in lighter colors.
- Hybrid Enamel (Water-Based Alkyd): Combines the durability of oil-based paints with the ease of use and cleanup of water-based paints. These are an excellent choice for cabinetry.
- High-Quality Latex Paint (Acrylic Latex): With a good primer and a durable topcoat, high-quality acrylic latex can work well. Look for “cabinet coat” or “enamel” finishes. Add a paint conditioner (like Floetrol) to latex paint to improve flow and reduce brush marks.
Avoid: Standard interior latex paint, as it’s not durable enough for the high traffic and wear that kitchen cabinets endure.
Choosing Your Finish:
- Satin: A popular choice, offering a subtle sheen that’s easy to clean and hides minor imperfections well.
- Semi-Gloss: More durable and easier to clean than satin, with a noticeable sheen. Can highlight imperfections more.
- Gloss: The most durable and easiest to clean, but shows every single flaw.
Application Methods:
Method 1: Brushing and Rolling (DIY Friendly)
This is the most accessible method for DIYers.
- Load Your Brush/Roller: Dip your brush about one-third of the way into the paint. For rollers, load them evenly.
- Apply Thin, Even Coats: Start by “cutting in” edges and corners with your brush. Then, use your roller to fill in the larger flat areas. Apply paint in smooth, consistent strokes.
- Work in Sections: Paint the cabinet frames first, moving from top to bottom. For doors and drawer fronts, paint the back side first, let it dry, then flip and paint the front. This prevents them from sticking.
- Avoid Overworking: Don’t go over areas multiple times once the paint starts to set. This can cause brush marks.
- Allow Drying Time: Let each coat dry completely according to the paint manufacturer’s instructions. This is crucial for durability.
- Light Sanding Between Coats: After the first coat of paint is dry, lightly sand any drips, unevenness, or dust nibs with 220-grit sandpaper or a fine sanding sponge. Wipe with a tack cloth. This creates a smoother surface for subsequent coats.
- Apply Multiple Coats: Most cabinets will need at least two, and often three, thin coats of paint for full coverage and durability.
Method 2: Spray Painting Kitchen Cabinets (Professional Finish)
If you’re looking for the smoothest, most factory-like finish, spray painting kitchen cabinets is the way to go. This requires more specialized equipment and careful setup.
- Equipment: You’ll need an HVLP (High Volume Low Pressure) sprayer. Renting one is an option if you don’t want to buy.
- Setup: You need a well-ventilated area, preferably outdoors or in a garage with doors open. Mask off everything meticulously. Cover walls, ceilings, floors, appliances, and any surfaces you don’t want painted with plastic sheeting and painter’s tape.
- Practice: If you’re new to sprayers, practice on scrap wood or cardboard first to get a feel for the spray pattern and pressure.
- Thinning Paint: Most paints need to be thinned slightly for spraying. Follow the sprayer and paint manufacturer’s recommendations.
- Application: Hold the sprayer about 10-12 inches from the surface and move in smooth, consistent, overlapping strokes. Aim for thin, even coats.
- Drying and Sanding: Allow ample drying time between coats, and lightly sand with fine-grit sandpaper (320-grit or higher) and tack cloth between coats for the smoothest finish.
Step 4: Reassembly and Enjoyment
Once your final coat of paint is completely dry (allow at least 24-48 hours, or as recommended by the paint manufacturer, for full curing), it’s time to reassemble.
- Reattach Hardware: Carefully screw your cabinet knobs and pulls back onto the doors and drawer fronts.
- Hang Doors and Replace Drawers: Reinstall the doors and drawers onto the cabinet frames.
- Clean Up: Remove all painter’s tape and drop cloths. Clean your brushes and rollers thoroughly.
Common Cabinet Painting Mistakes to Avoid
Even with careful preparation, some common cabinet painting mistakes can derail your project.
- Skipping Prep: Not cleaning or sanding thoroughly is the most frequent mistake leading to peeling paint.
- Using the Wrong Paint: Using interior latex or a low-quality paint will result in a finish that chips and wears quickly.
- Applying Paint Too Thickly: Thick coats lead to drips, runs, and a less smooth finish. Multiple thin coats are always better.
- Not Allowing Adequate Drying/Curing Time: Rushing between coats or reassembling too soon can cause paint to stick or peel. Curing takes much longer than drying.
- Poor Ventilation: Working in a poorly ventilated area can be hazardous with certain types of paint and primer.
- Rushing the Process: Patience is key. Each step needs sufficient time to dry and cure properly.
- Not Labeling Doors/Drawers: This can lead to a frustrating reassembly process where doors don’t align correctly.
Exploring Different Paint Types: Chalk Paint Kitchen Cabinets
Some DIYers opt for chalk paint kitchen cabinets. Chalk paint is known for its matte, velvety finish and requires minimal prep (often no sanding!).
Pros of Chalk Paint:
- Minimal Prep: Often just cleaning is needed.
- Easy to Use: Applies smoothly with brushes.
- Unique Finish: Creates a vintage or distressed look.
Cons of Chalk Paint:
- Durability: It’s a softer finish and requires a protective topcoat (wax or polycrylic) for durability, especially in a kitchen environment.
- Cost: Can be more expensive than traditional cabinet paints.
- Maintenance: The protective topcoat might need occasional reapplication.
If you choose chalk paint, follow the manufacturer’s instructions carefully, especially regarding the crucial sealing step.
Cabinet Refinishing vs. Painting
While we’ve focused on painting, it’s worth mentioning cabinet refinishing. Refinishing can sometimes involve stripping the old finish and reapplying a new stain or varnish, especially if the wood is beautiful and you want to enhance its natural grain. Painting is a more complete overhaul, offering a color change and often a more modern update than refinishing. Both are valid ways to refresh cabinets, but painting provides more creative color freedom.
Frequently Asked Questions (FAQ)
Q: How long does it take to paint kitchen cabinets?
A: The total time can vary depending on the size of your kitchen, your chosen application method (brushing/rolling vs. spraying), and drying times. Realistically, budget 3-7 days for the entire process, including prep, priming, multiple paint coats, and drying/curing.
Q: Can I paint over existing laminate or thermofoil cabinets?
A: Yes, but it requires specialized preparation. You’ll need a good degreaser and potentially a bonding primer specifically designed for laminate or thermofoil surfaces. Sanding is still important, but be gentle to avoid damaging the underlying material.
Q: How many coats of paint do I need?
A: Most projects require at least two coats of paint, but three thin coats often provide the best coverage and durability, especially if you’re going from a dark color to a light one.
Q: What is the best brush for painting cabinets?
A: High-quality synthetic bristles are best for latex and acrylic paints. Angled brushes are great for cutting in edges, and a good sash brush can help with detail work.
Q: Should I paint the inside of my cabinets?
A: It’s generally recommended to only paint the interior surfaces that are visible when the doors are closed. Painting the entire interior can be time-consuming and is often unnecessary unless you have a specific aesthetic goal.
Q: How do I get a smooth finish without brush marks?
A: Use high-quality brushes and rollers, apply thin coats, avoid overworking the paint, and consider a paint additive like Floetrol for latex paints. Light sanding and tack cloths between coats also help achieve a super smooth finish. For the smoothest result, spray painting kitchen cabinets is the best option.
Q: What is the best sheen for kitchen cabinets?
A: Satin or semi-gloss are the most popular and practical sheens. They offer good durability and are relatively easy to clean, while also hiding minor imperfections better than a high-gloss finish.
By following these detailed steps and paying close attention to preparation, you can achieve a beautiful, durable, and transformative kitchen cabinet painting project that you’ll be proud of for years to come. Happy painting!